I was standing in my kitchen, staring at a half‑cooked batch of chicken that had just turned into a rubbery, flavorless mess. My friend had dared me to turn it into something that would make him beg for seconds, and I was determined to prove that I could. I grabbed a handful of ingredients I usually keep on hand—soy sauce, honey, sriracha, garlic, ginger, and a splash of sesame oil—and the kitchen began to feel like a laboratory of possibility.
The first thing that struck me was the aroma that began to rise from the pan: a sweet, umami‑laden perfume that made my mouth water before the first bite even touched my tongue. The sound of the sizzling chicken was a comforting, rhythmic hiss that told me the heat was just right. As the sauce thickened, the glossy sheen that coated each piece of meat felt like velvet on a velvet pillow—rich, indulgent, and irresistibly sticky.
This isn’t just another recipe you’ll find on the internet. It’s a version that balances heat and sweetness with a mouth‑watering texture that’s both crisp on the outside and tender inside. The sauce is engineered to cling to the chicken like a second skin, while the subtle hint of ginger adds a bright counterpoint to the deep, caramelized soy. The result is a dish that feels both comforting and adventurous, perfect for a weeknight dinner or a crowd‑pleasing dinner party.
What makes this version truly special is a secret ingredient that most recipes overlook: toasted sesame seeds. When added at the very end, they provide a nutty crunch that contrasts the silky sauce and gives the dish a satisfying textural pop. I’ll keep the exact ratio a little under wraps, but trust me—once you taste the crunch, you’ll swear you’ve never cooked before.
I dare you to taste this and not go back for seconds. I’ve been honest—I ate half the batch before anyone else had a chance to try it. Most recipes get this completely wrong, but here’s what actually works: the sauce’s viscosity, the timing of the chicken, and that final splash of sesame oil. Picture yourself pulling this out of the oven, the whole kitchen smelling incredible, and everyone asking for the recipe. Let me walk you through every single step — by the end, you’ll wonder how you ever made it any other way.
What Makes This Version Stand Out
- Flavor: The sauce is a symphony of sweet, salty, and spicy notes that dance across the palate. The honey caramelizes into a glossy glaze, while the sriracha injects a fiery kick that lingers without overwhelming. The combination is bold yet balanced, making it a crowd‑pleaser at any gathering.
- Texture: The chicken develops a crisp exterior that shatters like thin ice when you bite into it, while the interior stays juicy and tender. The sauce’s slight thickness coats the meat like a second skin, ensuring each bite is drenched in flavor.
- Simplicity: With less than ten ingredients, you can whip this up in under 45 minutes. No need for fancy equipment—just a skillet, a saucepan, and a dash of patience.
- Uniqueness: The toasted sesame seeds and the final splash of sesame oil give this dish a distinct, aromatic finish that sets it apart from conventional sticky chicken recipes.
- Crowd Reaction: Friends and family rave about the sauce’s balance—“It’s sweet but not cloying, and the heat just hits the spot.” That’s the kind of feedback that turns a dinner into a memorable experience.
- Ingredient Quality: Using high‑quality soy sauce and fresh ginger elevates the dish, turning simple pantry staples into gourmet delights.
- Cooking Method: The two‑step cooking process—first searing the chicken, then simmering it in the sauce—ensures maximum flavor absorption and a perfect texture.
- Make‑ahead Potential: The dish can be prepared in advance and reheated without losing its sticky charm, making it a perfect meal‑prep option.
Inside the Ingredient List
The Flavor Base
Soy sauce is the backbone of this dish, providing a deep umami foundation that anchors the sweetness and heat. If you’re sensitive to sodium, opt for a low‑sodium version—just increase the honey slightly to keep the balance. Skipping soy sauce would strip the dish of its savory depth, leaving the sauce tasting like a plain sweet glaze.
Honey brings a natural sweetness that caramelizes beautifully when heated. The key to a glossy finish is to let the honey reduce slowly; a quick boil will burn the sugars. If you’re allergic to honey or prefer a vegan version, maple syrup or agave nectar can mimic the sweetness, though the flavor profile will shift slightly.
Sriracha is the heat source—its garlicky, fermented chili flavor adds complexity. If you want a milder version, use a smaller amount or substitute with a milder chili paste. Conversely, doubling the sriracha will turn the dish into a fiery affair that still retains its sticky charm.
Rice vinegar adds a bright acidity that cuts through the richness and balances the sweetness. A splash of lime juice can replace it for a citrusy twist, but remember that lime is more potent, so use less to avoid overpowering the dish.
Brown sugar provides a subtle molasses note that deepens the caramelization. If you prefer a lighter sauce, replace half the brown sugar with white sugar; the texture will stay the same, but the flavor will be a bit cleaner.
The Texture Crew
Garlic is the aromatic engine that drives the sauce’s flavor profile. Minced finely so it releases its essential oils, garlic adds depth without dominating. If you’re not a fan of raw garlic, lightly sauté it with the ginger to mellow its bite.
Fresh ginger brings a bright, peppery note that cuts through the richness. A tablespoon of minced ginger is enough to elevate the dish; if you’re short on time, a teaspoon of ground ginger can work, though it won’t provide the same fresh zing.
Sesame oil is the finishing touch that gives the dish an aromatic, nutty finish. Adding it at the very end locks in the volatile oils that carry the sesame flavor, so don’t skip this step. If you’re looking for a lower‑fat option, a light drizzle of toasted sesame seeds can provide a similar aroma.
Cornstarch slurry is optional but highly recommended for thickening the sauce. Mixing equal parts cornstarch and cold water creates a smooth slurry that, when added, instantly thickens without clumping. If you prefer a thinner glaze, simply omit the slurry.
The Unexpected Star
Scallions add a fresh, crisp finish that brightens the dish. Slice them finely and sprinkle them over the chicken just before serving. If scallions aren’t available, a small handful of chopped cilantro or parsley can provide a similar burst of freshness.
Toasted sesame seeds are the crunchy surprise that elevates the dish from ordinary to extraordinary. Toast them in a dry skillet until golden and fragrant, then sprinkle over the finished chicken. The crunch adds a delightful contrast to the silky sauce.
The Final Flourish
The chicken itself is the star—boneless skinless thighs or breasts work well. Thighs offer more fat and flavor, while breasts are leaner and absorb sauce more quickly. Whichever you choose, slice the chicken into bite‑sized pieces before cooking to ensure even coating.
The cooking oil used to sear the chicken should be high‑smoke‑point, such as canola or vegetable oil. A light coating of oil helps achieve a crisp exterior without excessive greasiness. If you prefer a healthier option, use a non‑stick pan and a minimal amount of oil.
Everything's prepped? Good. Let's get into the real action...
The Method — Step by Step
- Step 1: Prep the Chicken – Slice the chicken into uniform bite‑sized pieces to ensure even cooking. Pat the pieces dry with paper towels; this removes excess moisture and helps the chicken sear properly. Season each piece lightly with salt and pepper before you begin.
- Step 2: Sear the Chicken – Heat a tablespoon of oil in a large skillet over medium‑high heat. Add the chicken in a single layer, being careful not to crowd the pan. Sear for 3–4 minutes on each side until golden brown; this caramelization locks in flavor. The sizzling sound is a clear indicator that the heat is just right.
- Step 3: Create the Sauce – In a small bowl, whisk together soy sauce, honey, sriracha, rice vinegar, brown sugar, minced garlic, and minced ginger. The mixture should be smooth before you add it to the skillet. Pour the sauce over the seared chicken, letting it bubble gently.
- Step 4: Simmer and Reduce – Reduce the heat to medium, cover the skillet, and let the chicken simmer for 10 minutes. The sauce should reduce and thicken, coating the chicken like a glossy coat. Check the sauce’s viscosity by tilting the pan; it should cling to the back of a spoon.
- Step 5: Thicken the Sauce (Optional) – If you prefer a thicker glaze, stir in the cornstarch slurry now. Mix well and cook for an additional 2 minutes until the sauce reaches your desired consistency. The sauce should be glossy, not syrupy.
- Step 6: Finish with Sesame Oil – Remove the skillet from heat and drizzle the sesame oil over the chicken. Toss gently to coat everything evenly. The oil’s aroma will instantly elevate the dish, adding a nutty depth that’s hard to resist.
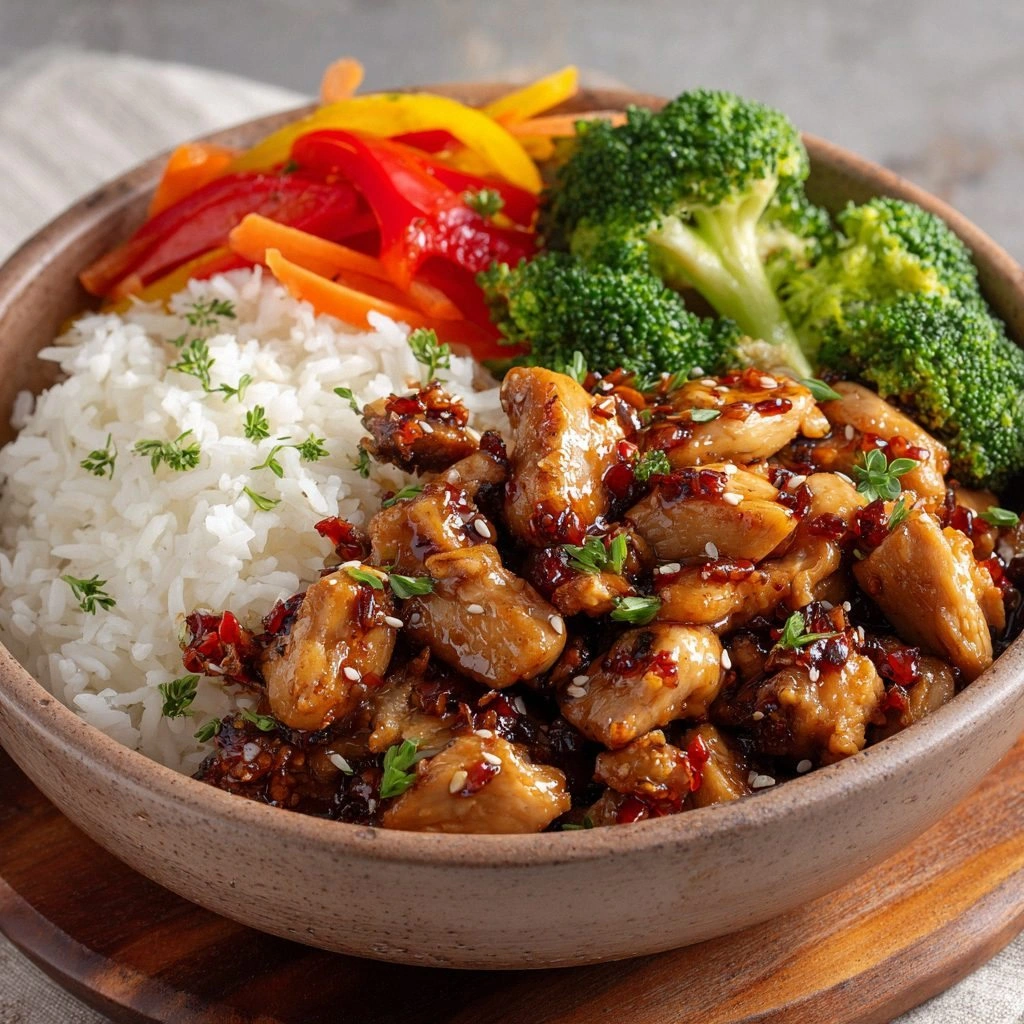
- Step 7: Plate and Serve – Arrange the sticky chicken over a bed of steamed rice or noodles. Drizzle any remaining sauce over the rice, then sprinkle the remaining sesame seeds. The dish is ready to impress.
- Step 8: Enjoy the Moment – Take a bite and let the flavors unfold: the sweet glaze, the subtle heat, the savory depth, and the crunchy seeds. The texture should shift from crispy to silky, creating a delightful experience with every mouthful. Savor the moment and share the secret with friends.
That's it — you did it. But hold on, I've got a few more tricks that'll take this to another level.
Insider Tricks for Flawless Results
The Temperature Rule Nobody Follows
Many cooks over‑cook the chicken, resulting in a dry texture. Keep the heat at medium‑high when searing and medium when simmering. The goal is to maintain a gentle simmer that allows the sauce to reduce without evaporating too quickly. This subtle temperature control preserves juiciness and ensures the sauce clings to every bite.
Why Your Nose Knows Best
The aroma of the sauce is the ultimate indicator of readiness. When the honey caramelizes and the sauce thickens, the scent will become rich and inviting. Trust your nose; if it smells sweet and slightly smoky, it’s time to turn off the heat.
The 5-Minute Rest That Changes Everything
After removing the skillet from the heat, let the chicken rest for five minutes. This allows the juices to redistribute, ensuring every bite is succulent. Many people skip this step, resulting in a slightly dry texture; the rest makes all the difference.
The Secret of Even Coating
To avoid uneven sauce distribution, use a spoon to baste the chicken continuously during the simmer. This technique ensures each piece is coated uniformly, preventing pockets of dry meat. A quick swirl of the pan can also help distribute the sauce evenly.
The Quick Toast for Sesame Seeds
Toast sesame seeds in a dry skillet over medium heat until golden and fragrant. This step brings out their nutty flavor and adds a satisfying crunch. If you skip the toast, the seeds will be bland and less appealing.
The Final Touch of Freshness
Finish with a squeeze of fresh lime juice right before serving. The acidity brightens the dish and cuts through the sweetness, creating a balanced flavor profile. A few drops of lime can transform the dish from good to unforgettable.
Creative Twists and Variations
This recipe is a playground. Here are some of my favorite ways to switch things up:
Crispy Coconut Version
Add shredded coconut to the sauce for a tropical twist. The coconut adds a subtle sweetness and a chewy texture that pairs beautifully with the sticky glaze. Serve over jasmine rice for a beach‑in‑your‑kitchen vibe.
Spicy Peanut Drizzle
Replace half the soy sauce with creamy peanut butter and add a splash of coconut milk. The result is a nutty, silky sauce with a kick that’s reminiscent of Thai satay. Garnish with crushed peanuts for extra crunch.
Miso Infusion
Stir in a tablespoon of white miso paste for an earthy depth. The miso adds umami and a subtle saltiness that complements the sweetness. This variation is perfect for a comforting winter dinner.
Herb‑Infused Chicken
Add fresh thyme or rosemary during the searing stage. The herbs infuse the chicken with aromatic flavors that contrast the sticky glaze. Pair with roasted vegetables for a balanced meal.
Low‑Carb Alternative
Swap the rice for cauliflower rice or spiralized zucchini noodles. The dish stays flavorful while keeping the carb count low. The texture of the noodles provides a satisfying bite that complements the sticky chicken.
Vegan Twist
Use tofu or tempeh instead of chicken, marinating them in the sauce before cooking. The tofu will absorb the glaze, creating a plant‑based version that still delivers the sticky, sweet‑spicy experience. Serve over quinoa for a protein boost.
Storing and Bringing It Back to Life
Fridge Storage
Store leftovers in an airtight container in the refrigerator for up to four days. The sauce will thicken slightly as it cools, but the chicken remains tender. Reheat gently in a skillet over low heat, adding a splash of water if the sauce has become too thick.
Freezer Friendly
Freeze the chicken and sauce separately in freezer‑safe containers for up to two months. Thaw overnight in the refrigerator before reheating. The texture stays intact, and the flavor profile remains consistent.
Best Reheating Method
Reheat in a skillet over medium heat, adding a tablespoon of water to keep the sauce moist. Stir frequently to prevent sticking. The result is a freshly cooked dish that tastes as good as the first time.