I was in the middle of a frantic midnight snack raid when my roommate dared me to create something that would make a pretzel‑lover weep with joy. I grabbed the last of the warm water, tossed in a packet of yeast, and before I knew it, the kitchen smelled like a German bakery on steroids. The dough was sticky, the cheese was begging to be melted, and I could hear the faint hiss of a soda‑bath bubbling in the background. That moment, right there, was the spark that ignited what I now call the ultimate cheese‑stuffed pretzel, and I’m still buzzing from the memory.
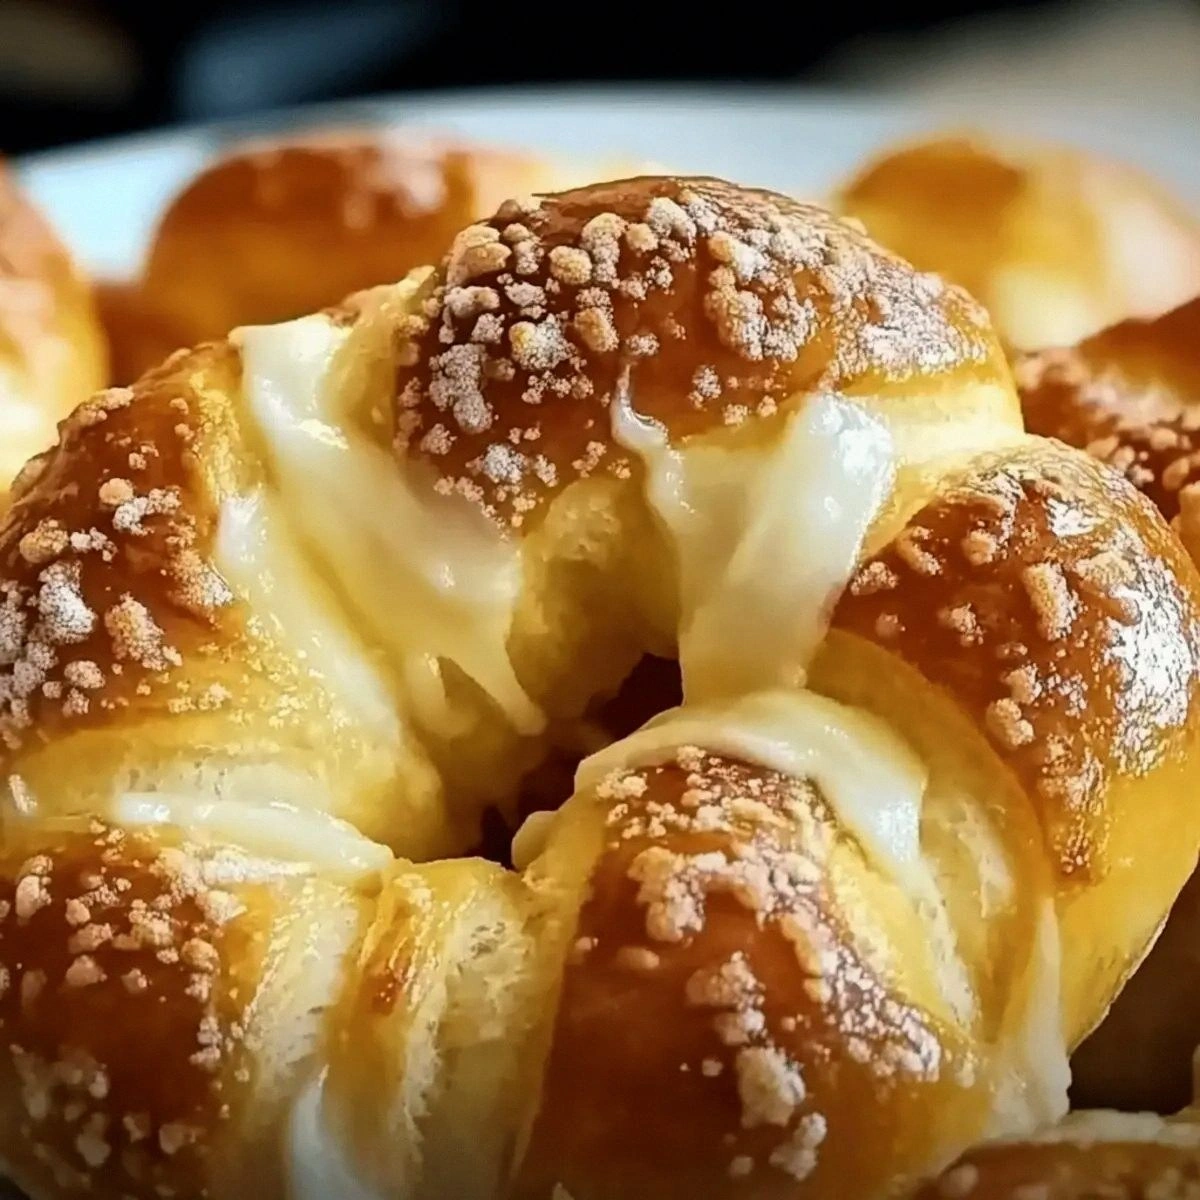
Picture this: a golden‑brown crust that cracks open with the slightest press, revealing a molten river of cheddar and mozzarella that stretches like a cheesy waterfall. The aroma hits you first—warm, yeasty, with a faint tang of soda that makes your nose do a little dance. As you bite, the exterior gives a satisfying snap, the interior is pillowy soft, and the cheese oozes out in a glorious, stringy embrace. The texture contrast is so addictive that I dare you to taste this and not go back for seconds.
Most pretzel recipes get the balance wrong: either they’re dry, or the cheese is just a sprinkle on top that melts into a sad, greasy film. I’ve cracked the code by stuffing the cheese inside the dough, then giving it a quick dip in a baking‑soda bath that creates that iconic deep‑brown sheen and a subtle crunch that sings. The secret? A splash of warm water to wake up the yeast, a pinch of sugar to coax it into a frothy rise, and a generous amount of shredded cheese that stays molten because we seal it inside before the bake. It’s hands down the best version you’ll ever make at home.
I’ll be honest — I ate half the batch before anyone else got to try it, and the rest disappeared in a blur of buttery, cheesy goodness. The technique I’m about to share involves a few unexpected moves, like a quick soda‑bath dunk that most home cooks skip, and a gentle hand‑rolling method that ensures each pretzel is perfectly uniform. Stay with me here — this is worth it. Let me walk you through every single step — by the end, you’ll wonder how you ever made it any other way.
What Makes This Version Stand Out
- Cheese Core: The cheese is sealed inside the dough, creating a molten heart that oozes out with every bite, unlike surface‑only toppings that dry out.
- Soda‑Bath Shine: A brief dunk in a baking‑soda solution gives the pretzels that iconic deep‑brown gloss and a subtle, crackly crust.
- Fluffy Interior: The dough stays light and airy thanks to a precise yeast activation and a gentle proofing period, delivering a cloud‑like bite.
- Simple Ingredients: No fancy gadgets or obscure items—just pantry staples you already have, making it an everyday indulgence.
- Crowd Magnet: These pretzels disappear at parties faster than you can say “extra cheese,” earning rave reviews from kids and adults alike.
- Make‑Ahead Friendly: You can shape and freeze the dough ahead of time, then bake fresh pretzels whenever the craving strikes.
- Customizable Flavor: Swap the cheese, add herbs, or drizzle with honey for endless variations that keep the recipe exciting.
- Visual Wow Factor: The glossy, twisted shape looks like it belongs on a bakery display, turning a humble snack into a show‑stopper.
Inside the Ingredient List
The Flavor Base
Warm water (1.5 cups) is the catalyst that awakens the yeast, creating a frothy, bubbly mixture that promises a lofty rise. If the water is too hot, it’ll kill the yeast; too cold, and you’ll get a sluggish proof. I always use a kitchen thermometer to hit that sweet spot of 105°F (40°C). For a dairy‑free version, swap the water for a mild almond milk, but remember it adds a subtle nutty undertone.
The Texture Crew
All‑purpose flour (4 cups) provides the structure, while the baking soda (0.5 cup) is the secret weapon for that signature pretzel crust. The soda reacts with the acidic dough during the bath, creating tiny bubbles that give the exterior its crackle. If you’re out of soda, a mixture of 1 tsp baking powder and 1 tsp cream of tartar can mimic the effect, though the flavor will be slightly different.
The Unexpected Star
Shredded cheese (2 cups) is the hero, and the type you choose makes all the difference. A blend of sharp cheddar and mozzarella gives both bite and stretch, but feel free to experiment with gouda, pepper jack, or even a sprinkle of parmesan for extra depth. The cheese should be cold when you stuff it; warm cheese melts too quickly and leaks out before the dough seals.
The Final Flourish
Kosher salt (1 tsp) and coarse sea salt for sprinkling are the unsung heroes that bring out the flavor of the dough and add a satisfying crunch on the crust. The egg (1) acts as a glossy binder, giving the pretzels a beautiful golden sheen after baking. If you’re avoiding eggs, a brush of milk or a light coating of melted butter works as a decent substitute, though it won’t achieve the exact same shine.
Everything's prepped? Good. Let's get into the real action...

The Method — Step by Step
Start by warming the water to about 105°F (40°C). Sprinkle the active dry yeast (2 teaspoons) over the water, add the granulated sugar (1 tablespoon), and give it a gentle stir. Let the mixture sit for 5‑7 minutes until it becomes frothy and bubbly, a sign the yeast is alive and ready to work. If you don’t see any foam, your yeast may be dead—don’t panic, just start over with fresh yeast. This is the moment of truth; the dough’s future depends on it.
Kitchen Hack: Use a small whisk to break up the yeast clumps; it ensures an even distribution and a more reliable rise.In a large mixing bowl, combine the all‑purpose flour (4 cups) with the kosher salt (1 tsp). Make a well in the center and pour in the activated yeast mixture along with the beaten egg (1). Stir with a wooden spoon until a shaggy dough forms, then turn it out onto a lightly floured surface.
Knead the dough for about 8‑10 minutes, until it’s smooth, elastic, and no longer sticks to your hands. This is where the gluten develops, giving the pretzels their characteristic chew. If the dough feels too dry, sprinkle a tablespoon of water; if it’s too sticky, dust with a little extra flour. The dough should feel supple, like a well‑conditioned piece of play‑dough.
Place the kneaded dough in a lightly oiled bowl, cover with a clean kitchen towel, and let it rise in a warm spot for 45‑60 minutes, or until it has doubled in size. I like to set the bowl in a turned‑off oven with the light on; the gentle warmth speeds up the rise without over‑proofing. While you wait, the kitchen will fill with a sweet, yeasty perfume that makes you want to peek inside.
While the dough is rising, prepare the baking‑soda bath: bring a large pot of water to a boil, then carefully stir in 0.5 cup of baking soda (it will bubble fiercely). This alkaline bath is the secret to that classic pretzel crust and a subtle caramelized flavor.
Watch Out: Adding the soda to boiling water can cause a vigorous eruption; pour the soda slowly and keep a safe distance.Punch down the risen dough and divide it into 8 equal pieces. Roll each piece into a long rope, about 12‑14 inches long. Place a generous handful of cold shredded cheese (2 cups) in the center of the rope, then fold the rope over the cheese and pinch the ends together, sealing the cheese inside. This step is pure magic—the dough hugs the cheese like a warm blanket.
Kitchen Hack: Chill the dough pieces for 10 minutes before stuffing; colder dough is easier to handle and less likely to tear.Twist each cheese‑filled rope into the classic pretzel shape: form a U, cross the ends over each other, and press them onto the bottom of the U. Place the pretzel on a parchment‑lined baking sheet. Once all pretzels are shaped, dip each one into the boiling soda bath for exactly 30 seconds—watch them puff up and develop that glossy sheen.
After the soda dip, return the pretzels to the baking sheet, brush them lightly with the beaten egg (for extra shine), and sprinkle generously with coarse sea salt. This final sprinkle adds a pop of salty crunch that balances the rich cheese.
Bake the pretzels in a preheated oven at 425°F (220°C) for 12‑15 minutes, or until they turn a deep golden brown and the cheese inside is bubbling through the cracks. The kitchen will fill with a toasty, buttery aroma that signals it’s time to pull them out. Let them cool on a wire rack for a few minutes; the crust will set while the interior stays wonderfully soft.
Serve the pretzels warm, fresh out of the oven, with a side of mustard or a creamy cheese dip if you’re feeling extra indulgent. Picture yourself pulling this out of the oven, the whole kitchen smelling incredible, and the first bite delivering a perfect balance of salty, cheesy, and slightly sweet dough. That sizzle when it hits the pan? Absolute perfection. And now the fun part—watch them disappear.
That's it — you did it. But hold on, I've got a few more tricks that'll take this to another level. From tweaking the bake for extra crispiness to mastering the perfect dough‑to‑cheese ratio, the next section is where the real pretzel mastery happens.
Insider Tricks for Flawless Results
The Temperature Rule Nobody Follows
Never let your dough sit in a drafty kitchen; even a slight chill can stall the yeast, leading to a dense crumb. I keep a small heating pad under the proofing bowl set to low, which creates a consistent 85°F (29°C) environment. This tiny temperature boost cuts the rise time in half and guarantees a light, airy interior. A friend tried skipping this step once — let’s just say the pretzels turned out as hard as a doorstop.
Why Your Nose Knows Best
Your sense of smell is a reliable indicator of dough readiness. When the dough has risen, it should emit a faint, sweet, yeasty aroma that makes you want to inhale deeply. If the scent is still flat, give it a few more minutes. Trusting your nose saves you from over‑proofing, which can cause the pretzels to collapse during baking.
The 5‑Minute Rest That Changes Everything
After shaping the pretzels but before the soda dip, let them rest for five minutes on the parchment. This brief pause relaxes the gluten, making the pretzels less prone to cracking when they hit the hot water. The result? A smoother surface and a more uniform rise in the oven. I always set a timer; it feels like a tiny meditation before the big bake.
Soda Bath Timing Mastery
Exactly 30 seconds per pretzel is the sweet spot. Less time and you won’t get that signature crust; more time and the dough becomes overly alkaline, giving a bitter aftertaste. Use a slotted spoon to lift each pretzel out, letting excess water drip off for a second before placing them back on the sheet. This timing trick is the difference between “good” and “legendary.”
Finish with a Salt Sprinkle
Coarse sea salt isn’t just for flavor; its larger crystals add a satisfying crunch that contrasts the soft interior. Sprinkle it while the pretzels are still wet from the soda bath; the salt adheres better and doesn’t fall off during baking. If you love extra crunch, double the amount—just don’t overdo it, or you’ll mask the cheese.
Creative Twists and Variations
This recipe is a playground. Here are some of my favorite ways to switch things up:
Jalapeño Heat
Add finely diced jalapeños to the cheese mixture for a subtle kick. The heat pairs beautifully with the salty crust, making these pretzels perfect for game‑day snacking.
Herb‑Infused Delight
Mix dried oregano, rosemary, and a pinch of garlic powder into the dough for an aromatic twist. The herbs infuse the crust, giving each bite an Italian‑style perfume.
Sweet Cinnamon Sugar
Swap the cheese for a cinnamon‑sugar blend, brush with melted butter, and sprinkle extra sugar after baking. These turn into a dessert‑style pretzel that pairs well with a warm cup of coffee.
Bacon‑Wrapped Crunch
Wrap each pretzel with half a slice of crisp‑cooked bacon before the soda dip. The bacon renders its fat into the crust, adding smoky depth and an irresistible crunch.
Vegan Cheese
Replace the shredded cheese with a plant‑based mozzarella alternative and use a flax‑egg (1 tbsp ground flaxseed + 3 tbsp water) instead of a regular egg. The texture stays gooey, and the flavor remains indulgent.
Storing and Bringing It Back to Life
Fridge Storage
Place cooled pretzels in an airtight container with a paper towel to absorb excess moisture. They’ll stay fresh for up to three days, retaining most of their chewiness. If you notice the crust drying out, lightly mist them with water before reheating.
Freezer Friendly
Freeze unbaked pretzels on a parchment sheet, then transfer them to a zip‑top bag. They’ll keep for up to two months. When you’re ready, bake them straight from frozen, adding an extra 2‑3 minutes to the bake time.
Best Reheating Method
To revive the pretzels, preheat your oven to 350°F (175°C), place the pretzel on a baking sheet, and add a tiny splash of water to the crust before covering loosely with foil. Heat for 8‑10 minutes; the steam restores the interior softness while the crust regains its crispness.