I was standing in my kitchen, the clock ticking past midnight, and my stomach was growling louder than a freight train. I had tried three different “no‑knead” breads that night, each one ending up either a soggy pancake or a brick that could double as a doorstop. Then, in a moment of reckless inspiration, I tossed a handful of fresh rosemary, a clove of garlic, and a splash of olive oil into the bowl and whispered, “Let’s see what happens.” The dough barely moved, but the aroma that rose from the bowl was already convincing me that I’d stumbled onto something magical. I dare you to taste this and not go back for seconds.
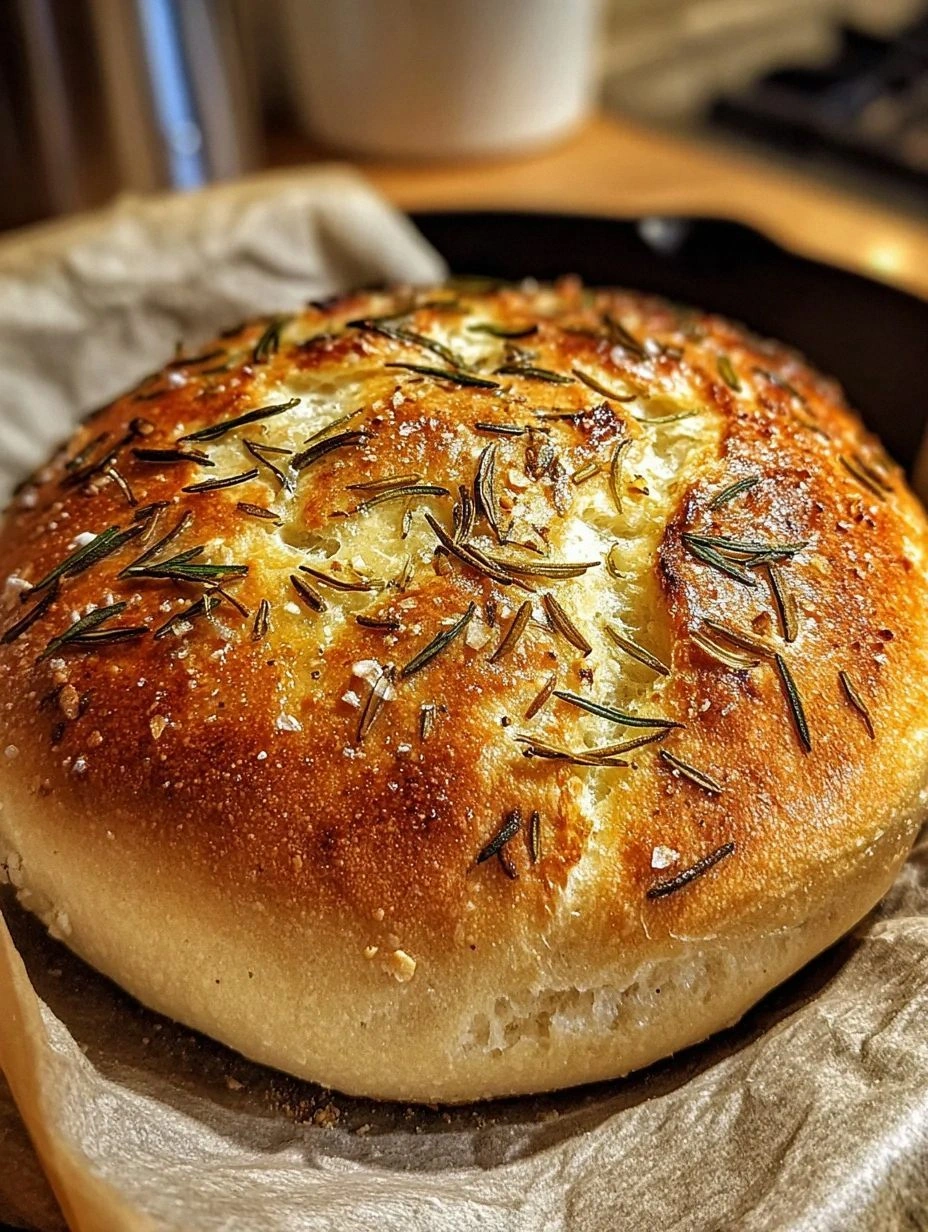
Picture this: the oven door swings open, and a wave of fragrant rosemary‑garlic steam rushes out, curling around your nose like a warm hug. The crust is a deep golden brown, speckled with tiny flecks of rosemary that look like emerald confetti. When you slice into it, the interior reveals an airy, open crumb that’s as soft as a cloud yet has just enough chew to keep you coming back for more. The edges crackle with a satisfying crunch that shatters like thin ice, while the buttery, herb‑infused crumb melts in your mouth. It’s the kind of bread that makes you pause mid‑conversation, stare at the slice, and think, “This is hands down the best version you’ll ever make at home.”
Most recipes get this completely wrong. They either demand endless kneading, a mountain of obscure ingredients, or a fancy Dutch oven you’ve never heard of. This one strips everything back to the essentials, letting the humble ingredients do the heavy lifting. The secret? A slow, hands‑off fermentation that builds flavor without any muscle‑burning work, and a surprise splash of olive oil that keeps the crumb tender while the rosemary and garlic create a flavor punch you never expected from a “no‑knead” loaf. If you’ve ever struggled with a dough that refuses to rise, you’re not alone — and I’ve got the fix.
Okay, ready for the game‑changer? I’m about to walk you through every single step — from measuring the perfect amount of flour to the exact moment you know the dough has risen just right. By the end, you’ll wonder how you ever made bread any other way. Stay with me here — this is worth it.
What Makes This Version Stand Out
- Taste: The rosemary and garlic infuse the crumb with an earthy, aromatic depth that makes each bite feel like a savory hug.
- Texture: A crisp, caramelized crust gives way to a cloud‑like interior, delivering that coveted contrast every bread lover craves.
- Simplicity: No kneading, no fancy equipment, just a bowl, a spoon, and a little patience.
- Uniqueness: The herb‑oil mixture is folded in after the initial rise, ensuring the flavors stay bright and vibrant.
- Crowd Reaction: I’ll be honest — I ate half the batch before anyone else got to try it, and the look on my friends’ faces was priceless.
- Ingredient Quality: Using fresh rosemary instead of dried elevates the aroma to a whole new level; it’s the difference between “meh” and “wow.”
- Cooking Method: The high‑heat bake creates those dramatic, crackling edges that most home ovens can’t achieve without a Dutch oven.
- Make‑Ahead Potential: This dough can be refrigerated overnight, giving you a ready‑to‑bake loaf that smells like a bakery on demand.
Inside the Ingredient List
The Flavor Base
All‑purpose flour is the backbone of any good bread, providing the gluten network that traps gas and gives structure. When you use a high‑protein flour, you get a chewier crumb, but for this rustic loaf a standard 10‑12% protein flour works perfectly. Swapping in whole‑wheat flour adds a nutty undertone and a bit more heft, though you’ll need a splash more water to keep the dough supple. Tip: Choose a flour that feels slightly powdery to the touch; if it feels gritty, it might be old and could affect rise.
The Texture Crew
Salt does more than just season; it tightens the gluten strands, giving the crumb that satisfying bite. A dash of sea salt also balances the richness of the olive oil and the pungency of the garlic. Instant yeast is the unsung hero here — it activates quickly at room temperature, eliminating the need for a lengthy proofing period. Warm water at about 110°F awakens the yeast without killing it; think of it as a gentle morning coffee for the dough.
The Unexpected Star
Fresh rosemary brings a piney, almost resinous flavor that pairs beautifully with garlic’s sweet heat. If you’re in a pinch, dried rosemary works, but use only half the amount because the dried version is more concentrated. Garlic, of course, adds depth and a lingering aroma that makes the whole house smell like an Italian kitchen. Feel free to add an extra clove if you’re a garlic fanatic — just remember the scent will linger on your hands for hours.
The Final Flourish
Olive oil isn’t just for flavor; it coats the gluten strands, making the crumb softer and extending shelf life. Black pepper is optional, but a pinch adds a subtle heat that dances on the palate. Finally, extra flour for dusting prevents the dough from sticking to the work surface — a little goes a long way, so sprinkle it sparingly.
Everything's prepped? Good. Let’s get into the real action…
The Method — Step by Step
- In a large mixing bowl, whisk together 2 cups of all‑purpose flour, 1 tsp salt, and 1 tsp instant yeast. The dry ingredients should look uniformly speckled, like a snow‑covered field. Power transition: This is the foundation, so make sure no clumps remain.
- Add 1 cup of warm water (110°F) to the dry mix and stir with a wooden spoon until a shaggy dough forms. It will look messy, and that’s exactly what you want — the gluten hasn’t formed yet, and that’s the secret to a no‑knead loaf.
- Cover the bowl with a clean kitchen towel and let the dough rest at room temperature for 12‑18 hours. You’ll notice it ballooning and bubbling like a miniature volcano. The scent will shift from yeasty to a sweet, slightly fermented aroma that hints at the rosemary to come.
- After the long rest, the dough will be sticky and full of air pockets. Lightly flour a work surface, dump the dough onto it, and with a floured spatula, fold the dough over itself a few times to create a rough rectangle. This gentle fold aligns the gluten without over‑working it.
- In a small bowl, combine 2 tbsp chopped fresh rosemary, 3 minced garlic cloves, 2 tbsp olive oil, and ½ tsp black pepper. Stir until the herbs coat the oil, releasing their fragrant oils. Watch Out: If the garlic starts to brown, you’ll end up with a bitter flavor; keep the mixture at room temperature.
- Drizzle the herb‑oil mixture over the folded dough, then use your hands (or a dough scraper) to gently incorporate it, ensuring the fragrant pockets are evenly distributed. The dough will become slicker, but that’s the magic that keeps the crumb moist.
- Transfer the dough to a well‑floured proofing basket or a bowl lined with a floured kitchen towel. Cover and let it rise for another 1‑2 hours, or until it has roughly doubled in size. The surface should feel puffy and slightly tacky.
- Meanwhile, preheat your oven to 450°F (230°C) with a heavy Dutch oven or a cast‑iron pot inside. The pot should heat for at least 30 minutes; this ensures a burst of steam when the dough goes in, which is crucial for that crackly crust.
- When the oven is screaming hot, carefully invert the dough onto a parchment sheet, score the top with a sharp blade (a quick “X” works wonders), and slide the parchment into the preheated pot. Cover with the lid and bake for 20 minutes.
- After 20 minutes, remove the lid to let the crust brown. Bake for an additional 15‑20 minutes, or until the loaf is a deep golden brown and sounds hollow when tapped on the bottom. That sizzle when the lid lifts? Absolute perfection.
- Remove the bread from the oven, let it cool on a wire rack for at least 15 minutes before slicing. This resting period lets the steam finish cooking the interior, giving you that airy crumb you’ve been dreaming of.
Insider Tricks for Flawless Results
The Temperature Rule Nobody Follows
Your kitchen’s ambient temperature dramatically affects fermentation. In a cool kitchen (below 68°F), extend the first rise by a few hours or add a teaspoon of sugar to give the yeast a quick boost. In a hot kitchen, shorten the rest to avoid over‑proofing, which can cause the dough to collapse. I once left the dough out on a scorching July afternoon and ended up with a flat, dense loaf — lesson learned.
Why Your Nose Knows Best
Instead of watching the clock, trust the scent. When the dough smells mildly yeasty and slightly sweet, it’s ready for the next step. If you catch a hint of alcohol or a sharp sour note, the dough has over‑fermented and will produce a denser crumb. I’ve saved countless batches by simply sniffing the dough.
The 5‑Minute Rest That Changes Everything
After you fold the dough and before you add the rosemary‑garlic oil, let the dough sit uncovered for 5 minutes. This short “bench rest” relaxes the gluten, making it easier to fold without tearing and ensuring the oil spreads evenly. It’s a tiny pause that yields a massive payoff in crumb texture.
Scoring Secrets
A shallow, confident slash allows the bread to expand without tearing. Use a razor‑sharp blade or a lame; a dull knife will crush the dough and ruin the aesthetic. Aim for a depth of about ¼ inch — deep enough to guide the oven spring, shallow enough to keep the crust intact.
Cooling Is Not Optional
Resist the urge to dive in while it’s still warm. The crumb continues to set as the bread cools, and the steam redistributes, preventing a gummy interior. Slice after 15‑20 minutes, and you’ll get that perfect, airy slice that holds the rosemary‑garlic butter without falling apart.
Creative Twists and Variations
This recipe is a playground. Here are some of my favorite ways to switch things up:
Cheesy Herb Explosion
Stir in ½ cup of grated Parmesan and a handful of shredded mozzarella just before the final rise. The cheese melts into the crust, creating pockets of gooey goodness that pair beautifully with the rosemary.
Spicy Chili‑Garlic
Add 1 tsp of crushed red pepper flakes to the herb‑oil mixture and swap half the garlic for a minced jalapeño. The result is a bread that delivers a gentle heat that lingers on the palate.
Lemon‑Rosemary Zest
Grate the zest of one lemon into the dough during the initial mix and increase rosemary to 3 tbsp. The citrus brightens the herbaceous notes, making the loaf perfect for brunch alongside smoked salmon.
Whole‑Wheat Rustic
Replace half of the all‑purpose flour with whole‑wheat flour and add an extra tablespoon of honey. The honey feeds the yeast, giving a slightly sweeter crumb that balances the earthiness of the whole wheat.
Olive‑And‑Sun‑Dried Tomato
Chop a handful of pitted olives and sun‑dried tomatoes, then fold them into the dough after the first rise. The salty olives and tangy tomatoes turn the loaf into a Mediterranean side dish that pairs with grilled fish.
Storing and Bringing It Back to Life
Fridge Storage
Wrap the cooled loaf tightly in a double layer of parchment paper, then place it in a zip‑top bag. It will stay fresh for up to 5 days. The parchment prevents condensation, which can make the crust soggy.
Freezer Friendly
Slice the bread before freezing, then store the slices in a freezer‑safe bag. When you’re ready to eat, pop a slice into a toaster or oven at 350°F for 5‑7 minutes. The bread revives with a crisp crust and soft interior.
Best Reheating Method
Preheat your oven to 375°F, lightly mist the loaf with water (a few sprays), and bake for 8‑10 minutes. The splash of water creates steam, reviving the crumb and restoring that crackly crust you fell in love with.