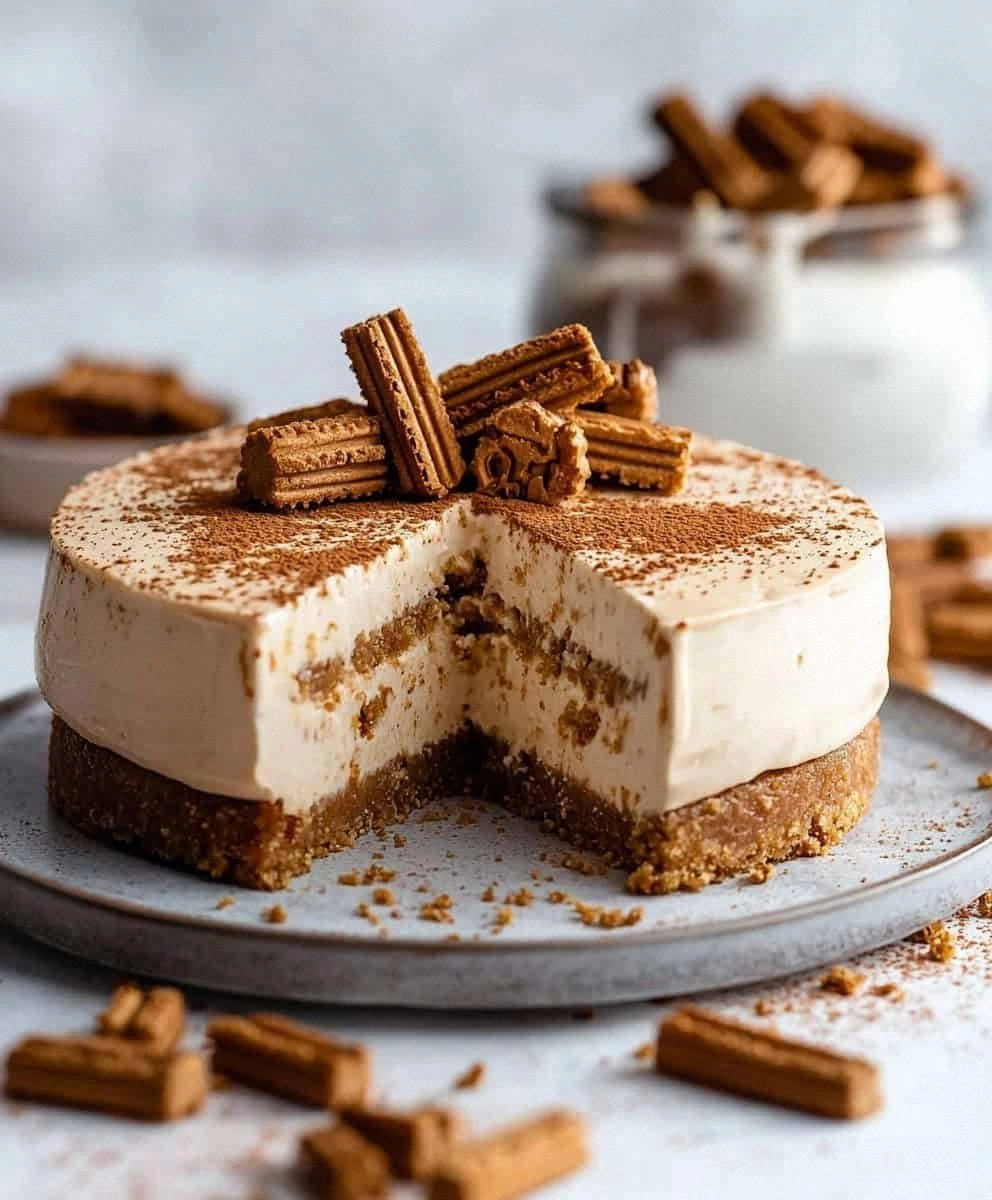
I still remember the exact moment I became completely, irrevocably obsessed with this no-bake Biscoff cheesecake. It was a Tuesday night, I was wearing mismatched socks, and I'd just demolished an entire jar of cookie butter with nothing but a spoon and questionable life choices. My partner walked in, raised an eyebrow, and said, "You know you could turn that into an actual dessert, right?" Challenge accepted. What followed was three weeks of obsessive testing, tasting, and tweaking until I landed on what I genuinely believe is the most dangerously delicious no-bake dessert in existence. This isn't just another cheesecake recipe — this is the one that'll ruin all other cheesecakes for you forever.
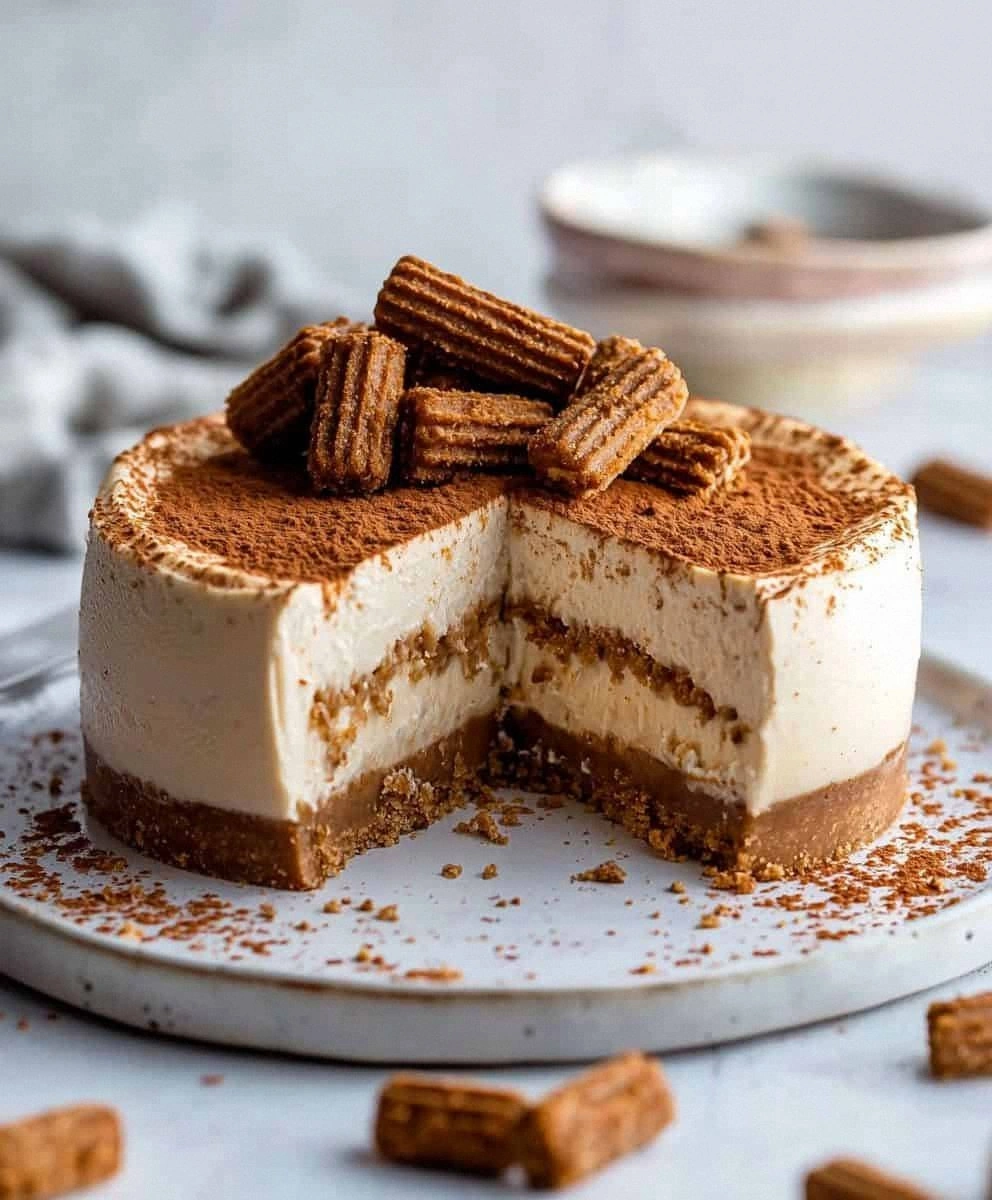
Picture this: a crust that shatters like thin caramelized glass, made from crushed Biscoff cookies mixed with just enough melted butter to hold it together. The filling? Oh, the filling is where things get wild. We're talking about a cloud-like cheesecake mousse that's been infused with so much cookie butter flavor, it tastes like someone took your favorite spread and turned it into silk. No gelatin, no complicated water baths, no praying to the dessert gods that your cheesecake doesn't crack. Just pure, unadulterated cookie butter bliss that sets in your fridge while you pretend to be productive.
Here's the thing that'll really blow your mind — this dessert tastes like you spent hours slaving away in the kitchen, but it comes together faster than ordering takeout. The secret weapon? We're using the natural setting power of whipped cream combined with cream cheese to create a structure so stable, you could probably (definitely) eat it straight from the pan with a fork at 2 AM. Not that I'm speaking from experience or anything. The texture is what dreams are made of: light enough to feel like you're eating clouds, but rich enough that a small slice feels completely satisfying.
What makes this version different from every other Biscoff cheesecake floating around the internet? We're not just dumping cookie butter into cream cheese and calling it a day. Oh no, my friend. We're layering flavors like a symphony — cookie butter in the crust, cookie butter in the filling, and (here's where it gets crazy) we're making a quick cookie butter caramel to drizzle on top. The result is a dessert that doesn't just taste like cookie butter; it tastes like someone captured the essence of your favorite cookie and turned it into the most luxurious cheesecake experience possible. Let me walk you through every single step — by the end, you'll wonder how you ever made it any other way.
What Makes This Version Stand Out
- Triple Threat Flavor: Most recipes get this completely wrong by only using cookie butter in one place. We're going full throttle with cookie butter in the crust, filling, and topping. The result is a dessert that doesn't just hint at cookie butter — it screams it from the rooftops in the most delicious way possible.
- Cloud-Like Texture: This cheesecake is so light and airy, it practically floats off your fork. The secret is whipping the cream to perfect peaks before folding it in, creating a mousse-like texture that melts on your tongue like frozen whipped cream. You'll taste it and immediately understand why other no-bake cheesecakes feel like eating cream cheese straight from the package.
- Zero Gelatin Needed: I dare you to find another no-bake cheesecake this stable without using gelatin. The combination of properly whipped cream and cream cheese creates a structure so perfect, you can slice it cleanly while it's still cold from the fridge. No weird textures, no jiggly disasters, just pure dessert perfection.
- Make-Ahead Magic: Picture yourself pulling this out of the fridge after a dinner party, watching your guests' eyes go wide as you slice into perfect layers. This dessert actually gets better after sitting overnight — the flavors meld and intensify while you're off doing literally anything else. Future you is going to be so impressed.
- Beginner-Friendly Brilliance: If you've ever struggled with traditional cheesecake, you're not alone — and I've got the fix. No water baths, no worrying about cracks, no checking if it's done. This recipe is foolproof enough for kitchen newbies but impressive enough to make experienced bakers jealous.
- Crowd-Pleasing Power: I've served this at birthdays, office parties, and that one awkward dinner where nobody knew each other. Every single time, people go back for seconds and thirds. The combination of familiar cookie butter flavor in an unexpected cheesecake format creates a dessert that appeals to kids and adults alike.
Inside the Ingredient List
The Flavor Foundation
Biscoff cookies aren't just cookies — they're little discs of caramelized magic that somehow taste like brown sugar, cinnamon, and childhood memories all rolled into one. When you crush them into fine crumbs for the crust, they create a base that's both sturdy and incredibly flavorful. The cookies' natural sweetness means we don't need to add extra sugar to the crust, keeping things balanced and not cloyingly sweet. If you can't find Biscoff cookies (though most grocery stores carry them now), speculoos cookies or even graham crackers with a teaspoon of cinnamon can work in a pinch, but trust me — the real deal is worth hunting down.
Cookie butter is the star of this show, and not all brands are created equal. The original Lotus Biscoff spread has the perfect balance of sweetness and spice, with a texture that melts beautifully into the cream cheese. Generic brands tend to be either too sweet or too gritty, which will throw off your whole dessert. When you're buying it, look for the smooth variety rather than crunchy — we want silk, not gravel. One jar is plenty for this recipe, but grab two because you'll definitely want to eat some straight from the spoon while cooking.
The Texture Crew
Cream cheese forms the backbone of our cheesecake, but here's where most people mess up — you want the full-fat brick, not the whipped stuff in a tub. The brick cream cheese has less air incorporated, which means it will blend smoothly and set properly. Take it out of the fridge at least 30 minutes before you start, or you'll end up with little cream cheese lumps that no amount of mixing will fix. I've made this mistake before, and biting into a lump of cold cream cheese in an otherwise perfect cheesecake is like finding a rock in your ice cream.
Heavy whipping cream isn't just for making things rich — it's our secret weapon for creating that cloud-like texture. When you whip it to soft peaks before folding it into the cream cheese mixture, you're essentially creating a mousse that will hold its shape beautifully. Don't substitute half-and-half or milk here; you need the fat content to create a stable structure. And please, for the love of all things dessert, don't use that canned whipped cream stuff. We're making magic here, not shortcuts.
The Unexpected Star
Brown sugar might seem like an unnecessary addition when we're already using cookie butter, but here's the game-changer — it adds depth and complexity that white sugar just can't match. The molasses in brown sugar enhances the caramel notes in the cookie butter, creating a more sophisticated flavor profile. Dark brown sugar works best here because it has more molasses, but light brown will do if that's what you have. Just don't skip it entirely, or your cheesecake will taste flat and one-dimensional.
Lemon juice might seem weird in a cookie butter dessert, but stay with me here — this is worth it. Just a teaspoon brightens all the other flavors and prevents the dessert from feeling too heavy or cloying. You won't taste lemon in the final product; instead, it'll taste like the cookie butter has been amplified to its full potential. It's like adding salt to chocolate chip cookies — you don't want to taste the salt, you just want everything else to taste more like itself.
The Final Flourish
Vanilla extract is the unsung hero of desserts, and this recipe is no exception. Use the good stuff if you have it — artificial vanilla tastes like sadness and broken dreams. The real extract adds warmth and rounds out all the flavors, making the cookie butter taste more complex and interesting. If you're feeling fancy, vanilla bean paste will give you those pretty little specks that make everything look more gourmet. Just a teaspoon is all you need to take this from good to absolutely unforgettable.
Unsalted butter for the crust needs to be properly melted but not hot. If it's too hot when you mix it with the cookie crumbs, it'll make the crust greasy instead of crisp. Let it cool for a minute after melting, or better yet, melt it first and let it sit while you gather everything else. The butter acts like delicious glue, holding all those cookie crumbs together while adding richness that takes the crust from merely functional to absolutely crave-worthy.
The Method — Step by Step
- Start by making your cookie crust because this needs time to set while you work on everything else. Toss 2 cups of Biscoff cookies into a food processor and blitz them until they become fine crumbs — we're talking sand-on-a-beach fine here. If you don't have a food processor, throw them in a zip-top bag and whale on them with a rolling pin until no large pieces remain. The finer the crumbs, the better your crust will hold together. Melt your butter and let it cool for a minute while you prepare a 9-inch springform pan by lightly greasing the sides with butter or non-stick spray.
- Combine your cookie crumbs with the melted butter in a medium bowl, and here's where you need to channel your inner pastry chef. Use a fork to mix until every crumb is coated in buttery goodness — it should look like wet sand and hold together when you squeeze it. If it's too dry and crumbly, add more melted butter a tablespoon at a time. Press this mixture firmly into the bottom of your prepared pan, using the bottom of a glass to really compact it down. The tighter you pack it, the cleaner your slices will be later. Pop this in the freezer for 15 minutes to set while you move on to the fun part.
- Now for the main event — grab your room temperature cream cheese and place it in a large mixing bowl. Beat it with an electric mixer on medium speed for about 2 minutes until it's completely smooth and fluffy. This step is crucial because any lumps now will be lumps forever — we're not making cottage cheese cheesecake here. Scrape down the sides of the bowl at least twice during this process to ensure everything gets incorporated. The cream cheese should look like thick whipped cream and be smooth enough to spread easily.
- Add the brown sugar, vanilla extract, and lemon juice to your beautifully smooth cream cheese. Beat everything together for another minute until it's completely combined and looks like a pale, fluffy cloud. The mixture should be sweet but not cloying, with the vanilla and lemon juice working their magic in the background. Don't overbeat here — once everything is incorporated, stop mixing. Overbeating can incorporate too much air, which might cause your cheesecake to deflate later. Taste it at this point (I won't judge if you eat a spoonful) and adjust if needed.
- Here's where things get exciting — time to add the star of the show. Scoop out 3/4 cup of cookie butter and add it to your cream cheese mixture. Beat on low speed just until it's fully incorporated and the mixture is a beautiful light brown color with tiny specks from the cookie crumbs. The smell at this point will make you want to face-plant into the bowl, but resist the urge — we're so close to the finish line. The mixture should be smooth, creamy, and smell like someone bottled happiness and stirred it with a cinnamon stick.
- In a separate bowl (yes, we're dirtying another dish, but trust me here), pour in your cold heavy cream. Using clean beaters, whip the cream on medium-high speed until it forms soft peaks — when you lift the beaters, the peaks should gently fold over themselves. This usually takes about 3-4 minutes, but don't walk away because cream goes from perfect to butter faster than you can say "overwhipped." The cream should look thick and billowy, like clouds you could float away on.
- Now comes the part that separates the amateurs from the pros — folding the whipped cream into the cream cheese mixture. Add about one-third of the whipped cream to your bowl and gently fold it in using a rubber spatula. Cut down through the center, scrape along the bottom, and lift up and over — rotate the bowl as you go. This incorporates the cream without deflating all that beautiful air you just whipped in. Once it's mostly combined, add the remaining cream in two more batches, folding gently each time. The final mixture should be light, fluffy, and look like it might float right out of the bowl.
- Retrieve your crust from the freezer — it should be firm and set. Pour the cheesecake filling over the crust and smooth the top with an offset spatula or the back of a spoon. Give the pan a gentle tap on the counter to release any large air bubbles, then cover it loosely with plastic wrap. The plastic wrap shouldn't touch the surface of the cheesecake — we're not making plastic-wrapped dessert here. Just drape it over the top of the pan to prevent it from absorbing any weird fridge flavors while it sets.
- Refrigerate your masterpiece for at least 4 hours, but overnight is even better if you can wait that long. I know, I know — waiting is the hardest part, especially when your kitchen smells like a cookie butter factory. But here's the thing: the cheesecake needs time for the flavors to meld and the structure to set properly. If you try to cut into it too early, you'll have a delicious but structurally unsound mess on your hands. Patience, young padawan — your reward is coming.
- When you're ready to serve, run a thin knife around the inside edge of the pan to loosen the cheesecake. Remove the sides of the springform pan — this is the moment of truth. If everything went right (and it did, because you're following my instructions), you should have a perfectly set cheesecake with clean sides and a texture that jiggles just slightly when you gently shake the pan. Slice it with a hot, dry knife for the cleanest cuts, wiping the blade between slices. Serve chilled and watch as people take their first bite and their eyes go wide with dessert-induced joy.
That's it — you did it. But hold on, I've got a few more tricks that'll take this to another level...
Insider Tricks for Flawless Results
The Temperature Rule Nobody Follows
Room temperature ingredients aren't just a suggestion here — they're the difference between a lumpy disaster and silk-smooth perfection. When your cream cheese is cold, it won't blend smoothly with the other ingredients, leaving you with little white lumps that taste like disappointment. Take everything out of the fridge 30 minutes before you start, or speed things up by placing items in a sealed bag and submerging them in lukewarm water for 10 minutes. A friend tried skipping this step once — let's just say her cheesecake looked like it had cottage cheese mixed in, and not in a good way. The butter should be soft enough to leave an indent when you press it, but not so soft it's melting into a puddle.
Why Your Nose Knows Best
Here's something they don't tell you in most recipes — your sense of smell is your secret weapon for knowing when each component is perfectly prepared. When you're toasting the cookie crumbs for the crust (if you want to go the extra mile), they'll start smelling like caramel and warm spices when they're ready. The cream cheese mixture should smell like vanilla-forward cookie dough when it's properly mixed — if you can still smell raw cream cheese, keep beating. And that whipped cream? When it's perfectly whipped, it'll have a faint sweet dairy aroma that makes you want to eat it with a spoon. Trust your nose — it's been evolutionarily designed to help you make better desserts.
The 5-Minute Rest That Changes Everything
After you've assembled your cheesecake but before you cover it with plastic wrap, let it sit uncovered in the fridge for exactly 5 minutes. This quick rest allows the surface to set slightly, which prevents the plastic wrap from sticking and creating unsightly marks on top. It also gives any small air bubbles time to rise to the surface, where you can gently pop them with a toothpick for a perfectly smooth finish. I discovered this trick by accident when I got distracted by a phone call, and now it's my non-negotiable step for picture-perfect results.
Creative Twists and Variations
This recipe is a playground. Here are some of my favorite ways to switch things up:
The Chocolate Lover's Dream
Replace half the cookie butter with melted dark chocolate for a mocha-caramel situation that'll make chocolate lovers weep with joy. Add a tablespoon of espresso powder to enhance the chocolate flavor without making it taste like coffee. The result is a sophisticated dessert that tastes like someone combined your favorite cookie with a fancy chocolate truffle. Top with chocolate shavings and a sprinkle of sea salt for the full experience.
The Peanut Butter Power Play
Swirl in 1/4 cup of smooth peanut butter along with the cookie butter for a peanut butter cookie-inspired version. The combination of peanut butter and cookie butter creates this insane flavor that's like the best parts of a peanut butter cookie and a speculoos cookie had a beautiful baby. Add some chopped peanuts to the crust for extra texture and peanut flavor. This version is especially popular with kids and anyone who grew up eating peanut butter sandwiches.
The Salted Caramel Upgrade
Make a quick caramel by melting 1/2 cup of sugar until amber, then stirring in 2 tablespoons of butter and 1/4 cup of heavy cream. Let it cool slightly, then swirl it through the cheesecake filling for ribbons of caramel throughout. The slight bitterness of the caramel balances the sweetness of the cookie butter perfectly. Sprinkle flaky sea salt on top just before serving for that sweet-salty magic that makes people close their eyes in happiness.
The Holiday Spice Edition
Add 1/2 teaspoon each of cinnamon, nutmeg, and ginger to the cream cheese mixture for a holiday-spiced version that tastes like Christmas morning. This variation is perfect for winter gatherings and holiday parties. The warm spices complement the cookie butter beautifully, creating a dessert that tastes like someone captured the essence of holiday baking in cheesecake form. Serve with a dollop of cinnamon whipped cream for maximum impact.
The Mini Version
Instead of one large cheesecake, divide the mixture among 12 lined muffin cups for individual servings that are perfect for parties. These mini cheesecakes set faster (about 2 hours) and are way easier to transport. Plus, everyone gets their own little dessert, which eliminates the awkward "who gets the last slice" situation. Top each one with a small cookie for the cutest presentation ever.
The Ice Cream Sandwich Situation
Spread the filling between two frozen Biscoff cookies for an ice cream sandwich that'll change your life. The cold temperature firms up the filling to ice cream consistency, but it still melts in your mouth like the cheesecake version. Roll the edges in mini chocolate chips or crushed cookies for extra texture and visual appeal. These are dangerous to have in your freezer because you will eat them all.
Storing and Bringing It Back to Life
Fridge Storage
Your no-bake Biscoff cheesecake will keep beautifully in the fridge for up to 5 days, though honestly, it never lasts that long in my house. Store it in the springform pan with plastic wrap pressed directly against the surface to prevent it from drying out and absorbing weird fridge smells. If you've already sliced it, press plastic wrap against the cut surfaces and it'll stay fresh for 3-4 days. The flavors actually intensify after the first day, so don't be surprised if it tastes even better on day two. Just make sure your fridge is set below 40°F to keep everything food-safe and delicious.
Freezer Friendly
Here's the beautiful thing — this cheesecake freezes like a dream for up to 2 months. Wrap individual slices tightly in plastic wrap, then place them in a freezer bag with as much air removed as possible. When you're ready to eat, let them thaw in the fridge overnight or at room temperature for about 30 minutes. The texture stays perfect, and having frozen cheesecake slices on hand has saved me from many late-night dessert emergencies. Pro tip: slice it before freezing so you can grab just what you need without thawing the whole thing.
Best Serving Method
For the best texture and flavor, let your cheesecake sit at room temperature for 15-20 minutes before serving. This takes the chill off and allows the flavors to really shine. If it's been in the freezer, you might want to let it sit for 30-40 minutes. The ideal serving temperature is cool but not cold — you want it to be firm enough to hold its shape but soft enough that your fork glides through like butter. Add any toppings or sauces right before serving to keep them fresh and prevent them from making the cheesecake soggy.