I still remember the Thanksgiving when my turkey surrendered in defeat. After years of faithfully following my grandmother's recipe—bless her heart—I produced a bird so dry it could have doubled as a loofah. The shame! Relatives politely chewed while I mentally drafted my resignation from family chef duties. But then, like a culinary superhero swooping in to save my reputation, a chef friend whispered two magical words: dry brine and spatchcock. I had no idea these techniques would transform my holiday horror story into the stuff of legend.
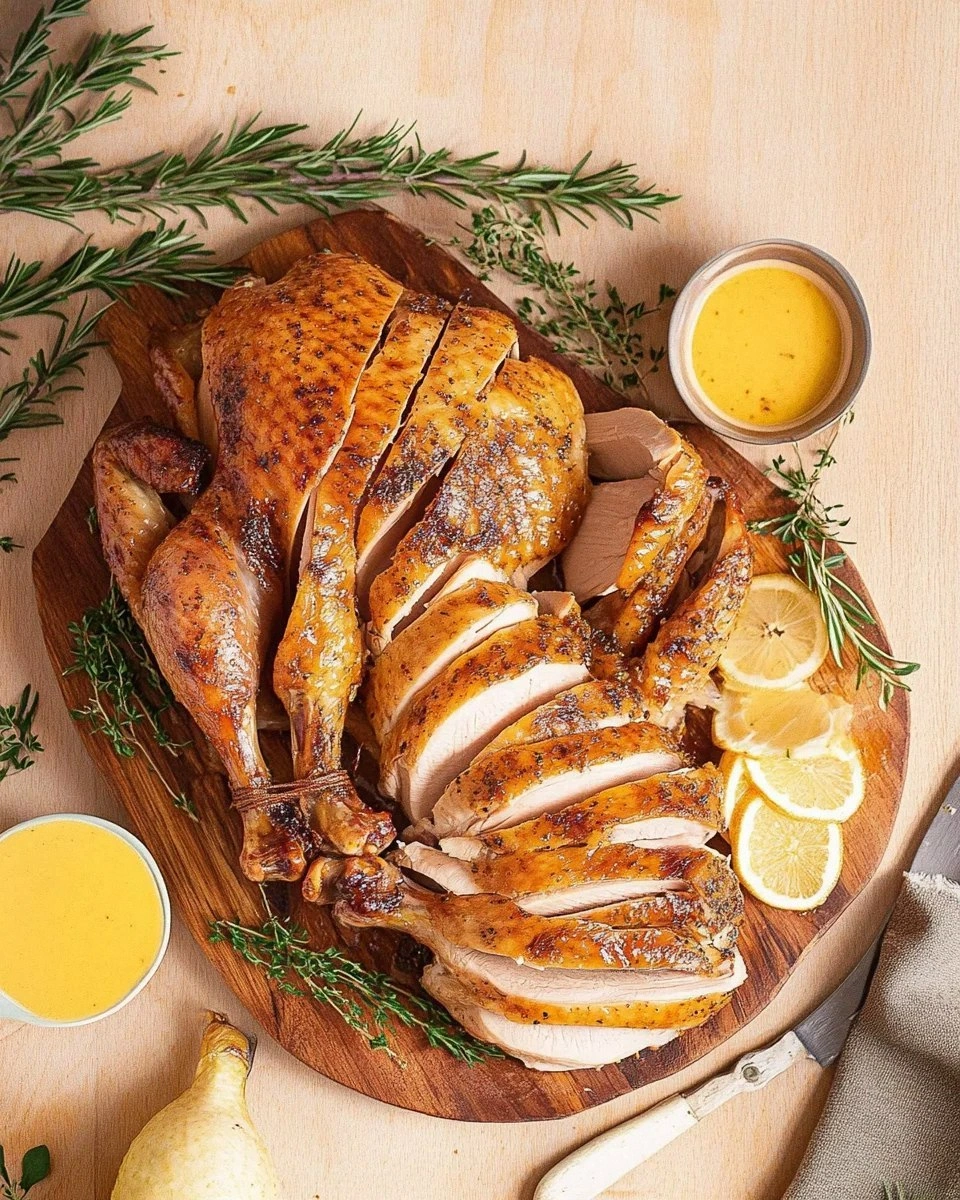
Picture this instead: a turkey that emerges from your oven with skin so golden and crispy it crackles like autumn leaves underfoot. The meat beneath stays impossibly juicy, practically falling off the bone in succulent shards. The cooking time? Cut nearly in half, freeing up your oven for all those glorious sides. Your guests hover around the kitchen island, drawn by aromas so intoxicating they abandon football and small talk entirely. This, my friends, is what happens when science meets tradition in the best possible way.
Here's the beautiful secret: dry brining works like a charm because salt draws out moisture initially, then that same moisture gets pulled back into the meat along with all the seasonings. It's like giving your turkey a luxury spa treatment that leaves it plump, seasoned throughout, and ready for its close-up. Add spatchcocking—removing the backbone so the bird lies flat—and you've got yourself a recipe for even cooking that would make any professional chef nod approvingly.
Let me walk you through every single step—by the end, you'll wonder how you ever made it any other way. Trust me, once you experience the magic combination of these two techniques, there's no going back to your old turkey ways. Your future self will thank you when you're carving into the most succulent, flavorful turkey of your life while everyone at the table fights for the crispy skin.
What Makes This Version Stand Out
Crispy-Skin Guarantee: The dry brine draws moisture from the skin, creating a pellicle that browns into shatteringly crisp perfection. While wet brines leave you with flabby, rubbery skin that never quite crisps up properly, this method ensures every bite crackles like you're biting into a perfectly roasted potato chip.
Even-Cooking Magic: Spatchcocking eliminates the dreaded breast-dries-out-before-legs-are-done dilemma. By flattening the bird, everything cooks at the same rate, meaning no more strategic tenting with foil or rotating pans like you're conducting some kind of poultry orchestra.
Flavor-Packed Interior: Forget bland, waterlogged meat. The dry brine seasons the turkey all the way through, not just on the surface. Every slice, from the breast to the thigh, tastes like it's been marinated for days in a symphony of herbs and spices.
Oven Efficiency: Your turkey will cook in roughly half the time of a traditional bird, freeing up valuable real estate for those honey-glazed carrots and marshmallow-topped sweet potatoes. No more 4 a.m. wake-up calls just to get dinner on the table at a reasonable hour.
Carving Simplicity: With the backbone removed and the bird lying flat, you can carve this turkey with the confidence of a professional butcher. No more wrestling with a hot, unwieldy bird while your father-in-law offers unhelpful suggestions from the sidelines.
Make-Ahead Friendly: The dry brine means you can prep your turkey up to three days ahead, eliminating that last-minute holiday panic. Your future holiday self will be sipping wine while everyone else is frantically basting and fussing.
Wow-Factor Presentation: When you bring this golden, mahogany bird to the table, prepare for gasps. The flattened shape creates an impressive display that looks like something out of a food magazine, not your aunt's Pinterest fail board.
Alright, let's break down exactly what goes into this masterpiece...
Inside the Ingredient List
The Flavor Foundation
Kosher salt forms the backbone of our dry brine, and don't you dare substitute table salt here. The larger, coarser crystals of kosher salt dissolve more slowly, creating a controlled release that seasons the meat gradually rather than leaving you with something that tastes like a salt lick. You'll need about one tablespoon for every five pounds of turkey, which might seem excessive until you understand that most of this salt will be discarded with the rendered juices. The salt works its magic by initially drawing moisture out of the turkey, then as the salt dissolves in these juices, it creates a concentrated brine that gets reabsorbed into the meat.
Brown sugar isn't just for sweetness—it brings molasses notes that caramelize into the most incredible depth of flavor. The sugar balances the salt while encouraging that gorgeous golden-brown color that makes everyone reach for their phone cameras. Dark brown sugar works best here because it contains more molasses, which means more flavor compounds that will develop into complex, almost smoky notes during the long roast. If you're out of brown sugar, you can substitute white sugar with a tablespoon of molasses mixed in, but honestly, the real stuff is worth the grocery trip.
The Aromatic All-Stars
Fresh thyme brings an earthy, slightly minty quality that pairs beautifully with turkey in ways that dried thyme simply cannot match. The essential oils in fresh herbs haven't been evaporated by the drying process, so they release their full aromatic potential when they hit the heat. Strip the leaves from woody stems by running your fingers backwards along the stem—the tiny leaves will collect in your palm while the tough stem stays behind. If you absolutely must use dried thyme, reduce the amount by two-thirds and add it to the salt mixture a day early so the oils have time to rehydrate.
Smoked paprika is your secret weapon for achieving that outdoor-roasted flavor without firing up the grill. This Spanish treasure adds a whisper of smoke that makes people wonder if you've been hiding a wood-fired oven somewhere. The sweet variety gives you color and depth without overwhelming heat, though if you're feeling adventurous, half sweet and half hot smoked paprika creates a more complex profile. Make sure you're getting the real deal—some cheap paprikas are just regular paprika with liquid smoke added, which tastes about as authentic as grape-flavored medicine.
The Unexpected Game-Changers
Orange zest might seem like an odd addition to turkey, but the citrus oils cut through the richness while adding bright, sunny notes that elevate the entire dish. Use a microplane to remove just the colored part of the peel—avoid the white pith underneath unless you want your turkey to taste like bitter marmalade. The zest works particularly well with the brown sugar, creating a kind of duck à l'orange vibe that feels sophisticated without being pretentious. If oranges aren't available, lemon or lime zest works too, though each brings its own personality to the party.
Coriander seeds, when toasted and ground fresh, release lemony, slightly nutty aromatics that make turkey taste expensive. These tiny spheres contain volatile oils that dissipate quickly after grinding, which is why pre-ground coriander tastes like cardboard sprinkled with disappointment. Toast them in a dry pan until they start popping like sesame seeds, then grind them while they're still warm. The aroma will transport you to a Middle Eastern spice market, and your turkey will thank you with layers of flavor that have guests asking for your secret.
The Final Flourish
Black pepper might seem basic, but freshly cracked peppercorns add pungent heat and floral notes that pre-ground pepper lost months ago at the factory. The key is cracking them coarsely rather than grinding them finely—you want little bursts of peppery heat, not an even dusting of blandness. Tellicherry peppercorns are worth seeking out for their complex, fruity flavor that plays beautifully with the orange zest. Add the pepper after the salt mixture has had time to penetrate the meat, otherwise the heat can become overwhelming.
Everything's prepped? Good. Let's get into the real action...
The Method — Step by Step
- Start with a completely thawed turkey—this is non-negotiable. If your bird is still partially frozen, the salt won't penetrate evenly and you'll end up with a turkey that's seasoned like a zebra. Remove it from the packaging, discard the giblets and neck (or save them for gravy), and pat the entire surface dry with paper towels. I mean really dry, like you're trying to remove every last molecule of moisture. This step might seem obsessive, but dry skin equals crispy skin, and crispy skin is what separates legendary turkeys from merely adequate ones. Take your time here; channel your inner monk and methodically blot every nook and cranny.
- Now for the fun part—spatchcocking. Place your turkey breast-side down on a cutting board that's seen better days (this gets messy). Using heavy-duty kitchen shears or poultry scissors, cut along both sides of the backbone from tail to neck. Don't be dainty about it—you're essentially performing turkey surgery here. Once the backbone is removed (save it for stock), flip the bird over and press down firmly on the breastbone until you hear a satisfying crack. This is the turkey's sternum breaking, which sounds gruesome but allows the bird to lie flat like a book. You want it as flat as possible for even cooking, so don't be shy about applying pressure.
- Mix your dry brine by combining kosher salt, brown sugar, and all your aromatics in a bowl. The ratio should be about 3 parts salt to 1 part brown sugar, with herbs and spices making up roughly 10% of the total volume. Use your fingers to work the mixture together, breaking up any brown sugar lumps until you have a uniform, sandy consistency. This is when your kitchen starts smelling like a holiday miracle—take a moment to appreciate the citrus oils releasing from the zest and the warm spices mingling with the herbs. The mixture should feel like damp sand at the beach, not wet, just barely moist from the brown sugar.
- Season the turkey like you're giving it a luxurious salt scrub. Start with the cavity side up, sprinkling the brine mixture evenly over all surfaces. Pay special attention to the areas where meat is thickest—the breast and thighs need more seasoning than the wings. Massage the mixture into every fold and crevice, making sure to get under the legs where skin meets body. Flip the bird over and repeat on the breast side, being particularly generous with the skin since some will drip off during cooking. You should use about a tablespoon of mixture per pound of turkey, though trust your instincts—if it looks under-seasoned, it probably is.
- Transfer your seasoned turkey to a wire rack set inside a rimmed baking sheet, breast-side up. This setup allows air to circulate all around the bird, which is crucial for developing that coveted crispy skin. Slide the whole contraption into your refrigerator, uncovered, for at least 24 hours and up to 72 hours. Yes, I know leaving meat uncovered in the fridge feels wrong, but this is where the magic happens. The cold, dry air of your refrigerator creates a kind of turbo-charged aging process that concentrates flavors and dries the skin to perfection. Your turkey will look slightly shriveled and discolored—this is exactly what you want.
- When you're ready to roast, remove the turkey from the refrigerator about an hour before cooking. A room-temperature bird cooks more evenly, and this rest period allows the salt to finish its work. Preheat your oven to 425°F—this high heat is what creates the beautiful browning that makes everyone reach for their cameras. Position a rack in the lower third of your oven to accommodate the turkey's new flat shape. The turkey should sit skin-side up, looking like it's sunbathing on a Caribbean beach rather than preparing for its final journey.
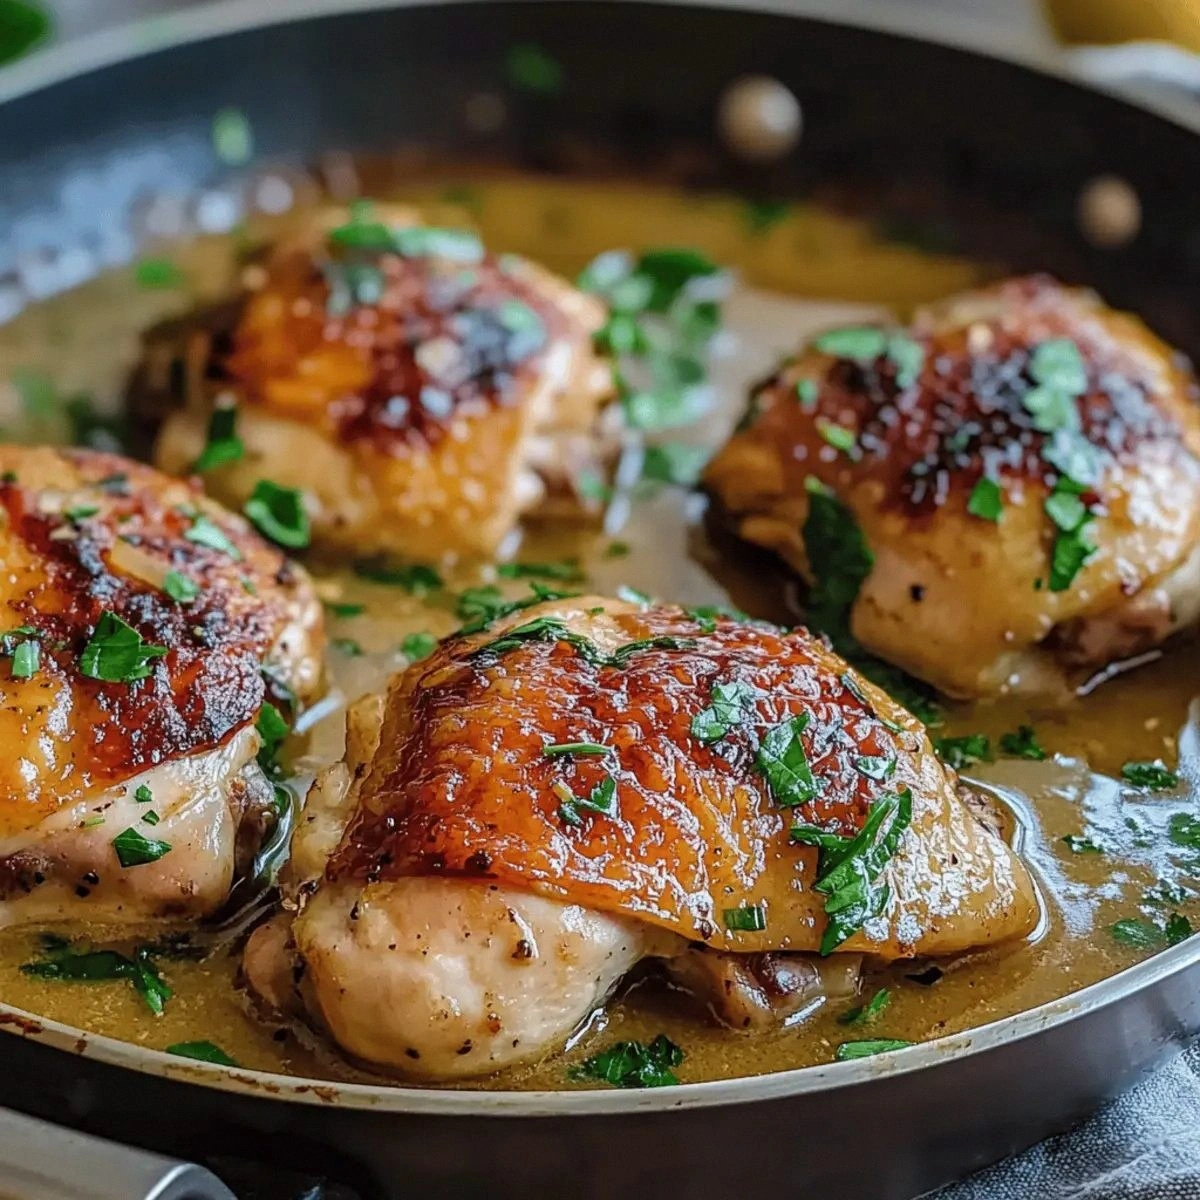
- Roast the turkey for approximately 6 minutes per pound, rotating the pan halfway through for even browning. A 12-pound turkey will take about 75 minutes, but start checking earlier—every oven has its own personality. The skin should be deep golden brown, almost mahogany in places, and the thickest part of the breast should register 150°F on an instant-read thermometer. Don't panic if the skin looks too dark before the meat is done; simply tent loosely with foil and continue roasting. The turkey will continue cooking as it rests, so err on the side of pulling it out a few degrees early rather than risking dryness.
- The resting period might be the hardest part because your kitchen smells like heaven and everyone is hovering with plates in hand. Resist the urge to carve immediately—let the turkey rest for at least 20 minutes, loosely tented with foil. During this time, the juices redistribute throughout the meat, ensuring every slice stays moist. The internal temperature will continue rising to the safe zone of 165°F, and you'll have time to finish your gravy and warm your side dishes. Place the turkey on a cutting board with a well to catch those precious juices—you'll want every drop for your gravy.
- Carving a spatchcocked turkey is almost embarrassingly easy compared to wrestling with a whole bird. Start by removing the legs—they should practically fall off with a gentle tug. Separate the thighs from the drumsticks, then slice the breast meat against the grain into thick, juicy slabs. The backbone removal means you can carve everything in neat, restaurant-quality portions rather than hacking away like you're performing amateur surgery. Arrange the carved meat on a platter, drizzle with some of the accumulated juices, and prepare for the compliments to roll in.
That's it—you did it. But hold on, I've got a few more tricks that'll take this to another level...
Insider Tricks for Flawless Results
The Temperature Rule Nobody Follows
Most recipes tell you to cook turkey to 165°F, but that's the temperature that guarantees safety for immediately served poultry. Since we're letting our bird rest (and it will continue cooking), we can pull it at 150°F in the thickest part of the breast. During the 20-minute rest, carryover cooking will bring it up to a safe 165°F while keeping the meat incredibly juicy. I learned this the hard way after years of serving turkey that resembled sawdust. A friend who works in a test kitchen finally clued me in—now my turkey is the stuff of family legend, not family therapy sessions.
Why Your Nose Knows Best
Forget timers and thermometers for a moment—your nose is actually one of the best tools for judging doneness. When the turkey is perfectly roasted, your kitchen will fill with an aroma that's equal parts savory and slightly sweet, with hints of herbs and caramelized meat. If you smell something acrid or sharp, your bird is likely overcooking. This might sound like kitchen mysticism, but professional chefs rely on this technique constantly. Trust your senses—they've been honed by thousands of years of human evolution, and they're usually more reliable than that cheap thermometer you got as a wedding gift.
The 5-Minute Rest That Changes Everything
After carving, let your turkey pieces rest on a warm platter for another 5 minutes before serving. This might seem like overkill after the initial rest, but it allows the muscle fibers to relax completely. The difference is subtle but noticeable—slices that might have seemed slightly tight will become buttery tender. Plus, this gives you time to finish your pan gravy and ensures everyone gets to enjoy hot turkey rather than lukewarm slices that have been sitting around. Your guests won't know why your turkey tastes better than every other turkey they've ever had, but they'll definitely notice the difference.
The Skin-Crisping Secret
For extra-crispy skin, brush the turkey with melted butter mixed with a teaspoon of baking powder about 30 minutes before the end of cooking. The baking powder raises the pH of the skin, helping it brown faster and crisper. This trick works because the alkaline environment promotes the Maillard reaction—that magical chemical process that creates hundreds of flavor compounds and that gorgeous brown color. Be careful not to add too much baking powder, though, or your turkey will taste like a science experiment gone wrong. Just a whisper is all you need for transformation.
The Make-Ahead Gravy Base
While your turkey roasts, those juices collecting in the pan are liquid gold. Pour off the excess fat, then deglaze the pan with white wine or stock, scraping up all the browned bits. This fond contains concentrated flavors that would cost you a fortune to replicate with store-bought stock. Reduce this mixture by half and you've got a gravy base that will make people weep with joy. You can even make this a day ahead—just reheat it with some additional stock when you're ready to serve. The depth of flavor is astonishing, especially when you consider it came from what most people throw away.
Creative Twists and Variations
This recipe is a playground. Here are some of my favorite ways to switch things up:
The Mediterranean Escape
Swap the orange zest for lemon zest, replace the thyme with oregano and rosemary, and add a tablespoon of fennel seeds to the brine. The result transports you to a Greek island where turkeys roam among olive groves. The fennel adds a subtle anise note that pairs beautifully with lemon and herbs. Serve this version with a side of lemon potatoes and watch your guests close their eyes in bliss with each bite.
The Smoky Southwest Version
Replace the smoked paprika with chipotle powder, add a teaspoon of ground cumin and coriander to the brine, and include lime zest instead of orange. This creates a turkey with subtle heat and deep, smoky complexity that begs for sides like elote or poblano gratin. The chipotle adds a gentle warmth that builds rather than overwhelms, making this perfect for spice lovers and mild palates alike.
The Asian-Inspired Fusion
Mix white miso paste with your salt for an umami bomb that creates incredibly savory meat. Add grated ginger, garlic powder, and a touch of five-spice powder to the brine. The miso creates a mahogany glaze as it roasts, while the ginger adds brightness that cuts through the richness. This version pairs spectacularly with sides that include soy sauce, sesame oil, or rice wine vinegar.
The Herb Garden Special
Go herb-crazy with fresh sage, rosemary, thyme, and parsley all chopped together. Add some lemon zest and black pepper, but skip the brown sugar for a more savory profile. The mixture of fresh herbs creates an almost pesto-like coating that perfumes the entire kitchen. This is the version to make when your herb garden is going crazy and you need to use everything before the first frost.
The Maple-Bourbon Indulgence
Replace half the brown sugar with maple sugar, add a tablespoon of bourbon to the brine mixture, and include some fresh sage. The maple adds a deeper, more complex sweetness than regular sugar, while the bourbon brings vanilla and caramel notes that make this taste like a special occasion even on a random Tuesday. Be careful with this one—it's so good you might find yourself making turkey more often than your family expects.
The Spicy Rebel
Add a tablespoon of Aleppo pepper or Korean gochugaru to the brine for a fruity heat that builds slowly. These chilies aren't just about heat—they add a subtle sweetness and complexity that regular chili powder can't match. The result is a turkey with a gentle warmth that makes people reach for another slice without quite understanding why they can't stop eating.
Storing and Bringing It Back to Life
Fridge Storage
Leftover turkey keeps beautifully for up to four days when stored properly. The key is to store the meat separately from the bones, which continue to release moisture that can make your precious leftovers soggy. Wrap carved meat tightly in plastic wrap, then place in an airtight container. The brining process actually helps the meat stay moist longer than regular roasted turkey, so you're in for a treat when you open the container days later. For best results, bring leftovers to room temperature before reheating—cold turkey straight from the fridge tends to dry out when rewarmed.
Freezer Friendly
This turkey freezes exceptionally well thanks to the brining process, which helps maintain moisture during freezing and thawing. Wrap individual portions in plastic wrap, then aluminum foil, and store in freezer bags with as much air removed as possible. Properly stored, your turkey will maintain quality for up to three months, though I've been known to dig into a six-month-old stash with delicious results. Pro tip: freeze some in meal-sized portions with a bit of the pan juices—when thawed and reheated, it tastes almost as good as fresh. The key is to thaw slowly in the refrigerator overnight rather than using the microwave's defrost setting.
Best Reheating Method
The secret to reheating turkey without turning it into cardboard is gentle heat and added moisture. Place slices in a baking dish, add a few tablespoons of chicken stock or the reserved pan juices, cover tightly with foil, and warm in a 275°F oven for about 15 minutes. The low temperature and steam created by the liquid keeps the meat moist while warming it through. Avoid the microwave at all costs—it creates hot spots that turn your carefully crafted turkey into shoe leather faster than you can say leftovers. For a quick lunch, you can also reheat slices in a skillet with a splash of stock, covered, over low heat.