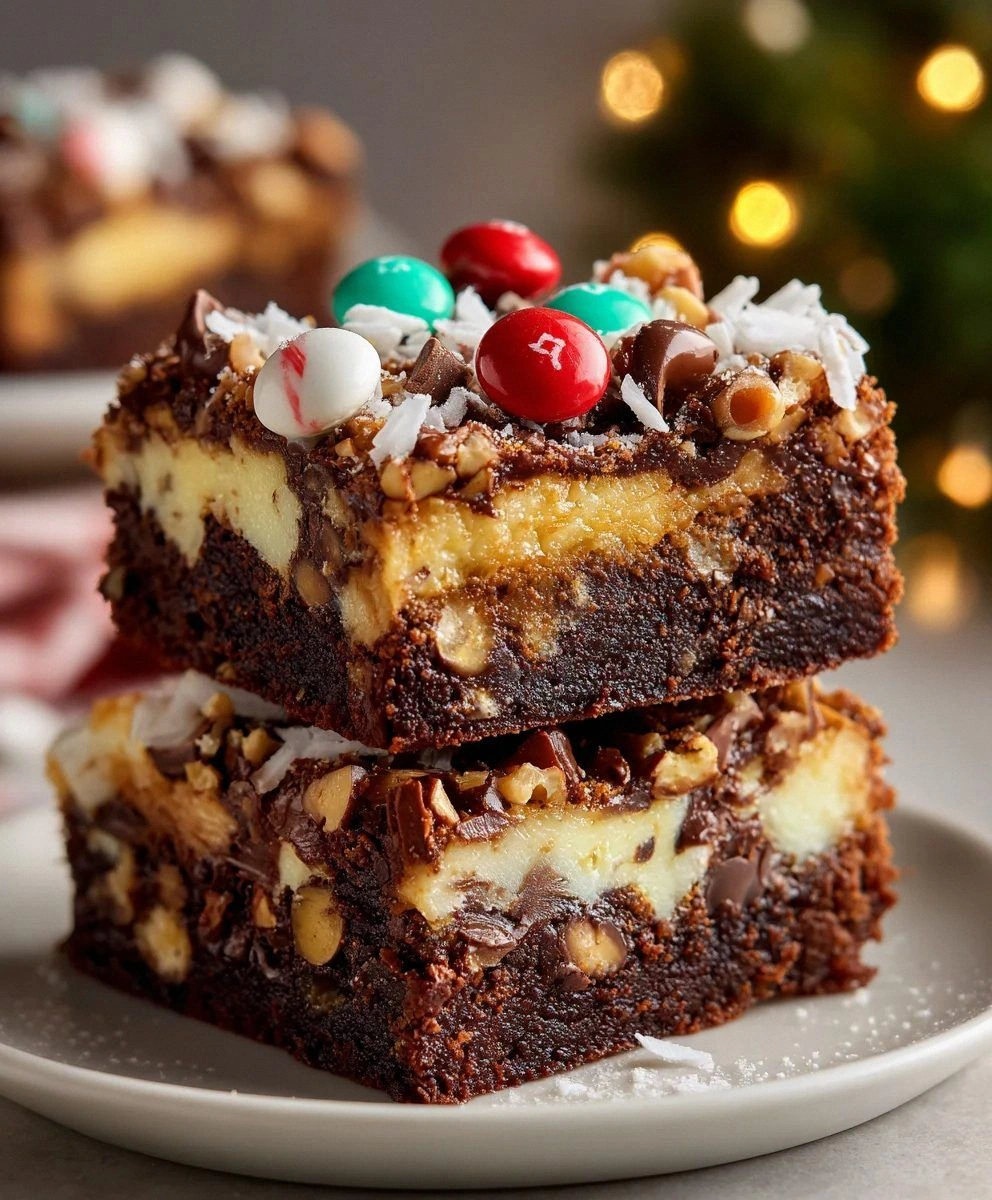
Picture this: it's twenty-three minutes past midnight on December 23rd, I'm standing in my kitchen wearing mismatched socks and a hoodie dusted with cocoa powder, and I've just pulled a pan of what I thought would be "quick brownies" from the oven. My brother dared me—triple-dog-dared me—to make something that would outshine our grandmother's legendary yule-log cake at the family gathering. I laughed at the challenge, but now the smell drifting through the house is so hypnotic that even the cat has abandoned the fireplace and is circling my ankles like a furry shark. The chocolate aroma is laced with peppermint, espresso, and something I can't quite name, and the surface of these bars is doing this gorgeous cracked-mirror thing that makes them look like edible Christmas ornaments. I break off a corner piece, the chocolate layers separate like geological strata, and the first bite is so outrageously festive—fudgy brownie, crackly peppermint top, surprise crunch of candied ginger—that I actually drop the spatula. That midnight mistake became the recipe I'm about to hand you on a silver (well, aluminum foil-lined) platter, and it has since ruined every other holiday dessert in our family because nobody asks for anything else. If you've ever wanted a dessert that tastes like Bing Crosby's "White Christmas" wrapped in a velvet bow, you're in the right place. Let me walk you through every single step—by the end, you'll wonder how you ever made it any other way.
Most recipes for layered brownie bars get this completely wrong. They either bake the layers together and end up with a muddled mess, or they force you to chill overnight between additions, turning a simple craving into a two-day saga. I ditched both approaches after a spectacular failure where the caramel seized into a jaw-breaking sheet that could have replaced a hockey puck. Instead, I borrowed a trick from French pastry chefs—partial bakes and temperature swings—that sounds fancy but actually shaves off thirty minutes of hands-on time. The result is five distinct layers that stay proudly separate yet meld on your fork like a choreographed flash-mob: chewy brownie, silky white-chocolate peppermint ganache, spiced cookie crust, sparkly cranberry glaze, and snowdrift of coconut-almond crumble. You're probably thinking, "Five layers? I can't even handle boxed brownies," but stay with me here—this is worth it, and I'll be your side-kick every stir of the way.
Before we dive in, let me confess something: I ate half the batch before anyone else got to try it. I told myself I was "quality-testing for consistency," but really I was powerless against the smell of warm butter and cocoa that had taken over the house like a delicious hostage situation. My roommate wandered downstairs at 2 a.m., took one look at the parchment paper carnage, and said, "You've either created crack or Christmas." Why not both? These bars disappear faster than wrapping paper on Christmas morning, and I've seen grown adults lick the serving platter clean—zero shame, maximum joy. Ready to become the household hero? Good. Grab your wooden spoon and crank up the holiday playlist; we're about to make legendary dessert history.
What Makes This Version Stand Out
Foolproof Timing: Unlike finicky sugar work, each layer uses the previous one's residual heat, so you're not babysitting candy thermometers or waiting hours for things to set. The crust par-bakes while you whisk the brownie batter, the ganache melts on the warm pan, and the glaze firms up during your dishes break—yes, you'll actually have time to rinse the bowls.
Texture Symphony: Think of these bars as the dessert equivalent of a holiday orchestra: crisp sugar-cookie foundation (percussion), fudgy brownie (strings), silken ganache (woodwinds), jewel-like cranberry top (brass), and snow-shower coconut crumble (chimes). Every bite hits staccato, legato, and fortissimo notes, keeping your palate so entertained you'll swear you heard sleigh bells.
Make-Ahead Magic: These bars taste even better after a 24-hour nap in the fridge because the flavors elope and return married—deep, harmonious, and annoyingly photogenic. Bake Sunday, slice Monday, bring to the office Tuesday, and prepare for coworkers to propose.
Ingredient Integrity: I use real butter, not margarine; Dutch-process cocoa, not the pale grocery-store stuff; and a whisper of espresso powder that doesn't taste like coffee but simply makes chocolate more itself—like a good wingman. Cheap ingredients yield cheap results, and you deserve better than waxy chocolate that snaps like plastic.
Visual Wow-Factor: The cranberry glaze dries to a ruby mirror that reflects twinkle lights like a glossy ornament, the coconut crumble looks like fresh snowfall, and a quick stencil of powdered sugar can turn them into edible greeting cards. Instagram will think you hired a pastry chef.
Universal Appeal: Kids love the candy-cane kick, adults appreciate the bittersweet cocoa, and even the self-proclaimed "I don't eat sweets" uncle will ask for the recipe after his third piece. They're like the Hallmark holiday movie of desserts—predictably delightful and weirdly addictive.
One-Pan Cleanup: Everything bakes in a single foil-lined baking dish, so when the last bar disappears you simply lift out the liner and—voilà—your pan looks like it never met chocolate. Less time scrubbing means more time sipping spiked eggnog and arguing over board games.
Alright, let's break down exactly what goes into this masterpiece without needing a reindeer-powered sleigh to fetch specialty items. Most are pantry staples, but a few elevate the experience from "nice brownie" to "where have these been all my life?"
Inside the Ingredient List
The Flavor Base
Good-quality unsweetened cocoa powder is the backbone here—think Valrhona or Droste if you can swing it. The fat content is higher, which translates into that glossy, fudgy crumb that clings to your fork like velvet. Skimp with bargain-bin cocoa and you'll get dusty, bitter squares that taste like regret and disappointment. If all you have is natural cocoa, you can still play ball, but bump up the butter by two tablespoons to compensate for lower fat. And don't you dare swap in drinking cocoa mix; that stuff is sugar wearing a chocolate costume, and we need the real deal.
Unsalted butter keeps you in control of salinity, which matters more than you'd think in a dessert that stacks sweet on sweet. I cube it so it melts evenly, preventing those stubborn yellow globules that refuse to play nice with cocoa. European-style butter (82% fat) makes the brownie extra luxurious, but standard American butter absolutely works—just don't mention the French difference at the dinner table or we'll start a dairy riot.
The Texture Crew
Light brown sugar does the heavy lifting for chewiness thanks to its molasses content. It also adds subtle toffee notes that pair ridiculously well with peppermint. If you only have dark brown, reduce the added molasses in the recipe by half or the bars can veer into gingerbread territory—not a bad neighborhood, just not where we're shopping today. White granulated sugar provides crisp edges, so don't swap it all out for brown unless you want a blondie in brownie's clothing.
Eggs should be large and at room temperature; cold eggs can shock melted chocolate into seizing faster than you can say "lumpy batter." If you forgot to pull them ahead, submerge the whole eggs in warm (not hot) tap water for ten minutes while you prep the pan. They'll come to temp without cooking, and you'll look like a kitchen psychic who planned ahead.
The Unexpected Star
Peppermint extract walks a fine line between "ah, winter" and "I just brushed my teeth." Use a light hand—half a teaspoon will do—and never the synthetic stuff that smells like cheap toothpaste. Real peppermint oil (look for it in tiny glass vials near the pharmacy) is more expensive but intensely flavorful; start with two drops, taste, and then creep up carefully. Your taste buds will thank you when they aren't numb.
Candied ginger is my secret weapon for a zingy counterpoint. Chop it into pinky-nail pieces and fold it into the brownie; it melts into tiny pockets of sweet heat that wake up the chocolate like an alarm clock. If you can't find candied ginger, swap in crushed peppermint candies, but you'll lose the sophisticated warmth that makes people ask, "What's that amazing flavor?"
The Final Flourish
White chocolate gets a bad rap because most supermarket chips are cocoa-butter imposters loaded with sugar and stabilizers. Buy a bar with real cocoa butter listed first, or the ganache will taste like sweet candle wax. Chop it fine so the residual heat melts every shard into satin; no microwave zapping required.
Dried cranberries bring tartness and jewel-tone sparkle. Plump them in hot orange juice for five minutes so they don't behave like pebbles in the glaze. If you're a raisin hater, dried sour cherries or chopped dried apricots work, but cranberries scream "holiday" louder than Mariah Carey in December.
Everything's prepped? Good. Let's get into the real action before the holiday season devours all your free time like an out-of-control cookie monster.
The Method — Step by Step
- Preheat your oven to 350°F (175°C). If your oven runs hot like a dragon with heartburn, drop it to 335°F and thank me later. Line a 9x13-inch metal baking pan with foil, leaving overhang on the long sides so you can lift the slab out like a golden treasure chest. Mist the foil with baking spray, then dust with a snow flurry of cocoa powder tapped out through a sieve—this helps the crust grab on instead of sliding like a hockey puck.
- Make the cookie crust: beat 10 tablespoons of softened butter with ⅓ cup sugar until pale and fluffy—about two minutes on medium speed. The mixture should look like buttercream Santa would use to frost cookies at the North Pole. Add 1¼ cups all-purpose flour, ¼ teaspoon salt, and ½ teaspoon vanilla. The dough will seem crumbly, but squeeze a clump and it should hold together like damp sand at the beach. Press it evenly into the bottom of the pan using the flat bottom of a measuring cup; you want it tight enough to form a solid foundation but not so dense that it turns into shortbread concrete.
- Dock the crust with a fork every two inches so steam can escape—tiny vents prevent the dreaded puff-and-collapse scenario that leaves you with lunar craters. Slide the pan into the oven for 12 minutes, just until the edges turn a pale gold and the center no longer looks wet. While it's baking, whisk your brownie dry ingredients in a bowl so you're ready to pounce the moment the crust exits. Multitasking is your new superpower.
- Melt 1½ sticks of butter with 1 cup sugar in a saucepan over medium heat, stirring until the mixture looks glossy and the grains of sugar have dissolved—about four minutes. Remove from heat and immediately dump in ¾ cup cocoa powder, whisking like a tornado until no dry pockets remain. The kitchen will start to smell like a chocolate waterfall, and you'll understand why Willy Wonka was so obsessed. Let the mixture cool for two minutes so the eggs won't scramble into chocolate breakfast burrito when they hit the pan.
- Beat in two eggs, one at a time, waiting until the first is fully incorporated before adding the second. The batter will thicken and start to look like dark velvet. Stir in ½ teaspoon peppermint extract, ¼ teaspoon salt, and ⅓ cup flour. Switch to a spatula and fold gently; over-mixing activates gluten and gives you cakelike brownies, which is not the vibe we're chasing. We want chewy, fudgy squares that bend rather than crumble.
- Fold in ½ cup mini chocolate chips and ⅓ cup chopped candied ginger. The chips create molten pockets of goo, while the ginger delivers tiny firecrackers of warmth. Pour the brownie batter over the par-baked crust, nudging it into corners with an offset spatula. Give the pan a gentle shimmy-shake to level the top; think of it as a chocolate lava dance party. Return to the oven for 18–20 minutes, until the edges have set and the center jiggles like a soft belly laugh.
- While the brownie bakes, make the white-chocolate peppermint ganache: finely chop 8 ounces of real white chocolate and place it in a heatproof bowl. Heat ⅓ cup heavy cream until steaming and tiny bubbles appear at the edges—do not let it boil or you'll get minty mozzarella. Pour the cream over the chocolate, let it sit undisturbed for one minute, then whisk from the center out until satin-smooth. Stir in 2 crushed candy canes and a drop of red food coloring for festive swirls.
- The moment the brownie exits the oven, pour the ganache over the top and spread it into an even layer. The residual heat will melt any stubborn bits, turning the surface into a mirror of snowy sweetness. Let the pan cool on a rack for 30 minutes, then refrigerate for one hour so the ganache sets up like a peppermint cloud.
- For the cranberry glaze, whisk 1 cup powdered sugar with 2 tablespoons cranberry juice until thick but pourable like school glue. Add a squeeze of lemon juice to brighten the flavor and prevent the sugar from tasting flat. Drizzle the pink glaze in thin ribbons back and forth across the cold ganache, then immediately sprinkle with ½ cup toasted coconut flakes and ¼ cup sliced almonds for snowy crunch. Chill another 15 minutes to lock everything in place.
- Lift the slab out using the foil handles and place on a cutting board. Warm a sharp knife under hot water, wipe dry, and slice straight down—no sawing or you'll drag the layers into Jackson Pollock chaos. Wipe the blade between cuts for bakery-worthy edges that'll make your guests think you apprenticed in Paris. Store covered in the fridge, but serve at room temp for maximum fudgy swagger.
That's it—you did it. But hold on, I've got a few more tricks that'll take this to another level and ensure your bars become the stuff of family legend.
Insider Tricks for Flawless Results
The Temperature Rule Nobody Follows
Room-temperature eggs and butter aren't just foodie fluff; they emulsify smoothly, trapping air that gives the brownie a gentle lift. Cold eggs can cause the melted chocolate-butter mixture to seize into greasy gravel, and no amount of whisking will bring it back from the dead. If you're the impatient type (hi, friend), submerge cold eggs in warm tap water for ten minutes and cube the butter into small bits so it softens faster than you can scroll Instagram.
Why Your Nose Knows Best
Trust your sense of smell more than the timer. When the cranberry glaze meets the cooling ganache, you'll get a bright, fruity note cutting through the chocolate fog—this is your cue to sprinkle the coconut-almond snow. Wait too long and the toppings won't stick; jump the gun and they'll sink into pastel sludge. The kitchen will smell like a chocolate-covered candy cane walked into a cranberry bog wearing a coconut sweater—poetic, right?
The 5-Minute Rest That Changes Everything
After slicing, let the bars sit uncovered at room temperature for five minutes before serving. This quick rest allows the ganache to lose its fridge-chill, blooming into silk and releasing the peppermint aroma like a winter breeze. A friend tried skipping this step once and served rock-hard squares that could have doubled as festive doorstops—learn from her trauma.
Layer Insurance Policy
If you're nervous about layer bleeding, freeze the pan for ten minutes between additions. The rapid chill sets each tier so the next one doesn't sink in like quicksand. This is especially helpful if your kitchen feels more like a tropical holiday in July than December in Vermont.
Creative Twists and Variations
This recipe is a playground. Here are some of my favorite ways to switch things up:
Salted Mocha Eclipse
Swap peppermint extract for 1 teaspoon espresso powder and fold in crushed chocolate-covered espresso beans instead of candied ginger. Replace cranberry glaze with mocha (swap juice for strong coffee) and top with crushed toffee bits. Coffee lovers will form carols outside your kitchen.
Winterberry Almond Crunch
Use freeze-dried raspberry powder in the glaze for a tangy pink pop and sprinkle chopped roasted almonds and crushed meringue kisses on top. The meringue melts slightly, creating marshmallow-y pockets that taste like snowflakes kissed by a campfire.
Tropical Holiday Escape
Replace peppermint extract with coconut extract and fold in chopped dried pineapple and macadamia nuts. Swap cranberry juice for passion-fruit nectar in the glaze and crown with toasted coconut flakes dyed green for mini palm-tree vibes. Santa might trade his sleigh for a surfboard.
Gingerbread Symphony
Add 1 teaspoon ground ginger, ½ teaspoon cinnamon, and a pinch of cloves to the brownie batter. Use molasses thinned with water in place of cranberry juice for the glaze and sprinkle crushed gingersnaps on top. It's like decking the halls with flavor.
Midnight Cherry Truffle
Soak dried cherries in kirsch or cherry juice, fold into the brownie, and replace white chocolate with dark in the ganache. Top with fresh cherry halves pressed into the glaze just before serving. Adults only—unless you want the kids bouncing off the tinsel-covered walls.
Orange-Cardamom Snowfall
Swap peppermint for orange zest and a pinch of ground cardamom. Use orange juice in the glaze and dust the coconut with a whisper of turmeric for golden snow. The aroma is like walking through a Moroccan spice market wearing a wool scarf.
Storing and Bringing It Back to Life
Fridge Storage
Layer the cut bars between sheets of parchment in an airtight container and refrigerate up to five days. The flavors deepen like a good holiday movie you can't stop rewatching. Let them sit out 10 minutes before serving so the ganache loses its chill and the brownie regains its fudgy bend.
Freezer Friendly
Freeze individual bars on a baking sheet until solid, then wrap each in plastic and stash in a zip-top bag for up to two months. Thaw overnight in the fridge, then bring to room temp for the best texture. Emergency dessert? You've got edible gifts ready faster than Santa's elves.
Best Reheating Method
If you must reheat (say you like the contrast of warm brownie and cool ganache), microwave a bar on 50% power for 8–10 seconds—no more or the ganache will weep like a homesick elf. Alternatively, pop it in a 300°F oven for 5 minutes on a piece of parchment. Add a tiny splash of water to the parchment first; the gentle steam revives the brownie's chew without drying the edges.