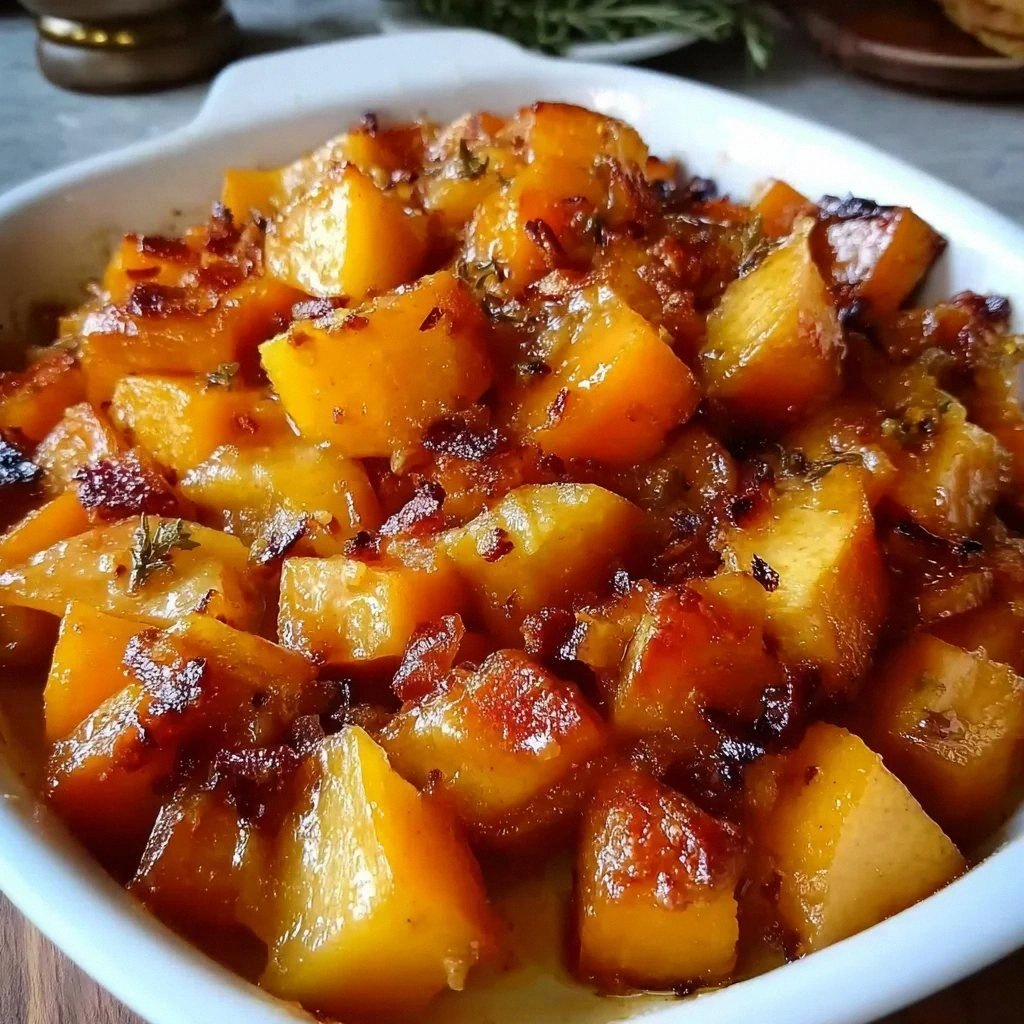
I still remember the day I almost set my kitchen on fire trying to roast butternut squash. There I was, juggling a hot pan, a dull knife, and a stubborn squash that refused to be tamed. Thirty minutes later, with smoke billowing from my oven and my dignity in tatters, I emerged with a tray of charred orange chunks that looked more like Halloween decorations than dinner. Fast forward three years of obsessive testing, and I've cracked the code to the most outrageously delicious butternut squash apple bake you'll ever taste. This isn't just another side dish recipe floating around the internet — this is the one that made my notoriously picky brother request seconds, then thirds, then the entire baking dish. The combination of caramelized squash edges, tender apples that hold their shape, and those warm spices that make your whole house smell like autumn wrapped in a blanket? Pure magic.
Picture this: It's Sunday afternoon, you've got your favorite playlist humming in the background, and the most incredible aroma is wafting from your oven. Your neighbors are probably wondering what kind of bakery moved in next door. That first bite hits you with sweetness from the roasted squash, then a bright pop from the apples, followed by the warmth of cinnamon and nutmeg dancing on your tongue. The edges get these gorgeous caramelized bits that provide a slight crunch, while the insides stay creamy and luxurious. I dare you to taste this and not go back for seconds — actually, I dare you to stop at seconds. I'll be honest — I ate half the batch before anyone else got to try it during my last test run. My excuse? Quality control, obviously.
What makes this version different from every other butternut squash recipe out there? Most recipes get this completely wrong by treating squash like potatoes — they either undercook it and you get that unpleasant raw squash texture, or they overcook it into baby food mush. Here's what actually works: we're going to roast the squash at two different temperatures, add the apples at exactly the right moment, and use a technique that creates those coveted crispy edges while keeping everything tender inside. Plus, I've discovered a game-changing ingredient addition that you'll never see coming. Stay with me here — this is worth it.
Let me walk you through every single step — by the end, you'll wonder how you ever made it any other way. We're talking about transforming humble vegetables into something that tastes like it came from a fancy farm-to-table restaurant, except you made it in your pajamas on a Tuesday. Okay, ready for the game-changer?
What Makes This Version Stand Out
Double-Temperature Roasting: We start hot to get those gorgeous caramelized edges, then drop the temperature to finish cooking everything through without drying it out. This technique is what separates amateur hour from restaurant-quality results. The high heat creates Maillard reactions on the squash that give you those deep, complex flavors you can't get any other way.
Apple Timing Perfection: Most recipes toss everything together and hope for the best. Not here. We add the apples after the squash has had a head start, so they stay perky and maintain their texture instead of dissolving into apple sauce. The result is distinct bites of sweet-tart apple that pop against the creamy squash.
The Butter Ratio: Too little and everything tastes dry and sad. Too much and you're swimming in grease. After testing dozens of batches, I've nailed the perfect ratio that coats every piece in silky richness without making it heavy. Coconut oil works beautifully too if you're dairy-free — the coconut flavor actually complements the sweetness perfectly.
Spice Balance That Actually Works: Cinnamon and nutmeg can go from warm and cozy to potpourri nightmare in seconds. This blend hits that sweet spot where the spices enhance rather than overpower. The cinnamon brings warmth, the nutmeg adds depth, and together they make your kitchen smell like you've been baking all day.
Make-Ahead Magic: This dish actually improves as it sits, making it perfect for holiday meals or dinner parties. The flavors meld together beautifully, and you can reheat it without losing that just-baked texture. I've served this at Thanksgiving three years running, and it's always the first dish to disappear.
Crowd-Pleasing Sweet Spot: Kids love it because it's naturally sweet. Adults love it because it's sophisticated enough for a dinner party. Vegetarians love it as a main. Meat-eaters love it as a side. It's basically the Switzerland of side dishes — everyone gets along with it.
Alright, let's break down exactly what goes into this masterpiece...
Inside the Ingredient List
The Flavor Base
The butternut squash is obviously the star here, but not all squash are created equal. You want one that feels heavy for its size and has a matte skin — shiny skin means it was picked too early. A medium squash, about two to three pounds, gives you the perfect ratio of flesh to skin. The natural sweetness intensifies during roasting, developing those gorgeous caramel notes that make this dish addictive. If you can't find butternut, buttercup or kabocha squash work beautifully too — they're even sweeter and creamier.
When it comes to apples, firm is the name of the game. Granny Smith brings that bright, tart contrast that makes the sweet squash sing, while Honeycrisp adds honeyed notes and holds up like a champ during roasting. Avoid soft apples like Red Delicious — they'll turn to mush and make the whole dish sad and watery. The apples should be slightly underripe if anything, they'll soften perfectly as they bake. Cut them into chunks about the same size as your squash pieces so everything cooks evenly.
The Texture Crew
Butter is what makes this dish feel luxurious rather than virtuous. It coats everything in golden richness and helps those edges get crispy and irresistible. If you're dairy-free, coconut oil is honestly incredible here — it adds a subtle tropical note that plays beautifully with the squash and apples. The key is using just enough to coat everything without making it greasy. Melt it first so it mixes evenly, ensuring every piece gets its fair share of richness.
Cinnamon is the warm hug that brings everything together, but it needs to be fresh. That jar that's been in your spice rack since 2019? It's not doing you any favors. Fresh cinnamon has a sweet, almost floral aroma that transforms this dish from good to unforgettable. Don't be tempted to add more than the recipe calls for — too much cinnamon overwhelms everything and gives it that artificial red-hot candy flavor.
The Unexpected Star
Nutmeg is where most recipes go wrong — they either skip it entirely or add way too much. Just a pinch adds incredible depth and complexity, but too much makes everything taste like eggnog. Fresh grated nutmeg is worth seeking out; it's warm and nutty with none of the bitterness you get from pre-ground. If you only have pre-ground, use slightly less since it's more concentrated.
That optional maple syrup? Don't skip it, especially if you're serving this to kids or as part of a holiday meal. Just a tablespoon or two amplifies all the natural sweetness and creates the most gorgeous glaze on the vegetables. Dark maple syrup has a more robust flavor that stands up to roasting, while the lighter stuff is more delicate. Either works, just adjust based on how sweet your apples and squash are.
The Final Flourish
Salt and pepper aren't just afterthoughts here — they're essential for making all the sweet flavors pop. Without enough salt, the dish tastes flat and one-dimensional. A generous pinch of flaky sea salt added right before serving creates these delightful salty-sweet bursts that make people close their eyes in happiness. Freshly cracked black pepper adds just enough bite to keep things interesting, but go easy — you want a whisper, not a shout.
Everything's prepped? Good. Let's get into the real action...
The Method — Step by Step
- Preheat your oven to 425°F and position the rack in the middle. This high temperature is crucial for getting those gorgeous caramelized edges on the squash. While the oven heats, grab your biggest rimmed baking sheet — not a casserole dish, not a cake pan, but a proper sheet pan with low sides that let steam escape. If all you have is a 9x13 pan, it'll work, but your edges won't get quite as crispy. Line it with parchment paper for easy cleanup, unless you enjoy scrubbing caramelized sugar off metal like some kind of kitchen masochist.
- Peel, seed, and cube your butternut squash into 1-inch pieces. Don't stress about perfect cubes — rustic and chunky is what we're after. Just try to keep them roughly the same size so they cook evenly. That neck part of the squash? Dice that up too, it's the sweetest part. Toss the squash in a large bowl with half the melted butter, salt, pepper, and all the cinnamon. Make sure every piece gets coated — those nooks and crannies need love too. Spread it out on your prepared baking sheet in a single layer, no overlapping or it'll steam instead of roast.
- Slide that tray into your hot oven and set a timer for 20 minutes. This is when the magic starts happening — the squash edges will start to brown and caramelize, creating those incredible flavors. Don't open the oven door to peek, no matter how good it smells. That sizzle when it hits the pan? Absolute perfection. While it roasts, prep your apples and mix up the remaining butter with the nutmeg.
- After 20 minutes, pull out the pan and give everything a good stir. The squash should have some nice golden spots and be starting to soften. Now it's apple time — scatter those apple chunks over the top and drizzle with the remaining butter mixture. Don't stir them in completely; you want them to sit on top where they can get a little caramelization without turning to mush. If you're using maple syrup, drizzle it over now for that gorgeous glaze.
- Drop the oven temperature to 375°F and slide the pan back in for another 15-20 minutes. This lower temperature lets everything finish cooking through without burning the edges. The apples should be tender but still hold their shape, and the squash should be creamy inside with those crave-worthy crispy edges. Start checking at 15 minutes — you want the apples just soft enough that a fork slides in easily but they don't collapse when you stir them.
- Remove from the oven and let it rest for 5 minutes. This is the hardest part because it smells incredible and you want to dive in immediately. But those few minutes let the flavors settle and the temperature even out. Plus, molten-hot squash has a way of burning tongues and ruining the whole experience. Sprinkle with a little flaky salt while it's still hot so it adheres to the glossy vegetables.
- Garnish if you're feeling fancy — some toasted pecans add amazing crunch, or a few sage leaves crisped in butter would make this dinner party worthy. But honestly, it's perfect just as is. The colors should be vibrant oranges and golden yellows with ruby-red apple skins peeking through. Serve it up and watch how fast it disappears.
- Store any leftovers in an airtight container in the fridge for up to 4 days. The flavors actually improve overnight as everything melds together. Reheat in a 350°F oven for best results, though the microwave works in a pinch. Add a splash of water or apple juice when reheating to bring back that just-baked moisture.
- This recipe doubles beautifully for a crowd — just use two sheet pans and rotate them halfway through cooking. Don't crowd everything onto one pan or you'll end up with steamed vegetables instead of roasted perfection. For a smaller batch, you can halve everything, but honestly, you'll wish you made the full batch once you taste how good the leftovers are.
That's it — you did it. But hold on, I've got a few more tricks that'll take this to another level...
Insider Tricks for Flawless Results
The Temperature Rule Nobody Follows
Here's the thing about oven temperature — it matters way more than most recipes let on. If your oven runs hot (and most home ovens do), that 425°F becomes 450°F and suddenly your beautiful squash is charred on the outside and raw in the middle. Get an oven thermometer and trust it over your dial setting. A friend tried skipping this step once — let's just say it didn't end well, and her smoke alarm has never quite recovered. The high-then-low method isn't just for show — it creates that perfect contrast between crispy edges and creamy centers that makes people wonder what your secret is.
Why Your Nose Knows Best
Your sense of smell is actually the best timer for this recipe. When the cinnamon starts to smell toasty rather than sharp, that's when the squash edges are caramelizing perfectly. If it starts to smell nutty and almost buttery, you know those edges are getting good and brown. That aroma should fill your kitchen with warmth and make you impatient for dinner. When you can smell the apples mingling with the spices, that's your cue that the second phase of cooking is working its magic.
The 5-Minute Rest That Changes Everything
Those five minutes of resting time aren't just about avoiding burnt tongues. As the vegetables sit, the steam redistributes moisture throughout, making everything more succulent. The flavors actually intensify as they have a moment to meld together. Plus, the slight cooling lets the natural sweetness really shine — when it's piping hot, your taste buds can't pick up the subtle flavors. Think of it like letting a steak rest, except for vegetables.
The Cutting Size Sweet Spot
Size matters more than you'd think here. Too small and you get mushy vegetable confetti. Too large and the centers stay crunchy while the outsides burn. One-inch pieces are the goldilocks size — they cook through in the time it takes to get those gorgeous caramelized edges. If you can't eyeball it, use a ruler the first few times. Soon you'll be able to cut perfect pieces without thinking, and your roasting game will level up significantly.
Seasoning Timing That Actually Matters
Adding salt at two different stages is the secret handshake of this recipe. The first addition seasons the squash as it roasts, drawing out moisture and concentrating flavors. The final sprinkle of flaky salt adds texture and those delightful salty-sweet bursts that make people close their eyes when they taste it. Don't skip either step — they're both crucial for different reasons. The first is about building flavor, the second is about finishing with flair.
Creative Twists and Variations
This recipe is a playground. Here are some of my favorite ways to switch things up:
The Savory Herb Version
Swap the cinnamon and nutmeg for fresh rosemary and thyme, add some caramelized onions, and finish with a drizzle of balsamic glaze. The herbs bring out the squash's savory side while the balsamic adds tangy complexity. This version pairs beautifully with roasted chicken or pork tenderloin. The onions get meltingly sweet and create these incredible jammy bits throughout. It's like autumn on a plate but in a completely different flavor profile.
The Breakfast Hash Transformation
Cube everything smaller, add some breakfast sausage pieces, and crack a few eggs right on top during the last 10 minutes of cooking. The eggs bake into the vegetables, creating these pockets of creamy richness. Finish with some hot sauce and you've got a brunch dish that'll make you cancel your restaurant reservations. The sweetness of the vegetables against the savory sausage is morning perfection.
The Curry Night Remix
Replace the cinnamon and nutmeg with curry powder, add some chickpeas, and finish with cilantro and a squeeze of lime. The warm spices complement the natural sweetness of the vegetables in a completely different way. A dollop of yogurt on top takes it from side dish to vegetarian main course. The curry powder should be fragrant but not overwhelming — you want to taste the vegetables, not just the spices.
The Holiday Showstopper
Add some fresh cranberries for tart pops of color, swap the maple syrup for brown sugar, and top with candied pecans. The cranberries burst during roasting, creating these gorgeous ruby pockets that look stunning on a holiday table. The candied pecans add crunch and make it feel special enough for Thanksgiving dinner. This version has converted more squash skeptics than I can count — something about the tart berries against the sweet vegetables just works.
The Mediterranean Mashup
Trade the butter for olive oil, add some chopped kalamata olives and feta cheese during the last 5 minutes of cooking. The briny olives and salty feta create this incredible contrast with the sweet vegetables. Finish with some fresh oregano and a squeeze of lemon. It's like taking your taste buds on a trip to Greece while keeping the comfort food vibes. The key is not adding the feta too early or it'll melt into a puddle.
The Spice Market Edition
Add a pinch of cardamom and some chopped dates for a North African twist. The cardamom adds this exotic floral note while the dates melt into sticky pockets of sweetness. Some toasted almonds on top add crunch and make it feel special enough for company. A little harissa stirred in at the end adds gentle heat that builds slowly. This version is what I make when I want to impress dinner guests who think they've tasted every squash preparation possible.
Storing and Bringing It Back to Life
Fridge Storage
Let the bake cool completely before storing — hot vegetables in a sealed container create condensation that leads to soggy, sad leftovers. Store in an airtight container for up to 4 days, though I doubt it'll last that long. The flavors actually intensify overnight, making leftovers something to look forward to rather than tolerate. Press plastic wrap directly against the surface if you're storing for more than a day — this prevents the top from drying out and developing that weird fridge skin.
Freezer Friendly
This freezes beautifully for up to 3 months, which makes it perfect for meal prep or holiday planning. Let it cool completely, then portion into freezer bags, squeeze out all the air, and lay flat to freeze. This saves space and lets you break off just what you need. Thaw overnight in the fridge for best results, though you can defrost in the microwave if you're impatient. The texture won't be quite as perfect as fresh, but the flavors are still incredible.
Best Reheating Method
The oven is your friend here — 350°F for about 10 minutes with a splash of water or apple juice to create steam and bring back that just-baked texture. Cover with foil for the first half to prevent drying, then uncover to let the edges crisp up again. The microwave works in a pinch, but it tends to make everything a bit mushy. Add a tiny splash of water before reheating — it steams back to perfection and prevents that dried-out leftover taste.