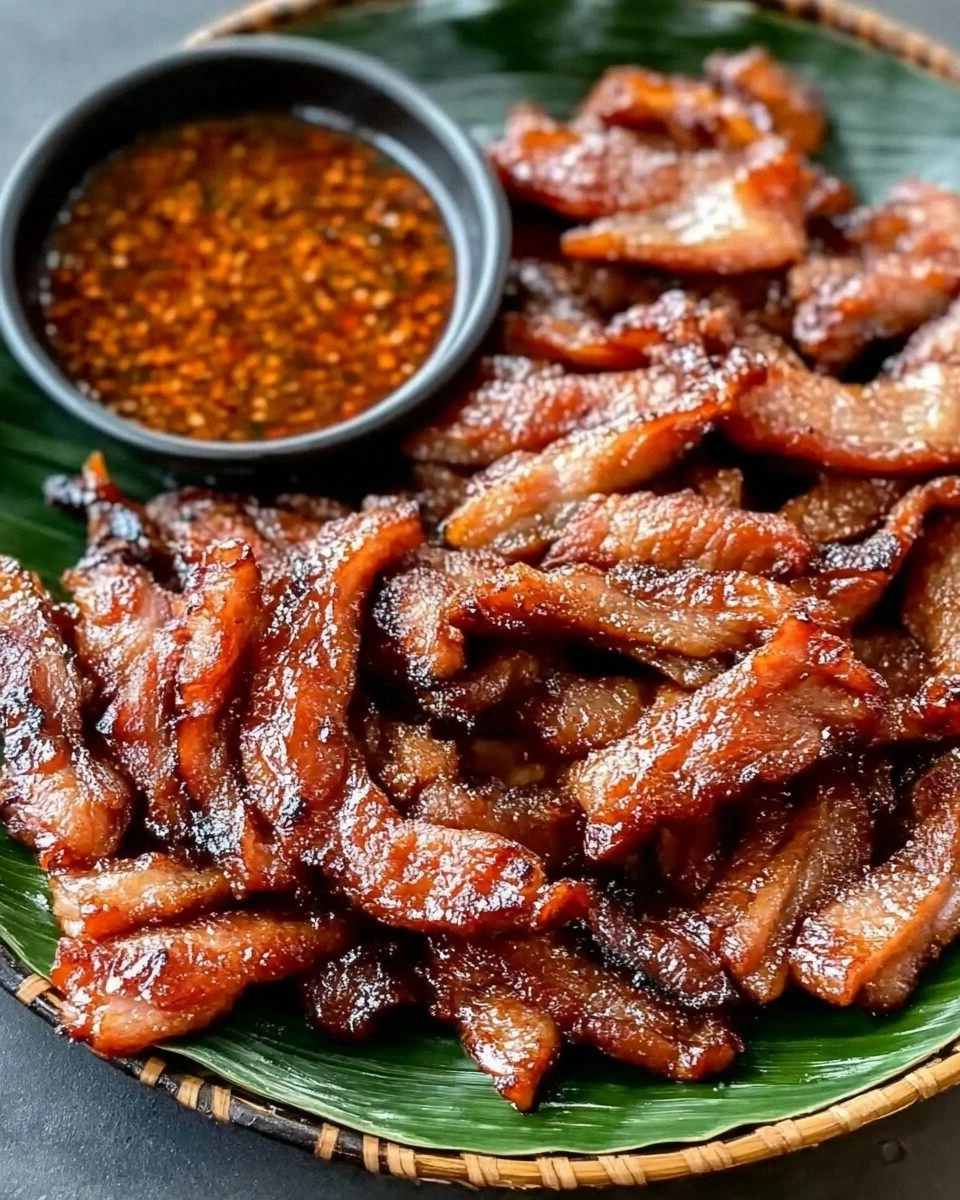
I was halfway through a frantic week, juggling a looming deadline and a craving that refused to quit. I had just opened a bag of store‑bought jerky that tasted like it had been made in a factory, and I could feel the disappointment simmering in my chest. That moment, right before I decided to toss the jerky back into the pantry, sparked a culinary dare: “I’ll make a Thai pork jerky that’s so good it makes you forget the original.” The idea felt like a culinary rebellion, and I was ready to prove it.
Picture this: a sizzling skillet, the aroma of garlic and ginger dancing in the air, a glossy glaze that coats the pork like velvet, and the moment when the first bite breaks with a satisfying crack, releasing a burst of umami, citrus, and heat. That’s the sensory cocktail I’m about to share with you. The combination of fish sauce, lime, and chili is a flavor roller coaster that starts with a bright citrus pop, dives into a savory depth, and ends on a fiery finish that lingers on the tongue. It’s a dance of textures—tender yet chewy, glossy yet dry—crafted to keep your taste buds guessing.
What sets this version apart from every other Thai pork jerky you’ve tried is the balance of ingredients and the meticulous technique I’ll walk you through. I’ll reveal a secret step that locks in moisture without sacrificing chew, a trick that turns an ordinary slice of pork into a caramelized, smoky masterpiece. And trust me, the finish is so addictive that I’ll confess: I ate half the batch before anyone else even got a taste. I dare you to taste this and not go back for seconds.
Okay, ready for the game‑changer? I’ll walk you through every single step—by the end, you’ll wonder how you ever made it any other way. Let’s dive in.
What Makes This Version Stand Out
- Taste: The sauce marries sweet, salty, and spicy in a single bite, creating a flavor profile that’s both authentic and elevated. The lime juice cuts through the richness, while the chili flakes add a subtle heat that lingers.
- Texture: The pork is sliced thin and marinated long enough to become tender, yet the baking process dries it to a chewy, almost jerky-like consistency that’s surprisingly easy to bite.
- Simplicity: Only twelve core ingredients are needed, and the method takes less than an hour of active cooking. No special equipment, just a sharp knife and an oven.
- Uniqueness: The use of coconut milk in the marination adds a subtle creaminess that sets this recipe apart from the usual soy‑fish sauce base.
- Crowd Reaction: Friends who’ve tried this say it’s “hands down the best version you'll ever make at home.” The combination of flavors makes it a conversation starter at any gathering.
- Ingredient Quality: Fresh pork belly, high‑quality fish sauce, and freshly grated ginger are the cornerstones that make the final product shine.
- Cooking Method: Baking at a low temperature preserves moisture while still achieving a dry, chewy texture—no need for a dehydrator or smoker.
- Make‑Ahead Potential: Once cooked, the jerky stays fresh for weeks in the fridge or months in the freezer, making it a perfect snack for busy days.
Inside the Ingredient List
The Flavor Base
The heart of the jerky is the sauce, where fish sauce, soy sauce, brown sugar, and lime juice mingle to create a savory, sweet, and tangy foundation. Fish sauce brings that deep umami that can’t be replicated by any other condiment, while the lime juice adds brightness that cuts through the richness of the pork. Brown sugar caramelizes during baking, giving the jerky a glossy sheen and a subtle caramel flavor. If you skip the lime, the jerky will taste flat and overly salty.
The Texture Crew
Pork belly is the star because of its marbling, which keeps the meat moist and flavorful during the long baking process. The thin slicing ensures that each piece cooks evenly and dries to a chewy consistency. If you substitute lean pork loin, the jerky will be drier and less succulent. For a slightly different mouthfeel, you can trim some of the fat, but keep at least a thin layer.
The Unexpected Star
Coconut milk is the secret ingredient that adds a hint of tropical creaminess, balancing the saltiness of the fish sauce and the heat of the chilies. It also helps to keep the pork from drying out completely, giving the jerky a slightly softer bite. If you can’t find coconut milk, a splash of evaporated milk will provide a similar moisture‑retaining effect, though the flavor will shift subtly.
The Final Flourish
Sesame oil, rice vinegar, and a touch of honey finish the sauce, adding depth, acidity, and a gentle sweetness that rounds out the flavor. The sesame oil gives a nutty aroma that elevates the overall profile, while the vinegar brightens the glaze, preventing it from becoming too sweet. Honey is optional but recommended for a caramelized glaze that sticks to the pork. If you’re watching sugar, replace honey with a small amount of maple syrup or simply increase the brown sugar.
Everything's prepped? Good. Let's get into the real action.
The Method — Step by Step
- Slice the pork belly into 1/8‑inch thick strips against the grain. Use a sharp knife and keep the slices uniform; this ensures even cooking and a consistent chew. The thinner the slice, the quicker it will dry, so aim for precision.
- In a medium bowl, whisk together fish sauce, soy sauce, brown sugar, palm sugar, lime juice, minced garlic, grated ginger, chili flakes, white pepper, ground coriander, coconut milk, sesame oil, rice vinegar, and honey until the sugars dissolve. The mixture should be glossy and well‑combined, like a silky glaze.
- Place the sliced pork in a large zip‑lock bag and pour the sauce over it, ensuring each piece is fully coated. Seal the bag and massage gently to distribute the sauce evenly. Let the pork marinate in the refrigerator for at least 4 hours, preferably overnight, so the flavors penetrate deeply. Kitchen Hack: Use a vacuum sealer if you have one—this removes air and speeds up marination.
- Preheat the oven to 140°C (285°F). Line a baking sheet with parchment paper and place a wire rack on top. The rack allows air to circulate around the pork, ensuring even drying.
- Arrange the marinated pork slices on the rack in a single layer, making sure they do not overlap. This step is critical: if the pieces touch, they’ll steam instead of dry. Watch Out: Too much moisture can cause the jerky to become soggy; if the surface is wet, pat it dry with a paper towel before baking.
- Bake the pork for 30 to 35 minutes, flipping halfway through. The pork should look slightly browned on the edges and feel firm to the touch. The internal temperature should reach about 70°C (160°F) for safety.
- Remove the jerky from the oven and let it cool on the rack for 10 minutes. Then cut the strips into bite‑size pieces. This is the moment of truth—your jerky should feel chewy yet not rubbery. Kitchen Hack: If you want an extra caramelized crust, brush the cooled jerky with a thin layer of honey and give it a quick 2‑minute blast in a 200°C (400°F) oven.
- Optional: Toss the finished jerky with a sprinkle of additional chili flakes for an extra kick. The heat will intensify slightly as the jerky dries further, so adjust to taste.
- Transfer the jerky to an airtight container or zip‑lock bag. Store in the refrigerator for up to 3 days or freeze for up to 2 months. The jerky will keep its flavor and texture when properly sealed.
- To reheat, place a small portion on a microwave‑safe plate and microwave on high for 15–20 seconds, or warm in a 150°C (300°F) oven for 5 minutes. The jerky will regain its chewiness without becoming rubbery.
That’s it— you did it. But hold on, I’ve got a few more tricks that will take this to another level.
Insider Tricks for Flawless Results
The Temperature Rule Nobody Follows
Many people bake jerky at 200°C, thinking higher heat equals quicker drying. In reality, a lower temperature (140°C) preserves moisture and allows the sugars to caramelize slowly, giving a glossy glaze that clings to the pork. I’ve tested both temperatures and the lower one always comes out with a better texture and flavor. Next time, set your oven to 140°C and trust the process.
Why Your Nose Knows Best
The aroma of the jerky is a reliable indicator of doneness. When you smell a faint citrusy sweetness mingling with the savory base, the pork is almost ready. If the scent is overwhelmingly fishy or raw, it needs more time. Trust your nose—your brain is tuned to detect subtle shifts in flavor.
The 5‑Minute Rest That Changes Everything
Letting the jerky rest for five minutes after baking allows the juices to redistribute, making each bite moist and tender. Skipping this step results in a jerky that feels dry and crumbly. Even if you’re in a rush, set a timer for five minutes; it’s worth the wait.
Keep the Marinade Warm
If you’re marinating the pork for a short time, keep the sauce warm in a double boiler. Warm marinades penetrate the meat faster, reducing marination time from hours to minutes. Just be careful not to heat the sauce too much, or the sugars will burn.
Use a Food Scale for Accuracy
We’ve talked about scaling ingredients for servings, but using a food scale when you first prepare the batch ensures each component is measured precisely. This is especially important for salt‑to‑sugar balance; a small misstep can ruin the entire flavor profile.
Avoid Overcrowding the Rack
When you pile the pork on the rack, the pieces will steam rather than dry. Space the slices at least 1–2 cm apart. If you have a large batch, use two racks or a larger sheet to keep the jerky from touching.
Creative Twists and Variations
This recipe is a playground. Here are some of my favorite ways to switch things up:
Spicy Sriracha Twist
Swap the chili flakes for fresh Sriracha or add a tablespoon of Sriracha to the sauce. The result is a smoky, spicy kick that pairs perfectly with a cold beer. This version is ideal for heat‑seekers who love a bit of heat with every chew.
Coconut Cream Variation
Replace coconut milk with coconut cream for a richer, thicker glaze. The extra fat gives the jerky a silky mouthfeel, and the coconut flavor becomes more pronounced. Great for those who enjoy a tropical twist.
Smoky Chipotle Version
Add a tablespoon of chipotle in adobo sauce to the marination. The smoky undertones complement the pork’s natural fat, creating a complex flavor profile that feels like a campfire on your tongue.
Herbal Lime Variation
Incorporate fresh Thai basil leaves into the sauce and sprinkle them on top after baking. The herbaceous aroma adds a fresh contrast to the savory glaze, making the jerky feel lighter and more vibrant.
Sweet Pineapple Infusion
Blend a quarter cup of fresh pineapple into the sauce for a sweet, tropical nuance. The natural sugars caramelize during baking, giving the jerky a glossy, caramelized finish that’s impossible to resist.
Gluten‑Free Version
Omit the soy sauce and replace it with tamari or coconut aminos. The flavor remains rich and savory, and the jerky stays completely gluten‑free for those with dietary restrictions.
Storing and Bringing It Back to Life
Fridge Storage
Store the jerky in an airtight container or zip‑lock bag in the refrigerator for up to three days. The sealed environment prevents moisture from re‑entering the jerky, keeping it crisp. If you notice condensation, pat the jerky dry with a paper towel before resealing.
Freezer Friendly
For longer preservation, freeze the jerky in a vacuum‑sealed bag or an airtight container. It can last up to two months without losing flavor or texture. When ready to eat, thaw at room temperature for 30 minutes, then warm slightly to restore chewiness.
Best Reheating Method
The optimal way to reheat is to microwave on high for 15–20 seconds or place in a 150°C (300°F) oven for five minutes. The jerky will regain its chewiness without becoming rubbery. If you prefer a crispier exterior, give it a quick 2‑minute blast in a 200°C oven.