Picture this: I’m in my cramped kitchen, a stack of leftover chicken on the counter, and a sudden craving for something comforting but quick. The oven is already preheated for a pie I’m trying to rescue, so I’m juggling a saucepan, a rolling pin, and a half‑filled skillet. I’m about to unleash a culinary experiment that would make my neighbor’s taste buds do a double‑take. I’ve been told I’m terrible at making pot pies—my crusts always come out soggy, my fillings too watery, and my kids have never been convinced. But today, I’m about to flip that narrative on its head.
The moment I drop the first handful of flour into the bowl, the room fills with that comforting, slightly sweet scent of raw dough. I can hear the sizzle when the onions hit the pan, the gentle crackle of carrots releasing their sugars, and the subtle pop of peas as they thaw. My senses are on high alert: the sight of the golden crust forming, the aroma of thyme and rosemary mingling with the buttery base, the sound of the sauce thickening, the feel of the dough clumping under my fingertips, and the promise of that first bite that will melt in my mouth. It’s a sensory symphony that’s begging for a second round.
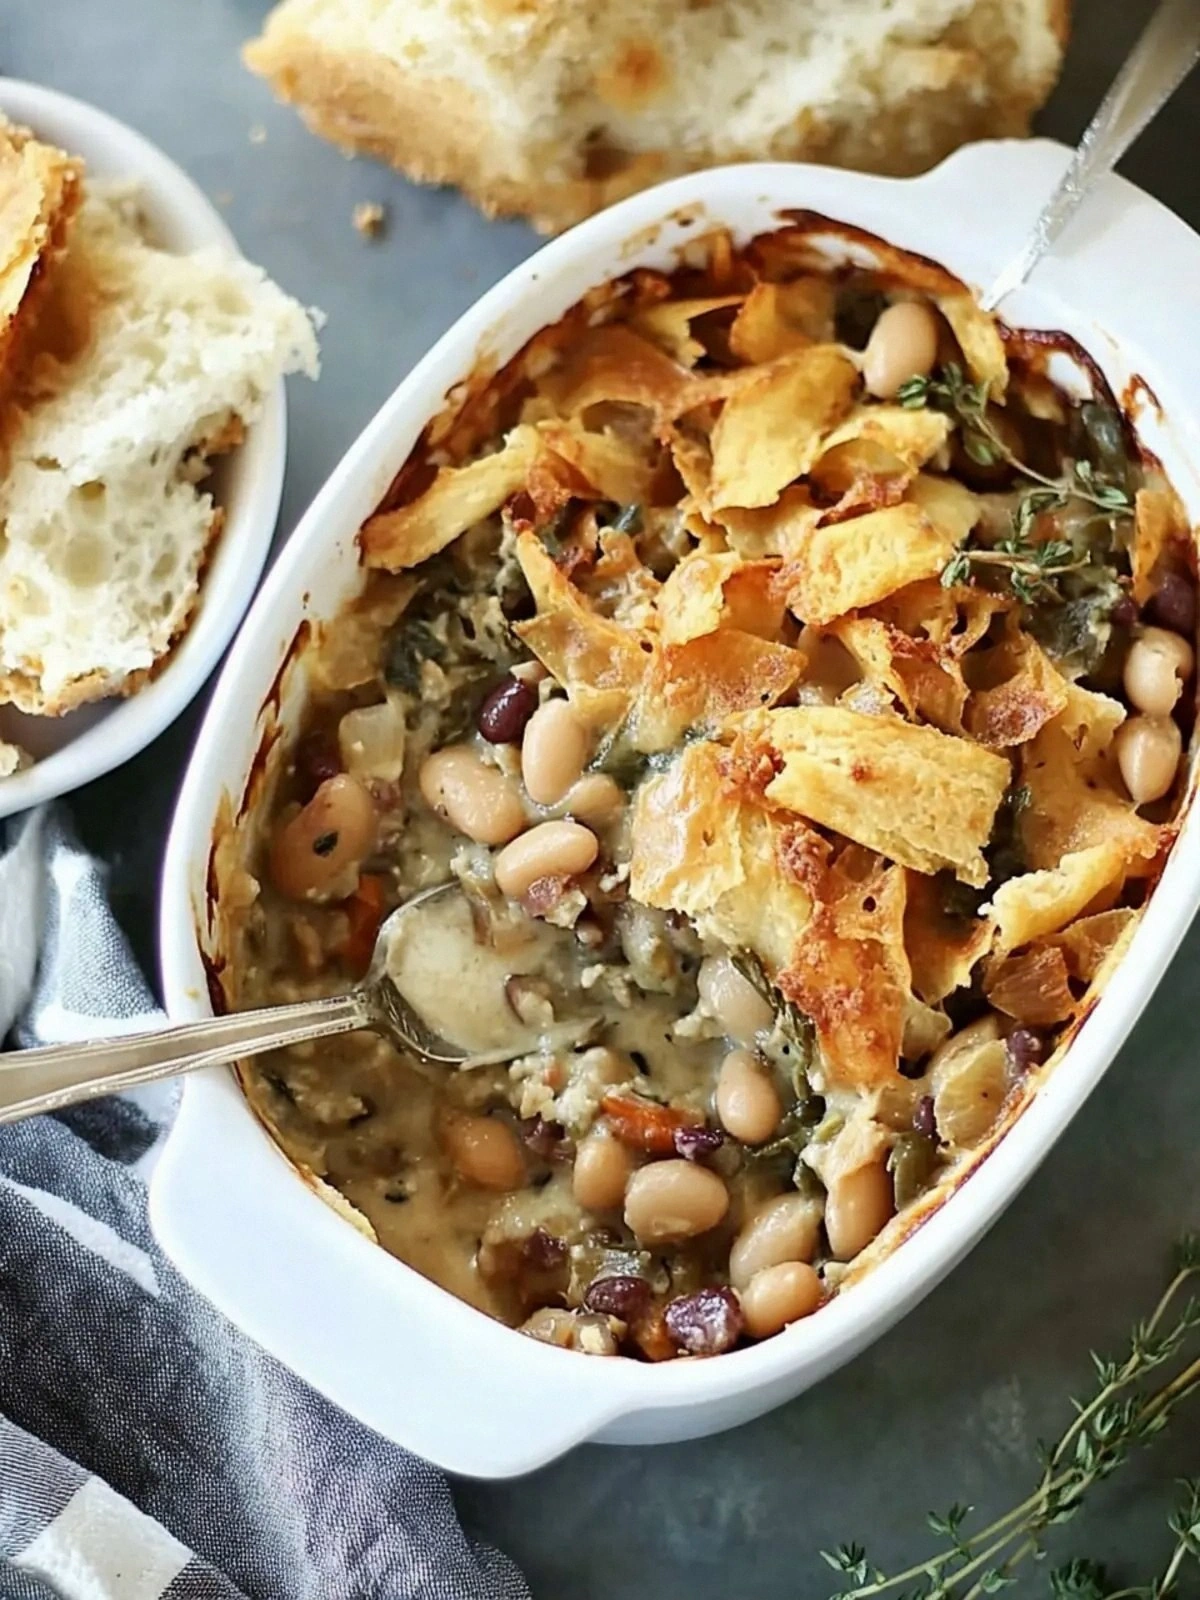
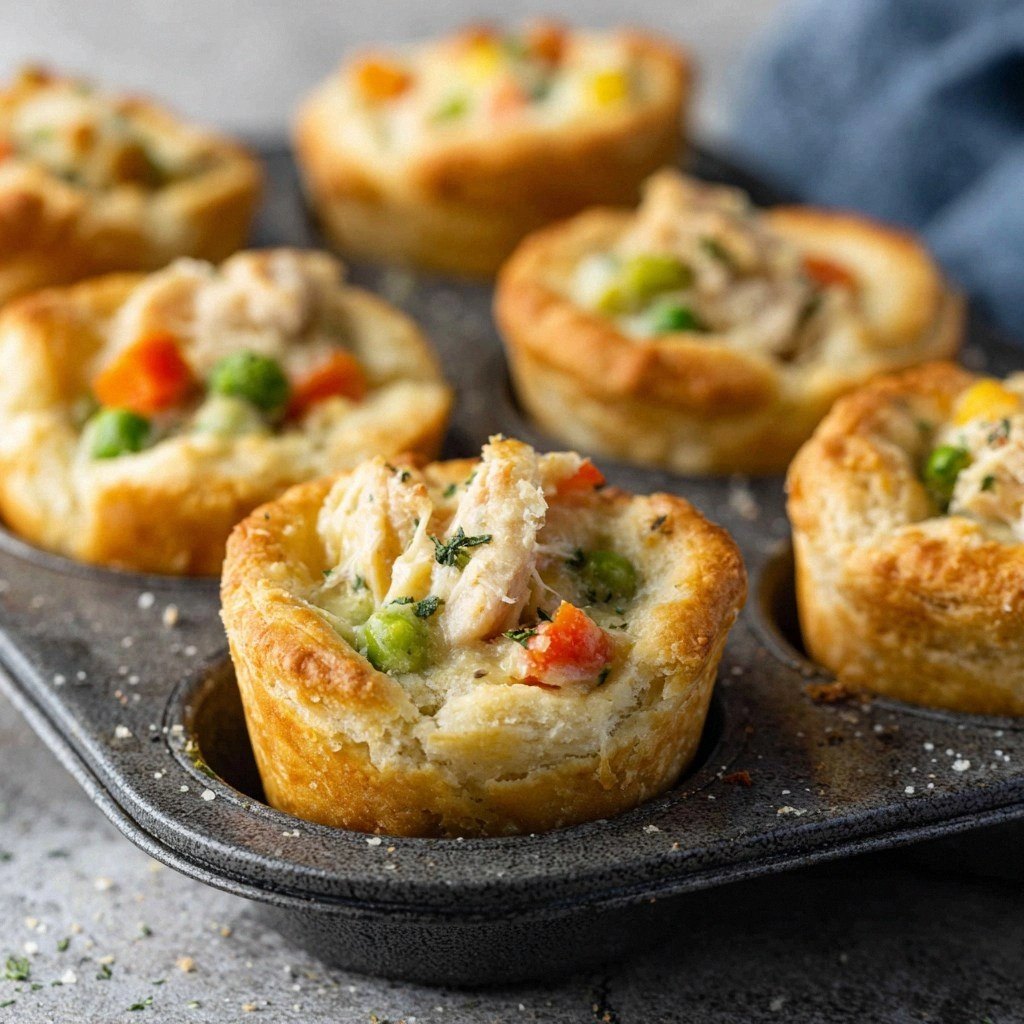
What sets this version apart is that it’s not just a pot pie—it’s a mini pot pie that’s practically a bite‑size masterpiece. The crust is flaky and crisp, the filling is creamy and packed with flavor, and the whole thing is served in a single, elegant bite. I’ve discovered that the secret lies in a few unconventional tweaks: using a blend of all‑purpose and pastry flour, incorporating a splash of heavy cream, and finishing the crust with an egg wash that gives it a glossy, golden sheen. I dare you to taste this and not go back for seconds. If you’ve ever struggled with pot pies, you’re not alone—and I’ve got the fix.
Most recipes get this completely wrong. Here’s what actually works: the dough needs to be chilled, the filling should be thickened with a roux, and the mini cups should be lined with parchment for even baking. Picture yourself pulling this out of the oven, the whole kitchen smelling incredible, and the mini pies looking like they’ve just stepped out of a bakery. The moment you bite into one, the filling explodes with savory goodness, and the crust gives a satisfying crunch that shatters like thin ice. Let me walk you through every single step—by the end, you’ll wonder how you ever made it any other way.
What Makes This Version Stand Out
- Taste: The filling is a velvety blend of chicken, vegetables, and cream that coats the dough like a silky sauce, leaving a lingering savory aftertaste that makes every bite feel like a hug.
- Texture: The crust is a buttery, flaky masterpiece that snaps when you bite, while the interior stays moist and custard‑like, a contrast that keeps the palate excited.
- Simplicity: With only 16 ingredients and a single sheet of dough, you can whip up these mini pies in under an hour, making them a go‑to for busy weeknights.
- Uniqueness: The addition of a splash of heavy cream and a dash of Parmesan elevates the filling to gourmet levels, while the mini size makes them perfect for parties or individual servings.
- Crowd Reaction: Friends who’ve tried this say the mini pies are the best they’ve ever had, and they’re always asking for the recipe after the first bite.
- Ingredient Quality: Using fresh, high‑quality chicken and real butter instead of margarine makes a noticeable difference in flavor and texture.
- Cooking Method: The dough is rolled into small rounds and filled with a pre‑cooked mixture, then baked until golden—no need for a long, slow simmer.
- Make‑Ahead Potential: Assemble the pies ahead of time and freeze them; they bake just as well straight from the freezer, saving you time on busy days.
Inside the Ingredient List
The Flavor Base
All‑Purpose Flour: This is the backbone of your pastry, providing structure and a neutral canvas for the butter’s flavor to shine. If you use a higher protein flour, the crust will become tough; stick to a soft blend for maximum flakiness. Skipping flour would turn your pie into a flat, doughy mess that can’t hold the filling. When shopping, look for a brand that’s labeled “soft” or “cake” flour for a lighter crumb.
Unsalted Butter: Cold, cubed butter is essential for a flaky crust. The fat pockets create steam pockets that puff up during baking, giving you that signature lift. If you use salted butter, you’ll need to reduce the added salt in the dough to avoid an overly salty final product. Butter also adds a rich, buttery aroma that makes the pie feel indulgent.
Ice Water: A small amount of ice water brings the dough together without activating the gluten, preserving the tenderness of the pastry. Too much liquid and the dough becomes sticky; too little and it won’t bind. If you can’t find ice water, just chill the dough in the fridge for an extra 15 minutes to achieve the same effect.
Salt: A tablespoon of salt balances all the flavors and enhances the natural sweetness of the vegetables. It’s a small quantity that makes a big difference; without it, the filling will taste flat. Use sea salt for a subtle brininess that complements the chicken.
The Texture Crew
Black Pepper: A teaspoon of freshly ground pepper adds a gentle heat that cuts through the richness of the cream. It also brings depth to the overall flavor profile. If you prefer a milder taste, reduce the amount or use a peppercorn grinder for a smoother finish.
Dried Thyme: Thyme brings an earthy, slightly minty note that pairs perfectly with chicken. Its subtle flavor doesn’t overpower the other ingredients, but it’s essential for that classic pot pie aroma. You can substitute with fresh thyme if you have it on hand; just use a third of the dried amount.
Dried Rosemary: A teaspoon of rosemary adds a piney, woody undertone that gives the filling a rustic feel. It’s especially good when combined with thyme and rosemary for a fragrant herb blend. If you’re not a fan of rosemary, you can replace it with oregano for a Mediterranean twist.
Olive Oil: A tablespoon of olive oil is used to sauté the aromatics, allowing them to release their flavors without burning. It also adds a subtle fruity note that complements the cream. Use a light olive oil to keep the flavor from becoming too strong.
The Unexpected Star
Onion: A diced medium onion brings sweetness and depth to the filling. When caramelized just right, it forms the base of the flavor profile. Skipping onion would leave the filling lacking that essential savory backbone. Keep it finely diced so it cooks evenly.
Garlic: Two cloves of minced garlic add a punch of umami that brightens the entire dish. Garlic’s aroma is unmistakable and brings a comforting warmth to the pot pie. If you’re sensitive to garlic, reduce to one clove or use garlic powder sparingly.
Carrots: Two medium carrots diced add sweetness, color, and a satisfying crunch when baked. They also help thicken the filling slightly as they release their natural sugars. If you prefer a smoother texture, pulse the carrots in a food processor before adding.
Frozen Peas: A cup of frozen peas adds a pop of color and a burst of sweet flavor that balances the savory elements. They’re also a quick and convenient way to add a vegetable component without the prep time. Thaw them briefly before adding to avoid excess liquid.
The Final Flourish
Cooked Shredded Chicken: Two cups of shredded chicken provide the protein backbone of the dish. Using rotisserie or leftover chicken saves time and adds a smoky flavor. If you’re vegetarian, substitute with diced tofu or a plant‑based protein for a similar texture.
Chicken Broth: One cup of broth adds moisture and depth to the filling, ensuring it stays creamy. A low‑sodium broth keeps the salt levels in check. If you’re on a dairy‑free diet, use a vegetable broth instead.
Heavy Cream: A half cup of heavy cream enriches the filling, giving it a silky, luxurious mouthfeel. It also helps the sauce thicken without becoming too thick. If you prefer a lighter version, substitute with half‑and‑half or a plant‑based cream.
Grated Parmesan: A quarter cup of Parmesan adds a nutty, umami kick that elevates the filling. It also creates a subtle golden crust when baked. If you’re lactose intolerant, try a vegan cheese alternative.
Beaten Egg: One beaten egg serves as an egg wash that gives the crust a glossy, golden finish. It also helps seal the edges of the mini pies. If you’re vegan, use a flax egg or a splash of soy milk.
Fresh Parsley: A tablespoon of chopped parsley offers a fresh, herbal note that brightens the dish. It’s optional but adds a pop of color for a polished look. If you’re allergic to parsley, substitute with cilantro or omit entirely.
Everything's prepped? Good. Let's get into the real action.
The Method — Step by Step
- Prepare the crust. In a large bowl, combine the flour, salt, and cold butter cubes. Using your fingertips or a pastry cutter, blend until the mixture resembles coarse crumbs. Add the ice water a tablespoon at a time, mixing gently until the dough comes together. Chill the dough in the fridge for 30 minutes; this keeps it from shrinking during baking.
- Cook the aromatics. Heat the olive oil in a large skillet over medium heat. Add the diced onion and cook until translucent, about 3–4 minutes. Stir in the minced garlic and cook for an additional 30 seconds until fragrant. This step builds the flavor base; don’t skip it—your filling will feel flat without it.
- Build the filling. Toss the diced carrots and frozen peas into the skillet, cooking for 5 minutes until they start to soften. Pour in the chicken broth and bring to a simmer. Stir in the shredded chicken, heavy cream, and grated Parmesan, letting the mixture thicken into a luscious sauce. The sauce should coat the back of a spoon; if it’s too thin, let it reduce further.
- Roll out the dough. On a lightly floured surface, roll the chilled dough to a thickness of about 1/8 inch. Use a small round cutter (about 2.5 inches in diameter) to cut out circles. Place a parchment‑lined muffin tin on the counter and press each dough circle into the cup, ensuring it covers the bottom and sides. This gives each mini pie a neat, uniform shape.
-
Fill the cups. Spoon the hot filling into each dough cup, filling them about three‑quarters full. The filling should be hot but not boiling, so it doesn’t melt the crust before baking. If you’re worried about overfilling, use a ladle to keep the portions even. Watch Out: Overfilling can cause the pies to spill over during baking; keep a tight lid or cover with foil if needed.
- Top with crust. Place another dough circle on top of each filled cup, sealing the edges by pressing with a fork or your fingertips. The crust should be snug but not overly tight—this allows steam to escape and creates a crisp edge. Brush the tops lightly with beaten egg to achieve that glossy, golden finish. Don’t forget to use a clean brush to avoid streaks.
- Bake to perfection. Preheat your oven to 375°F (190°C). Place the muffin tin in the oven and bake for 20–22 minutes, or until the crusts are golden brown and the filling is bubbling. The first 10 minutes are crucial for the crust to set; after that, keep an eye on the color to prevent over‑browning. If you want extra crispness, switch to broil for the last 2 minutes—just watch closely!
- Cool and serve. Remove the pies from the oven and let them rest for 5 minutes. The filling will continue to thicken as it cools, creating that perfect bite‑size consistency. Sprinkle with fresh parsley for a pop of color and a burst of freshness. Serve warm, and watch the smiles appear—this is pure comfort in miniature form.
- Optional glaze. If you want an extra shine, whisk a tablespoon of honey with a splash of water and brush over the crusts after baking. This will give a subtle caramelized flavor that pairs wonderfully with the savory filling. It’s a quick trick that elevates the presentation and taste.
- Enjoy and experiment. These mini pies are a blank canvas—try adding sun‑dried tomatoes, mushrooms, or a sprinkle of smoked paprika to the filling. The possibilities are endless, so feel free to tweak the flavors to suit your taste. I dare you to taste this and not go back for seconds. That’s the power of a well‑crafted mini pot pie.
That's it — you did it. But hold on, I've got a few more tricks that'll take this to another level.
Insider Tricks for Flawless Results
The Temperature Rule Nobody Follows
Keep the dough cold. A warm dough will shrink in the oven, resulting in a flat crust. I once baked a batch that collapsed because I let the dough sit out for too long. Keep it in the fridge until you’re ready to roll it out, and you’ll see a dramatic difference in the final texture.
Why Your Nose Knows Best
Trust the aroma. When the filling starts to bubble and the edges of the crust turn golden, your nose is the best judge of doneness. Don’t rely solely on the timer; the scent of toasted butter and caramelized onions tells you everything you need to know.
The 5‑Minute Rest That Changes Everything
Let the pies rest. After baking, give the mini pies a 5‑minute rest before serving. This pause allows the filling to set, preventing it from sliding off the crust when you pick it up. I’ve seen people try to lift them immediately, and the result is a soggy mess.
Egg Wash for a Golden Finish
Brush it well. The beaten egg not only gives a shiny appearance but also seals the crust, preventing steam from escaping too quickly. Brush the tops lightly, and if you’re aiming for extra crispness, add a pinch of sesame seeds to the egg wash before brushing.
Use a Muffin Tin for Even Baking
Even heat distribution. A muffin tin keeps each mini pie at the same height, ensuring they bake uniformly. If you don’t have a muffin tin, a small baking dish lined with parchment works, but the pies may not be as uniform.
Keep the Filling Warm
Serve hot. The filling is best when served warm, as it keeps the creamy texture and prevents it from solidifying too quickly. If you need to keep them warm for a while, cover the tin with foil and place it in a low‑heat oven (about 200°F) until ready to serve.
Creative Twists and Variations
This recipe is a playground. Here are some of my favorite ways to switch things up:
Spicy Cajun Mini Pies
Add a teaspoon of Cajun seasoning to the filling and sprinkle a pinch of cayenne pepper on the crust before baking. The smoky heat pairs wonderfully with the creamy base, giving each bite a kick that’s sure to impress.
Mushroom & Thyme Delight
Sauté sliced mushrooms with the onions and garlic before adding the broth. The earthy flavor of the mushrooms complements the thyme, creating a depth that feels like a forest in a bite.
Sun‑Dried Tomato & Basil
Stir in chopped sun‑dried tomatoes and fresh basil into the filling. The sweet acidity of the tomatoes cuts through the richness, while the basil adds a fresh, herbal note that brightens the dish.
Cheesy Jalapeño Crunch
Add diced jalapeños and a handful of shredded cheddar to the filling for a cheesy, spicy version. The cheddar melts into the sauce, creating pockets of gooey delight that contrast with the crisp crust.
Vegetarian Veggie Surprise
Replace the chicken with diced tofu or a plant‑based protein. Keep the rest of the ingredients the same; the result is a hearty, vegetarian mini pie that still feels indulgent.
Herb‑Infused Puff
Mix chopped fresh rosemary, thyme, and oregano into the dough before rolling. The herbs infuse the crust with aromatic flavors, turning each bite into a fragrant experience.
Storing and Bringing It Back to Life
Fridge Storage
Cool before refrigerating. Let the mini pies cool completely before placing them in an airtight container. Store them in the fridge for up to 3 days; they’ll keep their flavor and texture well.
Freezer Friendly
Freeze individually. Wrap each pie tightly in plastic wrap and place them in a freezer bag. They stay fresh for up to 2 months. When ready to eat, bake directly from the freezer; add 5 minutes to the baking time.
Best Reheating Method
Oven revival. Preheat the oven to 350°F (175°C). Place the pies on a baking sheet and bake for 10–12 minutes, or until heated through. Add a splash of water to the bottom of the tin to keep the filling from drying out.