It started on a Friday night when the kitchen turned into a smoky battlefield after a disastrous attempt at a taco casserole. I had sliced a pound of chicken breasts, tossed them in a bowl of oil and spices, and then, in a fit of impatience, dumped them straight onto a sheet pan. The result? A greasy, unevenly cooked mess that smelled like burnt plastic more than Mexican fiesta. I stared at the charred edges, feeling a mix of frustration and curiosity. That moment sparked a mission: to create a Southwest chicken dish that would not only taste like a culinary triumph but also be a reliable, macro-friendly staple for the week.
Picture this: a sizzling pan, the aroma of cumin and chili powder mingling with the sharp scent of fresh cilantro, and the gentle hiss of olive oil as it embraces each chicken piece. The sound is a promise of flavor, a subtle reminder that good cooking starts with the right temperature. The texture of the chicken, when cooked to perfection, should be moist inside with a golden, slightly crisp exterior that gives a satisfying bite. The color—warm, inviting, speckled with a hint of green from the cilantro—speaks to the dish’s freshness. And the taste? A harmonious blend of smoky heat, tangy yogurt, and sweet corn that lingers on the palate.
What sets this version apart from every other Southwest chicken recipe out there is that it balances macros without sacrificing flavor. The recipe is engineered for lean protein, complex carbs, and healthy fats, making it a perfect fit for fitness enthusiasts and busy professionals alike. It’s also designed to be quick, with a prep time that won’t eat into your day, and it can be scaled up or down with ease. I’ve spent countless hours tweaking the spice ratios, testing different tortilla brands, and experimenting with yogurt substitutions until I found the sweet spot that feels like a hug in every bite.
And here’s the kicker: I discovered that using a simple technique—marinating the chicken in yogurt before cooking—locks in moisture and adds a subtle tang that elevates the entire dish. That unexpected step transforms ordinary chicken into a flavor powerhouse that will keep you coming back for more. I dare you to taste this and not go back for seconds. Let me walk you through every single step—by the end, you’ll wonder how you ever made it any other way.
What Makes This Version Stand Out
- Taste: The blend of chili powder, cumin, and garlic powder creates a bold, smoky profile that pairs beautifully with the creamy yogurt. Each bite delivers a punch of heat balanced by the coolness of the sauce.
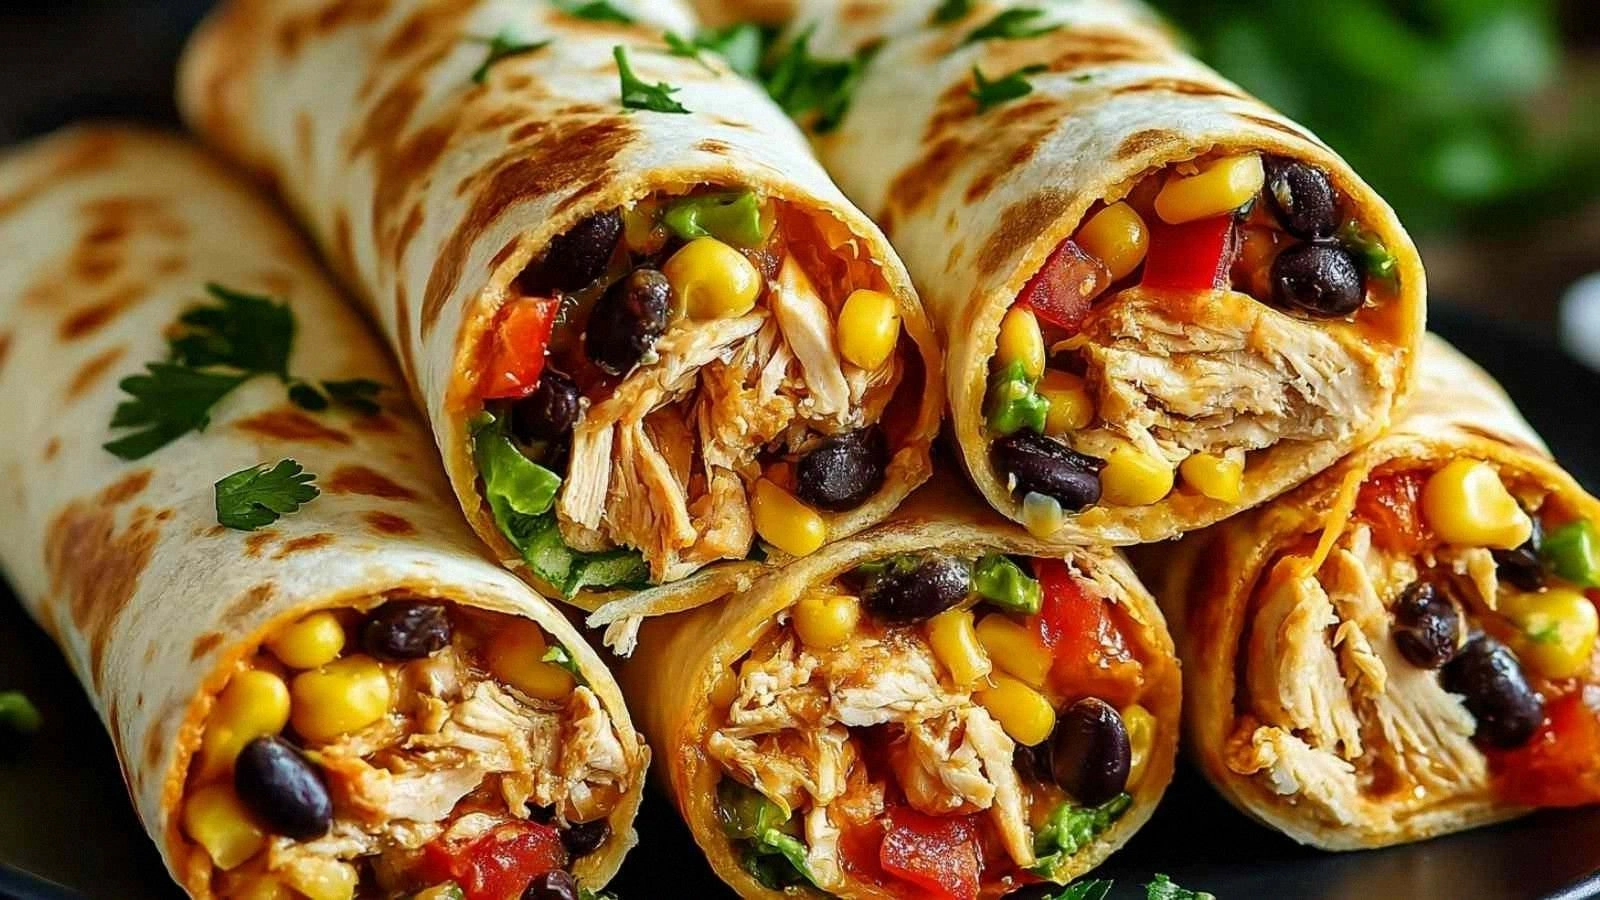
- Texture: The chicken is tender inside yet slightly caramelized on the outside, while the tortillas remain pliable and warm. The corn kernels add a pleasant pop that breaks up the richness.
- Macro-Friendly: With a lean protein base and low-fat dairy, the dish is low in saturated fat but high in essential nutrients, making it ideal for fitness-focused meals.
- Convenience: All ingredients are pantry staples, and the recipe can be assembled in under 20 minutes, which is perfect for weeknight dinners.
- Versatility: The roll-up format makes it easy to portion out for lunches, snacks, or dinner. It also adapts well to different dietary preferences.
- Crowd Appeal: Friends always ask for the recipe after the first batch—most recipes get this completely wrong. Here’s what actually works.
Alright, let's break down exactly what goes into this masterpiece...
Inside the Ingredient List
The Flavor Base
Olive oil is the silent hero that carries the spices and prevents the chicken from drying out. The combination of chili powder, cumin, garlic powder, and onion powder creates a depth that feels like a seasoned salsa on a plate. If you skip any of these, the dish loses its signature Southwest kick. A good rule of thumb is to keep the spice ratio balanced—too much cumin can overpower the mildness of the yogurt.
The Texture Crew
The 8‑inch flour tortillas provide a sturdy yet flexible canvas that holds the filling without tearing. Corn kernels add a sweet crunch that contrasts the creamy yogurt, while black beans contribute protein and fiber. If you prefer a gluten‑free option, swap the tortillas for corn or low‑carb alternatives, but keep the size consistent to maintain the roll‑up structure.
The Unexpected Star
Plain Greek yogurt is the unsung hero that keeps the chicken moist and introduces a creamy element that balances the heat. It’s also a lean protein source that adds a subtle tang, making the dish feel indulgent without the guilt. If you’re not a yogurt fan, a light sour cream works, but the flavor profile shifts slightly toward a richer finish.
The Final Flourish
Fresh cilantro and diced red onion are the bright accents that cut through the richness. They bring a burst of color and a fresh, herbal note that elevates the dish from ordinary to extraordinary. Salsa ties everything together, offering a vibrant, acidic counterpoint that keeps the palate refreshed. If you’re craving heat, choose a hotter salsa; if you prefer a milder touch, go for a tomato‑based one.
Everything's prepped? Good. Let's get into the real action...
The Method — Step by Step
- Step 1: Prepare the Marinade. In a medium bowl, whisk together olive oil, chili powder, cumin, garlic powder, onion powder, salt, and pepper. Add the Greek yogurt, ensuring it’s well blended. This mixture should have a silky, even consistency that coats each ingredient. The aroma will already hint at the dish’s future flavor profile.
- Step 2: Marinate the Chicken. Slice the chicken breasts into bite‑size strips or small cubes, depending on your preference for roll‑up or stuffed tortillas. Toss the chicken in the yogurt‑spice mixture, making sure every piece is fully coated. Cover and refrigerate for at least 30 minutes; if you’re in a rush, a 10‑minute soak will still deliver a tender result.
- Step 3: Cook the Chicken. Heat a large skillet over medium‑high heat. Once hot, add the marinated chicken, leaving a little space between pieces to avoid overcrowding. Sauté for 6–8 minutes, turning occasionally, until the chicken is cooked through and lightly browned. The internal temperature should reach 165°F, and the edges will begin to pull away from the pan, signaling readiness.
- Step 4: Add the Vegetables. Lower the heat to medium and stir in the corn kernels and black beans. Cook for an additional 3 minutes, allowing the vegetables to warm through and the flavors to mingle. The beans should be heated but not mushy, preserving their bite.
- Step 5: Warm the Tortillas. While the filling simmers, place each tortilla on a dry skillet or a warm plate for about 15–20 seconds on each side. The goal is to make them pliable without making them soggy. This step ensures the rolls won’t tear when you fold them.
- Step 6: Assemble the Roll‑Ups. Spread a thin layer of salsa on the center of each tortilla. Sprinkle a handful of shredded cheese, a few spoonfuls of the chicken‑corn mixture, and a dash of diced red onion. Finish with a sprinkle of cilantro. Fold the sides inward, then roll tightly from one end to the other. The roll should be snug enough to hold its shape but still flexible.
- Step 7: Finish Cooking. Place the assembled rolls seam‑side down in the skillet. Cook for 2–3 minutes per side, pressing gently with a spatula to ensure even browning. The cheese will melt into a gooey coating that locks the roll together. This is the moment of truth—watch the edges turn a golden‑brown that shatters like thin ice when you bite.
- Step 8: Serve and Enjoy. Plate the rolls on a warm dish, drizzle with extra salsa, and garnish with more cilantro if desired. Serve with a side of Greek yogurt or a fresh salad for a complete meal. The dish should be aromatic, with a pleasing contrast of textures and a vibrant, satisfying taste.
That's it — you did it. But hold on, I've got a few more tricks that'll take this to another level...
Insider Tricks for Flawless Results
The Temperature Rule Nobody Follows
Many cooks assume medium heat is enough for chicken, but a medium‑high setting ensures a crisp exterior while sealing in juices. Keep the skillet at 375°F; this temperature range gives the chicken a golden crust without burning the spices. A thermometer can help maintain consistency, especially if you’re cooking multiple batches.
Why Your Nose Knows Best
Before you even taste the first bite, let the aroma guide you. A well‑seasoned dish will emit a warm, inviting scent that hints at the depth of flavor inside. If it smells too flat, give it another minute to develop; the spices need time to bloom.
The 5‑Minute Rest That Changes Everything
After cooking the chicken, let it rest on a plate for 5 minutes before assembling the rolls. This short pause allows the juices to redistribute, ensuring each bite stays moist. A friend tried skipping this step once—let's just say the rolls ended up dry and unappetizing.
Keep the Tortillas Warm with a Damp Cloth
Wrap the tortillas in a slightly damp kitchen towel while you finish cooking the filling. The moisture keeps them supple, preventing cracks when you roll them. It’s a simple trick that elevates the overall texture of the dish.
Use a Silicone Baking Mat for Easy Cleanup
Sautéing the chicken and veggies on a silicone mat prevents sticking and makes cleanup a breeze. It also distributes heat evenly, ensuring the chicken cooks uniformly. This small investment saves time and frustration in the long run.
Creative Twists and Variations
This recipe is a playground. Here are some of my favorite ways to switch things up:
Mexican Street Corn Roll‑Ups
Swap the corn kernels for grilled corn on the cob, diced into small pieces. Add a pinch of smoked paprika for an extra smoky depth. This version mirrors the beloved street corn, complete with a creamy, tangy coating.
Greek Yogurt‑Creamy Spinach Roll‑Ups
Incorporate a handful of fresh spinach into the filling. The spinach adds a subtle earthiness and a pop of green that complements the cilantro. It also boosts the nutritional profile with iron and calcium.
Low‑Carb Taco Roll‑Ups
Replace the flour tortillas with low‑carb or cauliflower tortillas. Keep the rest of the ingredients the same to maintain flavor. This variation is perfect for keto or paleo dieters looking for a satisfying meal.
Spicy Chipotle Variation
Introduce chipotle peppers in adobo sauce to the yogurt mixture. The smoky heat will elevate the dish to a new level of complexity. This is ideal for those who love a fiery kick.
Breakfast‑Style Roll‑Ups
Add a fried or poached egg to each roll before serving. The yolk’s richness pairs beautifully with the tangy yogurt and spicy filling, creating a hearty breakfast option.
Vegan Roll‑Ups
Swap the chicken for marinated tofu cubes and use coconut yogurt in place of Greek yogurt. This vegan version retains the same flavor profile while offering a plant‑based protein source.
Storing and Bringing It Back to Life
Fridge Storage
Store the assembled rolls in an airtight container in the refrigerator for up to 3 days. Keep the yogurt sauce separate until serving to prevent the tortillas from becoming soggy. When ready to eat, let the rolls sit at room temperature for 10 minutes before reheating.
Freezer Friendly
Wrap each roll in parchment paper and place them in a freezer bag. Freeze for up to 2 months. To reheat, remove the parchment and microwave on medium power for 1–2 minutes, or bake at 350°F for 15 minutes. The rolls will retain their texture and flavor.
Best Reheating Method
The secret to a mouth‑watering reheated roll is to add a tiny splash of water or broth to the skillet before adding the rolls. This creates steam that keeps the filling moist and prevents the tortillas from drying out. A quick 2‑minute sauté on low heat is sufficient to revive the dish.