Picture this: I’m in the middle of a frantic Saturday night, juggling a half‑baked pizza, a pot of simmering sauce, and a sudden craving for something sweet that feels like a hug in a bowl. The kitchen is a symphony of sizzling, clinking, and the faint scent of vanilla, but my eyes are glued to the oven door because I know that the moment it opens, a cloud of fluffy, cloud‑like cheesecake will descend. I had tried every cheesecake recipe I could find, from classic New York to French éclair‑style, and each one left me wanting a lighter, fluffier finish that wouldn’t feel like a heavy dessert. But then I stumbled upon a Japanese cheesecake recipe that promised a cloud‑soft texture, a subtle tang, and a delicate balance of sweetness—exactly the kind of dessert that turns a simple dinner into a moment of pure joy.
I was skeptical at first. Why would a Japanese recipe, known for its meticulous precision, be the key to a cheesecake that feels like a cloud? The answer lay in the unique combination of ingredients and the gentle, low‑temperature baking method that Japanese chefs use to create airy desserts. As I read the recipe, I could almost hear the quiet hiss of the oven, see the pale, almost translucent batter rise, and feel the soft, pillowy texture that melts in your mouth. My heart raced with anticipation because I knew that this cake would be the lightest thing I’d ever bake, and I couldn’t wait to share the secret with you.
The first time I tasted it, I was blown away by how the cake’s airy interior contrasted with its slightly caramelized top. The flavor was a gentle, creamy sweetness that didn’t overwhelm the palate, and the subtle tang of cream cheese added depth without any heaviness. I was so excited that I almost ate a whole slice before anyone else could get a chance—yes, I admit it. It was a moment of pure culinary triumph, a reminder that sometimes the simplest tweaks can elevate a dish into something extraordinary.
What makes this version stand out from every other cheesecake recipe is not just the airy texture, but the harmony of flavors and the meticulous attention to detail that turns a basic dessert into a culinary masterpiece. From the gentle use of baking powder to the subtle infusion of yuzu zest, every element has been chosen to create a cake that feels like a cloud, yet tastes like a delicate, buttery dream. I dare you to taste this and not go back for seconds, because once you try it, you’ll wonder how you ever made it any other way.
Let me walk you through every single step—by the end, you’ll wonder how you ever made it any other way. I promise you’ll learn a few kitchen hacks, discover some surprising ingredient tricks, and master the art of making a Japanese cheesecake that will have everyone asking for your recipe. So grab your whisk, preheat your oven, and let’s dive into the world of cloud‑soft, tangy, and utterly irresistible cheesecake.
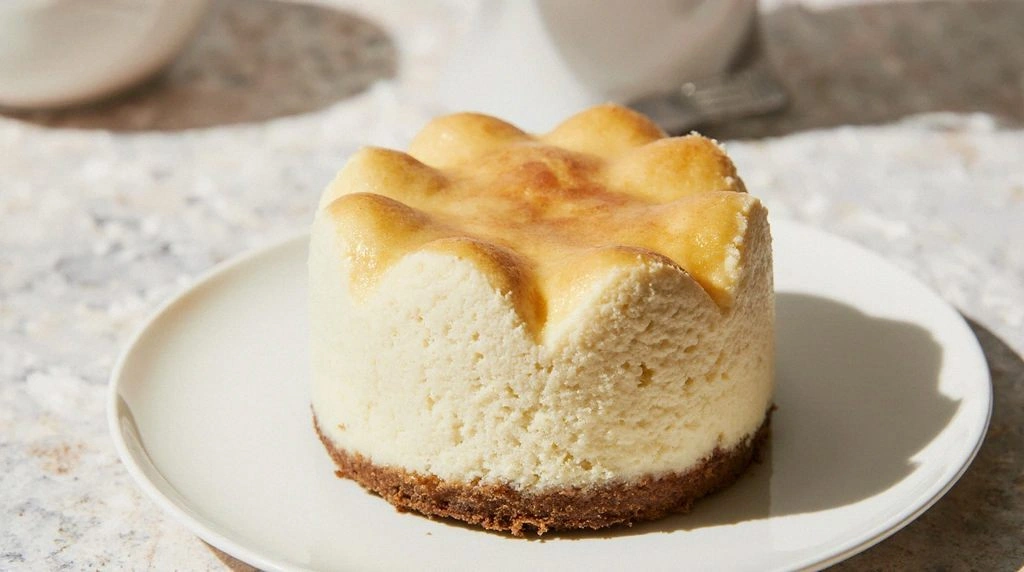
What Makes This Version Stand Out
- Taste: The subtle balance between creamy, tangy, and sweet creates a flavor profile that lingers on the tongue, unlike the heavy, dense textures of traditional cheesecakes.
- Texture: A velvety, airy interior that feels like a cloud, achieved through a precise batter mix and low‑temperature baking that prevents over‑cooking.
- Lightness: The use of baking powder and a gentle whisking technique keeps the batter airy, giving the cheesecake a light, almost soufflé‑like quality.
- Ingredient Quality: Fresh, high‑quality cream cheese and butter, paired with the bright citrus notes of yuzu zest, elevate the flavor beyond ordinary.
- Make‑Ahead Potential: This cheesecake can be assembled and refrigerated for up to 24 hours, allowing you to prepare it ahead of time without sacrificing quality.
- Simplicity: Despite its delicate outcome, the recipe uses only ten basic ingredients, making it approachable for home bakers.
- Visual Appeal: A golden, slightly caramelized top that contrasts beautifully with the pale, fluffy interior, making it Instagram‑ready.
- Versatility: The base can be easily customized with matcha, citrus, or chocolate to suit any palate or occasion.
Alright, let's break down exactly what goes into this masterpiece...
Inside the Ingredient List
The Flour Base
All‑purpose flour is the backbone of this cheesecake, providing structure without heaviness. The fine texture of the flour allows the batter to rise evenly, creating that signature cloud‑like interior. If you skip the flour or use a lower‑protein flour, the cake may collapse or become too dense, ruining the airy experience.
The Sweet Core
Granulated sugar is the sweetener that balances the tang of cream cheese. It dissolves into the batter, creating a smooth, silky mouthfeel. Too much sugar can cause the cake to brown too quickly, while too little can leave it bland. For a slightly caramelized finish, consider using a mix of granulated and brown sugar.
The Rising Agents
Baking powder and a pinch of salt work together to lift the batter while keeping the flavor balanced. Baking powder provides the lift needed for the airy texture, while the salt enhances the overall taste. If you forget the baking powder, the cake will be flat and heavy.
The Creamy Heart
Cream cheese is the star ingredient, giving the cheesecake its rich, tangy flavor. Use room‑temperature cream cheese for a smoother batter that incorporates more air. Skipping this step or using a low‑fat version will result in a watery, unstructured dessert.
Everything's prepped? Good. Let's get into the real action...
The Method — Step by Step
- Preheat your oven to 160°C (320°F) and line a 9‑inch springform pan with parchment paper. This low temperature is key to preventing the batter from browning too quickly and ensures a gentle rise. While the oven warms, let the butter soften at room temperature, as it will blend more smoothly into the batter.
- In a medium bowl, whisk together the flour, baking powder, and salt until well combined. This dry mix will form the foundation of the cake’s airy structure. By whisking first, you eliminate clumps and guarantee an even distribution of leavening agents.
- In a separate bowl, beat the cream cheese and butter until creamy and smooth. The cream cheese should be at room temperature; if it’s too cold, it will break when mixed. A smooth base ensures that the batter will incorporate air without forming lumps.
- Add the sugar to the cream cheese mixture and beat until light and fluffy. This step is crucial for incorporating air into the batter. As the mixture becomes pale and airy, you’ll notice a subtle change in texture—almost like a soft, buttery cloud.
- Gradually fold in the dry ingredients, mixing gently until just combined. Over‑mixing at this stage can trap too much air and cause the cake to crack. The batter should be smooth and slightly thick, ready to pour into the pan.
- Whisk the eggs, one at a time, into the batter, ensuring each egg is fully incorporated before adding the next. The eggs bind the batter together and provide structure. A slow, steady addition keeps the batter from curdling.
- Add the vanilla extract, milk, and heavy cream, then fold gently to combine. These liquids add moisture and help the batter stay airy. The final batter should be silky, with a consistency that pours smoothly but holds its shape.
- Stir in the yuzu zest and matcha powder, if using. The yuzu provides a bright citrus note, while matcha adds a subtle earthy flavor that pairs beautifully with the cream cheese. These ingredients are optional but elevate the cake’s complexity.
- Pour the batter into the prepared pan and tap the pan gently on the counter to release any air bubbles. The surface should be level for an even rise. This step is critical for preventing cracks during baking.
- Place the pan in the preheated oven and bake for 30 minutes, or until the top is a light golden brown and the center is set but still slightly wobbly. The gentle heat allows the cake to rise slowly, creating that signature airy texture.
- Turn off the oven and leave the cheesecake inside with the door slightly ajar for 15 minutes. This gradual cooling prevents the cake from cracking and ensures a smooth finish. The residual heat will finish the baking process without over‑cooking.
- After cooling, remove the cheesecake from the pan and chill in the refrigerator for at least 4 hours, preferably overnight. Chilling allows the flavors to meld and the texture to firm up, creating a silky, melt‑in‑your‑mouth experience. This step is essential for the perfect bite.
- Before serving, run a knife around the edges to ensure a clean release, then gently lift the cheesecake onto a serving plate. The final reveal will show a pale, golden top that contrasts beautifully with the airy interior. The cake’s texture should feel like a soft cloud, yet its flavor will linger pleasantly.
- Serve chilled with a drizzle of yuzu glaze or a sprinkle of matcha powder, if desired. These finishing touches add a pop of color and a burst of flavor that elevates the dessert to a gourmet level. Enjoy each bite as a moment of pure bliss.
That’s it — you did it. But hold on, I've got a few more tricks that'll take this to another level. From temperature tweaks to resting times, these insider tips will help you avoid common pitfalls and ensure every bite is flawless.
Insider Tricks for Flawless Results
The Temperature Rule Nobody Follows
Many bakers set their ovens to a high temperature, thinking it will speed up the process. However, the gentle heat of 160°C (320°F) is what creates that airy interior. If your oven runs hot, use an oven thermometer and adjust accordingly. A steady, low temperature prevents the batter from setting too quickly, giving it room to rise.
Why Your Nose Knows Best
The aroma of a cake in the oven is a powerful indicator of its progress. When you smell a faint, nutty scent, it’s a sign that the batter is caramelizing just right. If you detect a sharp, burnt smell, the oven is too hot or the batter is over‑baked. Trust your nose to avoid a burnt finish.
The 5‑Minute Rest That Changes Everything
After baking, letting the cheesecake rest in the oven with the door ajar for 15 minutes is essential. This step allows the residual heat to finish the bake without over‑cooking the surface. Skipping it often leads to a cracked top or a dry interior.
The Gentle Whisk
When mixing the batter, whisk in a gentle, circular motion. Over‑whisking can incorporate too much air, leading to a fragile structure that cracks. A light touch preserves the batter’s integrity, ensuring a smooth, even rise.
The Right Pan
A springform pan with a non‑stick lining is ideal for this cheesecake. The removable sides allow for easy release and a clean presentation. Using a glass pan can cause the cake to stick and crack upon removal.
The Cooling Trick
After chilling, place the cheesecake in a shallow dish with a splash of water before reheating. The steam created will re‑soften the cake without drying it out. This trick keeps the texture moist and luxurious.
Creative Twists and Variations
This recipe is a playground. Here are some of my favorite ways to switch things up:
Matcha Magic
Add 1 teaspoon of matcha powder to the batter for a vibrant green hue and a slightly bitter, earthy flavor. The matcha pairs wonderfully with the creamy base, creating a sophisticated dessert. Serve with a drizzle of honey for contrast.
Yuzu Zest Surprise
Incorporate 1 tablespoon of yuzu zest to give the cake a bright, citrusy kick. Yuzu adds a unique, almost floral note that elevates the cheesecake’s aroma. A light yuzu glaze on top adds a glossy finish.
Chocolate Swirl
Swirl melted dark chocolate into the batter before baking. The chocolate creates a marbled effect and adds a rich, bittersweet contrast. This variation is perfect for chocolate lovers who crave a lighter cake.
Berry Burst
Fold in fresh blueberries or strawberries into the batter for a burst of juiciness. The berries add color and a natural sweetness that complements the tangy cream cheese. Serve with a dusting of powdered sugar.
Lemon Twist
Replace the vanilla extract with lemon zest and a splash of lemon juice for a bright, zesty flavor. The lemon adds a fresh, crisp note that balances the richness. This version is ideal for spring or summer gatherings.
Nutty Crunch
Sprinkle toasted almonds or pistachios on top before serving. The nuts add a delightful crunch and a nutty flavor that complements the airy cake. A drizzle of caramel sauce completes the indulgent experience.
Storing and Bringing It Back to Life
Fridge Storage
Store the chilled cheesecake in an airtight container in the refrigerator for up to 3 days. The airtight seal prevents the cake from absorbing fridge odors and maintains its moisture. Keep it covered with plastic wrap before placing it in the container for extra protection.
Freezer Friendly
Wrap the cheesecake tightly in plastic wrap, then in foil, and freeze for up to 2 weeks. When ready to serve, thaw it in the refrigerator overnight. This method preserves the cake’s texture and flavor without compromising its airy quality.
Best Reheating Method
To reheat, place the cheesecake in a preheated oven at 120°C (250°F) for 10 minutes. The low heat warms the cake without drying it out. Add a tiny splash of water in the pan before reheating to create steam that keeps the cake moist.