I still remember the night I accidentally set the kitchen on fire while trying to make a “simple” snack. The oven door opened to a plume of smoke, the fridge door slammed shut, and my friend, who had just moved in, laughed until she cried. That disaster turned into a culinary revelation when I realized I could turn that ruined batch of cookies into a golden, crunchy masterpiece that left everyone begging for seconds. I was not just making a snack; I was crafting a moment of pure, unapologetic indulgence.
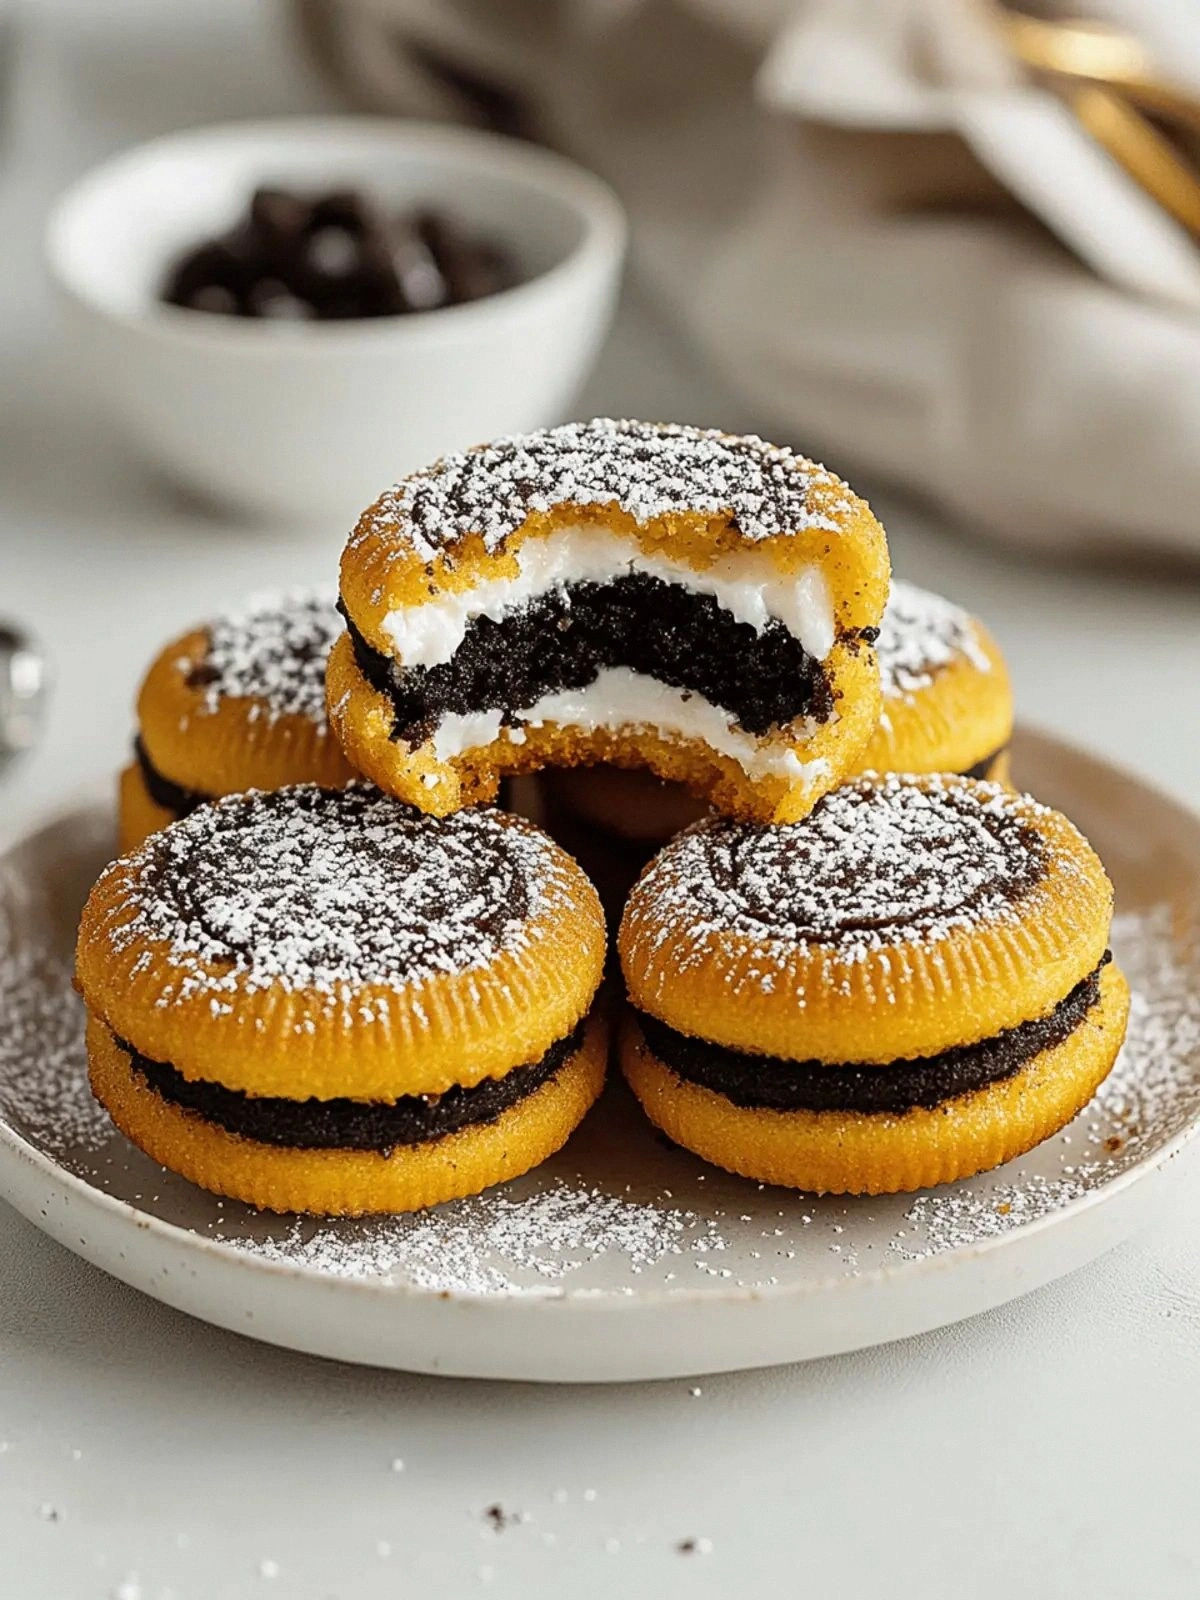
Picture the scene: a kitchen buzzing with the crackle of sizzling oil, the sweet aroma of chocolate and vanilla swirling around, and the sound of a timer ticking down. As the first Oreo hits the hot oil, you hear a satisfying pop that signals the beginning of something extraordinary. The golden crust forms in seconds, sealing in the creamy center, while the faint hiss of oil adds a symphonic backdrop to this culinary orchestra. The texture is a paradox—crispy on the outside, decadently gooey inside—creating a mouthful that feels like a hug from the inside out.
What makes this version stand out is not just the fact that it’s deep‑fried, but that each element is meticulously chosen to amplify flavor, texture, and visual impact. I’m talking about the crunch that shatters like thin ice, the subtle caramelization that adds depth, and a dusting of powdered sugar that gives it a finished, dessert‑like polish. This is hands down the best version you'll ever make at home. The recipe is simple, the ingredients are pantry staples, and the end result is a showstopper that will have your guests asking for the recipe—before you even give it to them.
I dare you to taste this and not go back for seconds. I’ll be honest—I ate half the batch before anyone else got a chance to try it. The secret? A pinch of salt in the batter that brings out the chocolate’s richness, and a splash of vanilla that elevates the entire flavor profile. Most recipes get this completely wrong, but here’s what actually works. Picture yourself pulling this out of the oil, the whole kitchen smelling incredible, and a plate of golden Oreos glistening like tiny moons. Let me walk you through every single step—by the end, you'll wonder how you ever made it any other way.
What Makes This Version Stand Out
- Crunch: The batter’s ratio of flour to oil creates a shell that’s crisp to the bite but never dry, giving a satisfying snap that echoes like a tiny drumbeat.
- Moistness: A splash of milk and a beaten egg lock in moisture, keeping the Oreo center luscious and preventing the batter from drying out during frying.
- Simplicity: No exotic ingredients or complicated techniques—just pantry staples and a deep fryer or a heavy skillet.
- Visual Appeal: The golden, caramelized crust contrasts with the chocolate filling, turning a simple cookie into a dessert that looks like it belongs on a runway.
- Audience Reaction: Guests line up for a bite, and the moment they taste the first crunch, their eyes widen and a collective “wow” erupts.
- Make‑Ahead Friendly: You can assemble the batter and batter‑coated Oreos in advance, then deep‑fry them just before serving for peak freshness.
Inside the Ingredient List
The Flavor Base
The 1 package of Oreo cookies is the star. They provide the chocolatey backbone and the creamy filling that melts into a velvety center when heated. If you’re aiming for a richer flavor, opt for a double‑stuf version; the extra cream will make each bite more indulgent. Skipping the cookies means you’re missing the iconic taste that makes this dish unforgettable.
The 1 teaspoon of pure vanilla extract is a subtle yet powerful enhancer. Vanilla lifts the chocolate, adding a sweet, floral undertone that balances the richness. A cheap imitation will leave the batter tasting flat—so invest in a decent vanilla for the best outcome.
The Texture Crew
All‑purpose flour is the foundation of the batter. It creates a structure that holds the batter together while frying. If you prefer a lighter coating, substitute half the flour with cornstarch; it will give a crisper bite.
Granulated sugar (2 tablespoons) adds a hint of sweetness and promotes browning. The sugar caramelizes on the surface, giving that golden sheen. If you’re watching sugar intake, you can reduce it by one tablespoon, but you’ll notice a slightly duller crust.
Baking powder (1 tablespoon) is the secret leavening agent that creates airy pockets in the batter, preventing it from becoming too dense. Without it, the coating would be heavy and chewy.
Salt (¼ teaspoon) is a flavor amplifier. It brings out the chocolate’s depth and balances the sweetness. A pinch of salt also helps the batter adhere better to the cookie’s surface.
The Unexpected Star
The 1 large egg is the glue that binds the batter together. It provides structure and helps the batter cling to the cookie. If you’re vegan, replace it with ¼ cup unsweetened applesauce; the texture will be slightly different but still delicious.
The 1 cup of milk keeps the batter moist and smooth. Whole milk adds richness; skim milk will give a lighter coating but may result in a slightly drier crust.
The Final Flourish
Vegetable oil (2 cups) is the medium that transforms the batter into a golden crisp. Use a neutral‑flavored oil with a high smoke point—canola or peanut oil work best. If you prefer a healthier option, try grapeseed or avocado oil; the flavor will be subtly different.
Powdered sugar (1 cup) is the finishing touch. A dusting of powdered sugar adds a sweet, snowy contrast to the golden crust, creating a dessert that feels indulgent without being overwhelming.
Everything's prepped? Good. Let's get into the real action.
The Method — Step by Step
- Start by crushing the Oreos into large chunks—no finer than a handful. The larger pieces keep the creamy center intact and allow for a dramatic gooey burst. Place the crumbs in a bowl and set aside.
- In a separate mixing bowl, whisk together the flour, granulated sugar, baking powder, and salt until evenly distributed. This dry blend will form the backbone of your batter, ensuring an even coating.
- In a small saucepan, heat the milk over low heat until just warm. Add the vanilla extract and stir until fully incorporated. Warm milk helps the egg bind more smoothly.
- Whisk the egg into the warm milk mixture, creating a silky liquid. This step is crucial; a poorly whisked egg will create lumps that interfere with the batter’s consistency.
- Pour the wet mixture into the dry ingredients, stirring until a thick, glossy batter forms. The batter should be thick enough to coat the back of a spoon but not so thick that it clumps.
- Dip each Oreo chunk into the batter, ensuring it’s fully submerged. Let excess batter drip off, then place the coated cookie onto a parchment‑lined tray. Repeat until all cookies are coated.
- Heat the vegetable oil in a deep fryer or a heavy‑bottomed pot to 350°F (175°C). Use a thermometer for precision; oil that’s too hot will burn the coating before the center melts.
- Gently lower a few coated Oreos into the hot oil, being careful not to overcrowd the pot. The first few should sizzle immediately, a clear sign the oil is at the right temperature.
- Fry each batch for 2–3 minutes, turning halfway through, until the coating is a deep amber and the edges start pulling away. The aroma should be intoxicating—a blend of toasted batter and chocolate.
- Remove the fried Oreos with a slotted spoon and place them on a rack over paper towels to drain excess oil. While they’re still hot, dust them generously with powdered sugar, letting the sugar cling to the warm surface.
- Serve immediately while the coating is still crisp and the center is molten. Pair with a scoop of vanilla ice cream or a drizzle of caramel for an extra indulgent touch.
That’s it— you did it. But hold on, I've got a few more tricks that'll take this to another level. The next section will reveal insider secrets that elevate the flavor profile and ensure every bite is flawless.
Insider Tricks for Flawless Results
The Temperature Rule Nobody Follows
Oil temperature is the unsung hero of deep frying. A consistent 350°F ensures the batter cooks quickly enough to seal the edges while keeping the center molten. If the oil is too hot, the coating will burn before the filling melts; too cool, and the coating will absorb oil and become greasy. Use a thermometer and let the oil stabilize for a minute before adding each batch.
Why Your Nose Knows Best
Smell is your best quality control. As soon as the batter hits the oil, it should emit a warm, buttery aroma with hints of toasted sugar. If the smell is metallic or burnt, the oil is too hot. Trust your nose to tell you when the batter is perfectly browned.
The 5‑Minute Rest That Changes Everything
After frying, let the Oreos rest on a rack for 5 minutes before dusting with powdered sugar. This rest allows the coating to set, preventing the sugar from sliding off. It also lets the center settle, reducing the risk of a messy spill when you bite into it.
The Quick Chill Trick
If you’re not serving immediately, place the fried Oreos on a wire rack and chill them in the refrigerator for 15 minutes. This step keeps the coating crisp and prevents the filling from leaking. When you’re ready to serve, a quick reheat in a hot oven (400°F) for 2 minutes revives the crispness.
The Powdered Sugar Whisper
Use a fine, sifted powdered sugar to avoid clumps. If you prefer a sweeter finish, add a pinch of sea salt to the powdered sugar; the contrast will elevate the chocolate’s richness.
Creative Twists and Variations
This recipe is a playground. Here are some of my favorite ways to switch things up:
Cinnamon Swirl
Add 1 teaspoon of ground cinnamon to the batter for a warm, spicy undertone. The cinnamon pairs beautifully with the chocolate, creating a comforting, autumnal flavor.
Nutty Crunch
Fold in ½ cup of chopped pecans or walnuts into the batter before coating the Oreos. The nuts add a satisfying crunch and a nutty aroma that complements the chocolate.
Minty Fresh
Replace the vanilla extract with 1 teaspoon of peppermint extract. The mint will give a refreshing contrast to the sweet, dense batter, ideal for summer gatherings.
Sea Salt Caramel
Drizzle a homemade caramel sauce over the powdered sugar dusting. Finish with a pinch of flaky sea salt to balance the sweetness with a subtle briny note.
Choco‑Nut Delight
Add ¼ cup of chocolate chips to the batter. The chips melt slightly during frying, creating pockets of extra chocolate that burst with each bite.
Spicy Surprise
Sprinkle a pinch of cayenne pepper into the batter. The mild heat will contrast with the sweetness, giving a bold, adventurous flavor profile.
Storing and Bringing It Back to Life
Fridge Storage
Store fried Oreos in an airtight container at room temperature for up to 24 hours. The coating may soften slightly, so dust them with powdered sugar before serving to restore crunch. Avoid refrigerating, as the moisture will make the batter soggy.
Freezer Friendly
For longer storage, freeze the coated Oreos on a parchment‑lined tray until solid, then transfer to a freezer bag. They’ll keep well for up to 3 months. When ready, thaw at room temperature before reheating.
Best Reheating Method
Reheat in a 400°F oven for 3–4 minutes, or until the coating is crisp again. If you’re short on time, a quick 30‑second blast in a microwave can soften the center, but the coating will lose crispness. Add a tiny splash of water to the oven before reheating to create steam, which helps the batter regain its original texture.