I was standing in my kitchen, staring at a slab of fresh ahi tuna that had just arrived from the market, when my phone buzzed with a frantic text: “I need a killer dinner idea, now.” I could feel the panic building, the clock ticking, and the urge to prove that I wasn’t just another foodie who fumbles with recipes. I pulled out the tuna, slapped a little salt on it, and then remembered a secret family trick that turns ordinary fish into a showstopper in just minutes.
Picture this: the tuna hits a hot cast‑iron skillet, the surface sizzles like a tiny volcano, and a chorus of spices erupts into a smoky, peppery perfume that makes your mouth water before the first bite even reaches your tongue. The texture is a contrast of a crisp, caramelized crust and a buttery, almost melt‑in‑your‑mouth center that sings with umami. The aroma is so intense it fills the whole kitchen, making even the most skeptical of diners gasp. It’s a sensory experience that feels like a culinary fireworks show, but without the mess or the danger.
What sets this version apart is the balanced blend of heat, herbs, and a dash of sweetness that makes the blackening seasoning feel like a perfectly choreographed dance. I’ve refined the ratio so the spice coating sticks like a second skin, yet the tuna remains tender inside. The result is a dish that’s as elegant as it is bold, and it’s the kind of recipe that will make your friends say, “How did you do that?” while you simply shrug and smile. Trust me, the moment you taste it, you’ll be daring yourself to take another bite.
And here’s the kicker: this isn’t just another “blackened tuna” recipe you’ll find on the internet. I’ve tweaked it with an unexpected ingredient that gives the crust a subtle caramelization without burning, and I’ve discovered a simple technique that guarantees a perfectly seared edge every time. If you’re ready to turn a quick lunch into a memorable meal, let’s walk through every single step together. By the end, you’ll wonder how you ever made it any other way.
What Makes This Version Stand Out
- Flavor: The blend of cayenne, thyme, oregano, and paprika creates a complex profile that balances heat with herbal depth, leaving the tuna with a memorable aftertaste.
- Texture: A crisp, caramelized crust forms within seconds, while the interior stays buttery and juicy, a contrast that excites the palate.
- Simplicity: No elaborate marinades or long prep times—just a few pantry staples and a hot skillet.
- Time: From prep to plate, the entire process takes less than 15 minutes, making it perfect for busy weeknights.
- Versatility: The seasoning can be adapted for other proteins, from shrimp to chicken, making it a go-to base for many dishes.
- Crowd‑pleaser: The bold flavors and beautiful sear make it a hit at dinner parties, while the quick prep keeps it practical for everyday cooking.
Alright, let’s break down exactly what goes into this masterpiece…
Inside the Ingredient List
The Flavor Base
The 1 teaspoon of cayenne pepper is the star that sets the heat level. It’s not just about spiciness; cayenne adds a subtle earthy tone that balances the herbal notes. If you’re a heat‑averse cook, reduce it to ½ teaspoon or replace it with smoked paprika for a milder kick. The cayenne also helps the crust form a deeper brown, giving the tuna a visual cue of doneness.
The Herb Ensemble
Dried thyme and oregano (each 1 teaspoon) contribute a fragrant, slightly piney aroma that anchors the seasoning. These herbs are resilient at high heat, so they don’t burn quickly, preserving their flavor. If you’re out of dried herbs, fresh ones can work, but use half the quantity and toast them briefly in the pan to release their oils.
The Garlic & Spice Fusion
Garlic powder (1 teaspoon) and black pepper (1 teaspoon) are the backbone of the rub. Garlic powder offers a clean, sweet bite without the risk of burning, while black pepper adds a subtle bite that’s almost invisible but essential. Skipping either will leave the seasoning feeling flat; together, they create a cohesive flavor profile.
The Sweet & Smoky Touch
Paprika (1 teaspoon) provides a mild sweetness and a vibrant color that signals the tuna’s readiness. Kosher salt (1 teaspoon) is crucial for seasoning the surface before the rub is applied. Salt draws moisture to the surface, which helps the spices cling better. If you prefer a lower sodium option, reduce the salt to ¾ teaspoon and adjust the other spices slightly to maintain balance.
Everything’s prepped? Good. Let’s get into the real action…
The Method — Step by Step
- Prep the Tuna: Pat the tuna steaks dry with paper towels until they feel almost dry. This step is vital for a crisp crust. Season both sides lightly with kosher salt, then set aside while you prepare the rub.
- Mix the Rub: In a small bowl, combine cayenne, thyme, oregano, garlic powder, black pepper, paprika, and the remaining salt. Whisk until the spices are evenly distributed. A smooth rub ensures a uniform crust.
- Apply the Rub: Pat the tuna steaks again to remove any moisture that may have come from the seasoning. Then, coat each side with the spice blend, pressing lightly so it sticks. Don’t be shy—this is where the flavor lives.
- Heat the Skillet: Place a cast‑iron or stainless steel skillet over medium‑high heat. Add 2 tablespoons of olive oil or neutral oil, swirling to coat the surface. The oil should shimmer but not smoke.
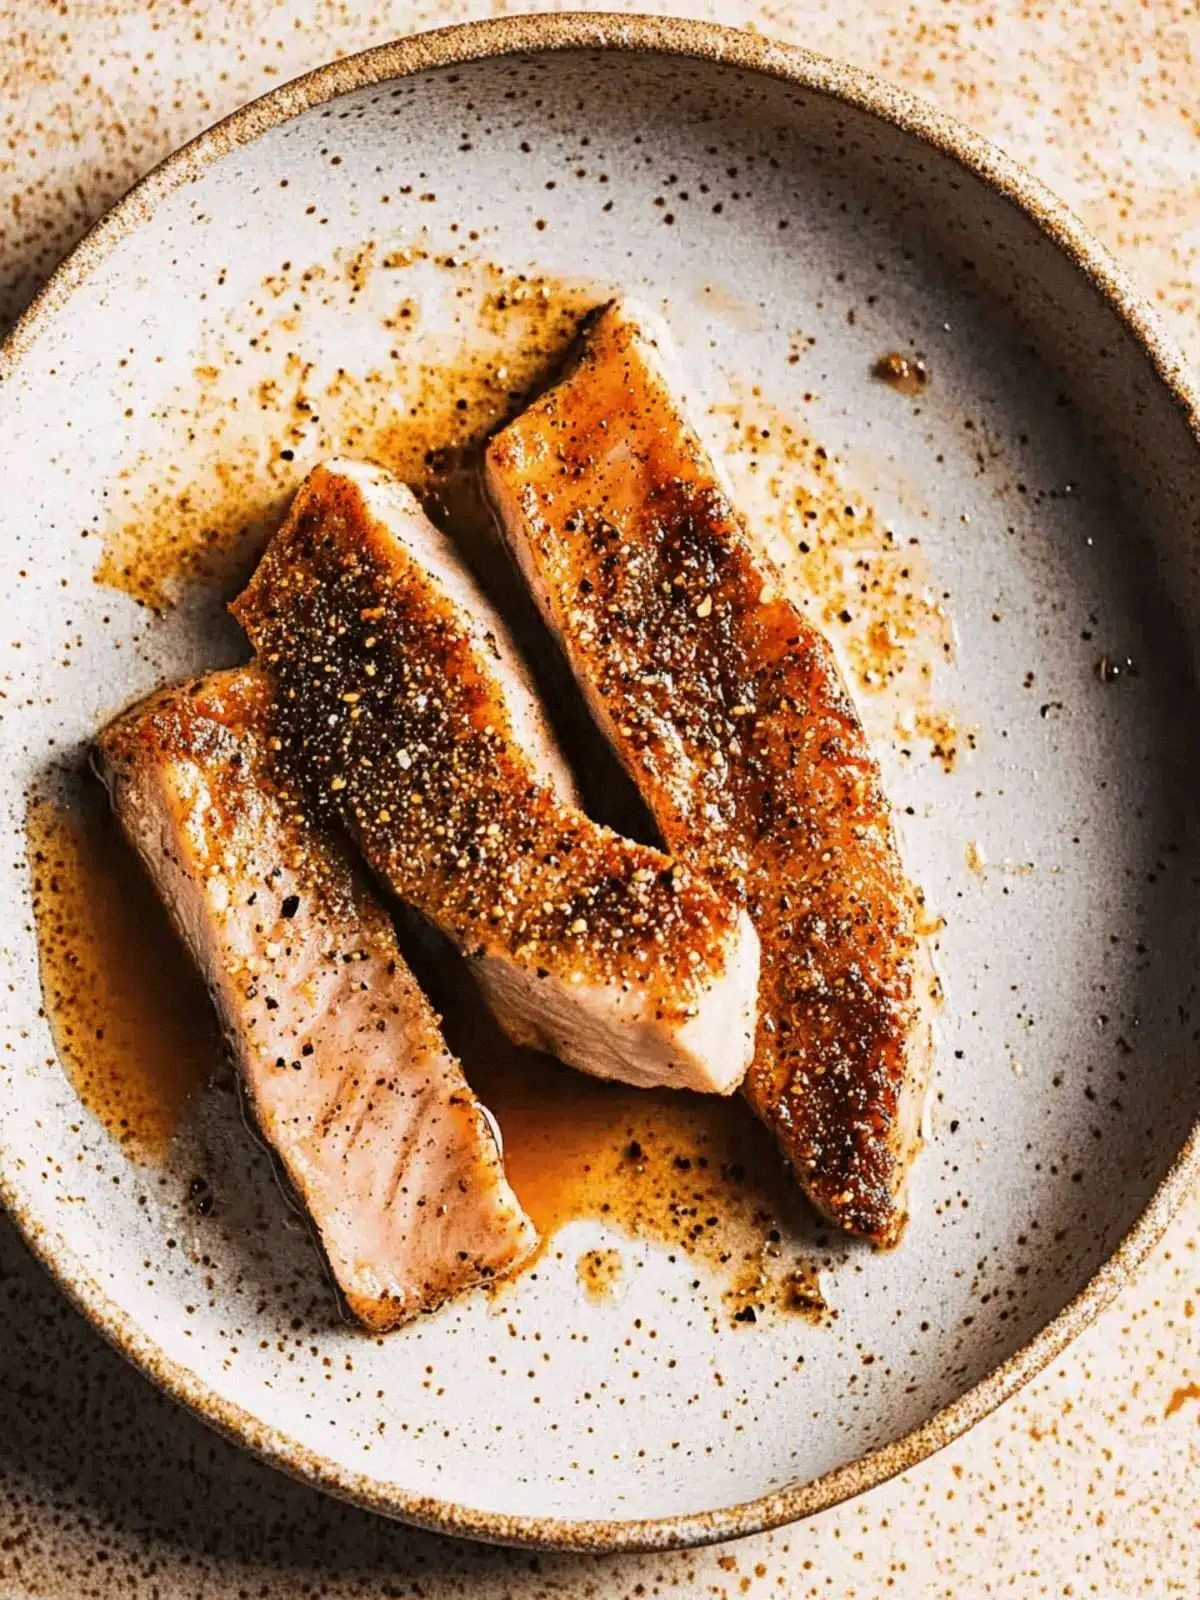
- Cook the Tuna: Place the tuna steaks in the hot skillet, skin‑side down if they have skin. Let them sear for 2 minutes without moving; the crust should develop a dark, almost blackened hue. Flip gently and sear the other side for another 2 minutes. The total cooking time should be about 4–5 minutes, depending on thickness.
- Rest the Tuna: Transfer the steaks to a plate and let them rest for 2 minutes. Resting allows juices to redistribute, ensuring every bite is moist and flavorful.
- Serve: Slice the tuna against the grain into ¼‑inch thick pieces. Plate them on a warm dish, drizzle a light vinaigrette if desired, and garnish with fresh herbs or citrus zest. The final dish should look like a slice of the ocean, perfectly seared on the outside and tender inside.
That’s it — you did it. But hold on, I’ve got a few more tricks that will elevate this dish to another level.
Insider Tricks for Flawless Results
The Temperature Rule Nobody Follows
Many cooks lower the heat once the tuna hits the pan, fearing it will burn. The trick is to maintain a steady medium‑high temperature throughout the sear. If the skillet starts to smoke, reduce the heat slightly, but keep it hot enough to keep the crust forming. Consistent heat ensures even browning and prevents the interior from cooling too quickly.
Why Your Nose Knows Best
Before you flip, listen for that unmistakable toasty scent. It’s the cue that the crust has formed and the tuna is ready to turn. Trusting your nose saves you from overcooking and guarantees that each bite has that coveted caramelized flavor.
The 5‑Minute Rest That Changes Everything
Resting the tuna for just five minutes after cooking might seem trivial, but it’s the secret to a juicy interior. The juices redistribute, preventing the outer layers from drying out. I’ve seen friends skip this step and end up with a dry, over‑cooked center.
The Right Oil Matters
Olive oil is great for flavor, but for a higher smoke point, consider grapeseed or avocado oil. A higher smoke point means the pan stays hotter longer, producing a crisper crust without burning the spices. Experiment to find the oil that best suits your taste and stove.
Slice Against the Grain
Cutting against the grain shortens the muscle fibers, making each slice tender. If you slice with the grain, you’ll end up with chewy, tough pieces. A quick visual check: the fibers should run perpendicular to your knife blade.
Seasoning the Plate
Before serving, sprinkle a pinch of sea salt or a drizzle of citrus-infused oil over the tuna. This final touch brightens the flavors and adds a subtle sheen that makes the dish look restaurant‑grade.
Creative Twists and Variations
This recipe is a playground. Here are some of my favorite ways to switch things up:
Citrus‑Infused Twist
Add a tablespoon of freshly grated orange zest to the rub. The citrus brightens the flavor profile, giving the tuna a refreshing lift that pairs beautifully with a light cucumber salad.
Spicy Pineapple Glaze
After searing, drizzle a glaze made from pineapple juice, soy sauce, and a touch of brown sugar. The sweet‑savory glaze caramelizes on the tuna, creating a glossy, tropical finish.
Herb‑Crunched Variation
Mix finely chopped fresh parsley, cilantro, and basil into the spice rub. The fresh herbs add a burst of color and a fresh, green undertone that contrasts nicely with the smoky crust.
Mediterranean Flair
Replace cayenne with sumac and add a sprinkle of toasted pine nuts to the rub. Serve the tuna over a bed of quinoa and drizzle with lemon‑yogurt sauce for a Mediterranean twist.
Asian‑Inspired Kick
Swap paprika for a small amount of toasted sesame seeds and add a splash of rice vinegar to the rub. Finish with a drizzle of sesame oil and a sprinkle of chopped scallions for an Asian‑inspired flavor profile.
Breakfast‑Style Brunch
Serve the tuna on top of a warm, buttery English muffin, add a fried egg, and top with a smear of avocado. The blackened tuna adds a smoky depth that pairs surprisingly well with brunch staples.
Storing and Bringing It Back to Life
Fridge Storage
Store leftover tuna in an airtight container in the refrigerator for up to 2 days. Wrap the tuna loosely in parchment paper before sealing to keep it from drying out. When you’re ready to eat, let it sit at room temperature for 15 minutes to re‑warm slightly.
Freezer Friendly
To freeze, place each tuna steak on a parchment‑lined tray and freeze until solid. Once frozen, transfer the steaks to a freezer bag or airtight container. They’ll keep for up to 3 months. When reheating, thaw in the refrigerator overnight and finish on the stove.
Best Reheating Method
Reheat the tuna in a preheated skillet over medium heat for 1–2 minutes per side, adding a splash of water or broth to create steam. This technique prevents the tuna from drying out and restores the juicy texture. Finish with a quick drizzle of lemon‑based sauce for extra brightness.
Now that you’ve mastered the base recipe, feel free to experiment with these variations. The possibilities are endless, and each one will keep your taste buds excited.