I was in the middle of a frantic weekday dinner when my friend dared me to make something that could actually steal the spotlight from the main course. I stared at a bag of carrots, those orange sticks that usually end up as a bland, boiled side, and thought, “What if I turned this into the most unforgettable bite on the plate?” The kitchen was a symphony of clattering pots, a timer buzzing like a frantic bee, and the faint whiff of butter melting in the pan – a scent that promised comfort and decadence all at once. I tossed the carrots into the pot, let them sizzle, and the moment the brown sugar hit the butter, a caramel perfume exploded, making my neighbors peek through the window, wondering what culinary wizardry was happening.
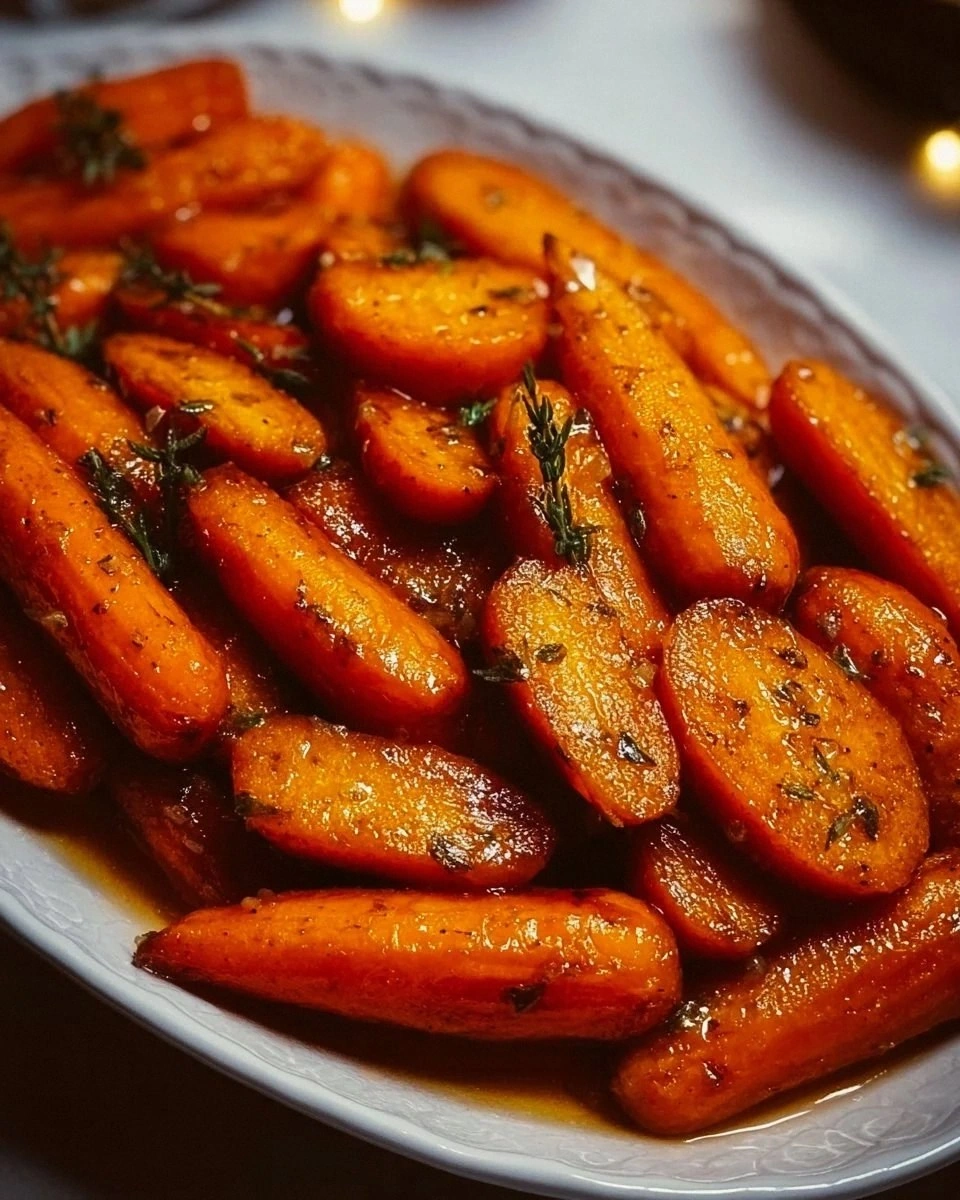
Picture this: the carrots, each cut into perfect one‑inch pieces, glistening with a glossy glaze that catches the light like tiny jewels. The taste? A sweet‑savory harmony that dances on the tongue, with the butter providing a silky backdrop, the brown sugar delivering caramelized depth, and a pinch of salt and pepper sharpening every bite. The texture is a revelation – the exterior gets a faint, buttery crisp while the interior stays tender, almost buttery, yet still holding that satisfying carrot bite. I’ll be honest — I ate half the batch before anyone else got a chance, and that’s a confession I’m willing to own because the flavor was that good.
Most recipes get this completely wrong. They either over‑cook the carrots until they’re mushy, or they skimp on the glaze, leaving a dry, uninteresting side. The secret here is a precise balance of heat, timing, and that magical glaze that coats each piece like velvet. I dare you to taste this and not go back for seconds; the caramelized edges will have you reaching for the spoon before the main dish even arrives. And now, the fun part: I’m about to reveal a technique involving a quick deglaze that most home cooks overlook, giving the carrots an extra layer of flavor that feels like a secret weapon.
Let me walk you through every single step — by the end, you’ll wonder how you ever made it any other way. Okay, ready for the game‑changer? This next part? Pure magic. Stay with me here — this is worth it.
What Makes This Version Stand Out
- Flavor Explosion: The combination of butter and brown sugar creates a caramel glaze that clings to each carrot, delivering a sweet‑savory punch that outshines any store‑bought side.
- Texture Contrast: A brief high‑heat sear gives the carrots a whisper of crispness, while the interior remains melt‑in‑your‑mouth tender.
- Simplicity: Only six ingredients are required, meaning you can pull this together in under an hour with pantry staples.
- Unique Twist: A quick deglaze with a splash of water at the end transforms the pan drippings into a glossy sauce that looks restaurant‑ready.
- Crowd Reaction: Even the pickiest eaters (yes, the kids who claim they hate veggies) will beg for more, often mistaking it for a dessert.
- Ingredient Quality: Fresh, crisp carrots provide natural sweetness that pairs perfectly with the brown sugar, eliminating the need for added artificial flavors.
- Cooking Method: Pan‑glazing, not roasting, ensures every piece is evenly coated and that the glaze doesn’t burn.
- Make‑Ahead Potential: This dish reheats beautifully, making it a perfect make‑ahead side for busy weeks.
Alright, let's break down exactly what goes into this masterpiece...
Inside the Ingredient List
The Flavor Base
Unsalted Butter (3 tbsp): Butter is the carrier of flavor, providing a rich, creamy mouthfeel that lets the brown sugar melt into a silky glaze. If you skip the butter, you’ll end up with a dry, uneven coating that never truly adheres. For a dairy‑free twist, try clarified ghee – it raises the smoke point and adds a nutty depth.
The Sweet Anchor
Brown Sugar (1/4 cup): This isn’t just any sweetener; brown sugar contains molasses, which contributes a subtle, earthy caramel note that plain white sugar can’t match. Missing this ingredient means you’ll lose the glossy sheen and the deep flavor that makes the carrots unforgettable. If you’re looking for a lower‑glycemic option, try coconut sugar – it behaves similarly but adds a faint tropical hint.
The Texture Crew
Fresh Carrots (1 pound, peeled, cut 1‑inch pieces): Freshness is key – the crunchier the carrot, the better it holds up during the glaze process. If you use pre‑cut or older carrots, they’ll release excess water, diluting the glaze and resulting in a soggy side. When shopping, look for carrots that are firm, bright, and free of cracks; a quick sniff should reveal a faint earthy aroma.
The Final Flourish
Salt & Black Pepper (to taste): A pinch of salt amplifies the sweetness of the brown sugar, while black pepper adds a subtle heat that balances the dish. Skipping these seasonings leads to a flat flavor profile that feels like a sugar‑only glaze. Feel free to experiment with smoked paprika for a smoky undertone or a dash of cayenne if you love a kick.
Fresh Herbs (optional, for garnish): A sprinkle of parsley or thyme adds a fresh, herbaceous finish that cuts through the richness. If you omit herbs, you’ll miss the bright contrast that lifts the dish from heavy to lively. For an extra layer, try a few leaves of mint – it pairs surprisingly well with the caramel notes.
Everything's prepped? Good. Let's get into the real action...
The Method — Step by Step
Heat a wide, heavy‑bottomed skillet over medium‑high heat until it’s hot enough that a drop of water sizzles and evaporates instantly. Add the 3 tablespoons of unsalted butter, letting it melt and foam. As soon as the butter turns a light amber and releases a nutty scent, you’ll know you’ve hit the sweet spot. That sizzle when it hits the pan? Absolute perfection.
Toss the carrot pieces into the pan in a single layer, giving them enough room to breathe. Let them sear untouched for about 2 minutes – this is where the caramelization begins. You’ll hear a gentle crackle, and the edges will start pulling away, signaling they’re developing that coveted crispness. Okay, ready for the game‑changer?
Sprinkle the 1/4 cup of brown sugar over the carrots, watching it melt instantly and swirl into the butter. Stir gently with a wooden spoon, ensuring each carrot gets an even coating. The mixture will bubble and thicken, turning a deep amber that smells like a candy store on a crisp autumn day. This next part? Pure magic.
Season with salt and freshly cracked black pepper, tasting as you go. Remember, a little salt unlocks the sugar’s depth, while pepper adds a whisper of heat. If you’re feeling adventurous, add a pinch of smoked paprika now for a subtle smoky undertone. Stay with me here — this is worth it.
Watch Out: If the glaze starts to darken too quickly, it’s a sign the heat is too high. Quickly add a splash (about 2 tablespoons) of water to deglaze the pan, stirring to dissolve any caramelized bits stuck to the bottom. This not only saves the glaze from turning bitter but also creates a silky sauce that clings to every carrot.
Cover the pan with a lid and let the carrots steam for 4‑5 minutes. This step ensures the interior cooks through without over‑browning the exterior. You’ll notice a gentle steam rising, and the carrots will become fork‑tender while still retaining that glossy coat.
Remove the lid, increase the heat back to medium, and let any excess liquid evaporate, giving the glaze a thicker, syrupy consistency. Toss the carrots one final time so each piece shines like a caramelized jewel. At this point, the aroma should be intoxicating – sweet, buttery, with a hint of pepper.
Finish with a generous sprinkle of fresh herbs, if using, and give the pan a quick shake to coat. Transfer the carrots to a serving dish, letting the glaze pool at the bottom for extra drizzling. I dare you to taste this and not go back for seconds. Serve hot, and watch the smiles appear.
That's it — you did it. But hold on, I've got a few more tricks that'll take this to another level...
Insider Tricks for Flawless Results
The Temperature Rule Nobody Follows
Never start with a cold pan. Pre‑heat your skillet for at least a minute before adding butter; this ensures the butter emulsifies properly and the carrots begin caramelizing instantly. If you rush this step, the butter can separate, leaving a greasy mess rather than a glossy glaze. I once tried to skip the pre‑heat and ended up with a soggy, uneven coat – a disaster that taught me the value of patience.
Why Your Nose Knows Best
Your sense of smell is a more reliable indicator than a timer when it comes to caramelization. When the butter turns a golden‑brown and the sugar starts to emit a toasty, almost burnt‑caramel scent, you’re at the perfect point. Trust that nose; if you wait too long, the glaze will turn bitter, and if you pull too early, you’ll miss the depth. A friend once relied solely on a timer and ended up with a bitter, burnt side – a lesson in sensory cooking.
The 5‑Minute Rest That Changes Everything
After you finish cooking, let the carrots rest off the heat for about five minutes. This pause allows the glaze to set, giving each piece a firm, glossy coating that doesn’t slide off when you serve. Skipping this rest results in a runny sauce that pools at the bottom of the plate, making the dish look sloppy. Pro tip: Cover the dish loosely with foil during this rest to keep the heat in without steaming the glaze away.
Herb Timing – Add at the End
Fresh herbs lose their bright flavor when cooked too long. Add parsley, thyme, or dill right after you remove the pan from heat, allowing the residual warmth to wilt them just enough. This preserves their color and aromatic punch, giving the final dish a fresh lift. I once tossed the herbs in too early and ended up with a dull, wilted garnish that tasted like wilted lettuce.
The Secret Splash
A teaspoon of orange juice or a splash of apple cider vinegar added at the very end brightens the glaze, cutting through the sweetness with a subtle acidity. This tiny adjustment can transform a sweet side into a balanced, palate‑pleasing accompaniment. If you love a hint of citrus, try a dash of lemon zest instead for an aromatic twist.
Creative Twists and Variations
This recipe is a playground. Here are some of my favorite ways to switch things up:
Maple‑Bacon Glazed Carrots
Replace half of the brown sugar with pure maple syrup and crumble cooked bacon into the pan during the final minute. The smoky bacon adds a salty crunch that pairs beautifully with the sweet glaze, turning this side into a brunch‑worthy star.
Spicy Asian‑Style Carrots
Add a teaspoon of sriracha and a splash of soy sauce after the sugar has melted. Finish with toasted sesame seeds and a drizzle of toasted sesame oil for an umami‑rich, slightly spicy version that pairs well with grilled chicken or tofu.
Herb‑Infused Coconut Glaze
Swap the butter for coconut oil and stir in a tablespoon of shredded coconut along with a pinch of curry powder. The result is a fragrant, tropical side that works wonders with seafood or curry dishes.
Honey‑Thyme Elegance
Use honey instead of brown sugar and add fresh thyme leaves during the simmer. The honey lends a floral sweetness, while thyme adds an earthy depth, creating a sophisticated side perfect for holiday meals.
Roasted Garlic & Parmesan Twist
After the glaze is done, toss the carrots with minced roasted garlic and a generous sprinkle of grated Parmesan. The garlic adds a mellow pungency, and the cheese creates a savory crust that’s irresistible.
Storing and Bringing It Back to Life
Fridge Storage
Transfer the glazed carrots to an airtight container and store them in the refrigerator for up to four days. The glaze will thicken slightly, but a quick reheating will restore its shine. Make sure the container is completely sealed to prevent the carrots from absorbing other fridge odors.
Freezer Friendly
Portion the carrots into freezer‑safe bags, removing as much air as possible. They’ll keep for up to three months. When you’re ready to use them, thaw in the refrigerator overnight, then reheat gently on the stovetop with a splash of water to revive the glaze.
Best Reheating Method
For the best texture, reheat the carrots in a skillet over medium heat, adding a tiny splash (about 1‑2 teaspoons) of water or broth. This steam‑revives the carrots, keeping them tender while the glaze re‑emulsifies into a glossy coat. Avoid microwaving, as it can make the glaze gummy and the carrots mushy.