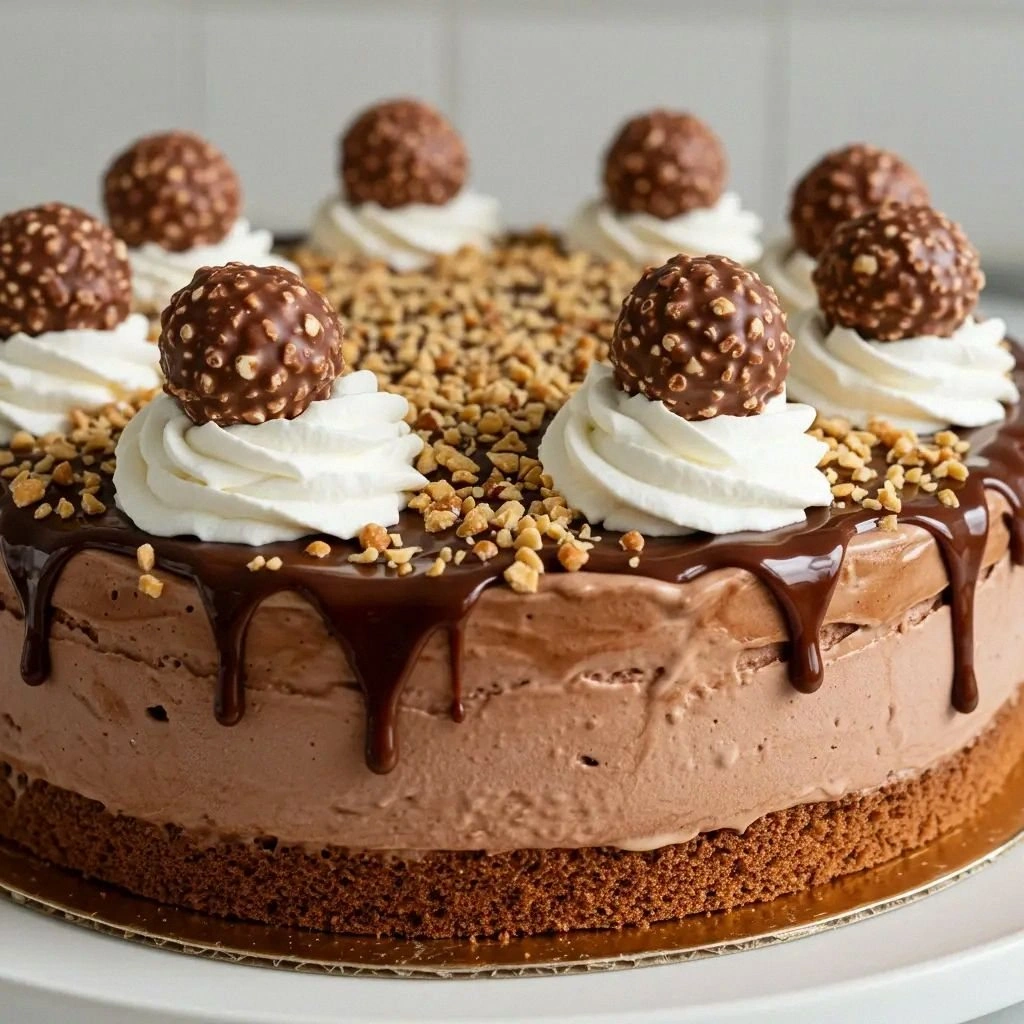
Picture this: you’re in the middle of a holiday dinner, the table is already a mess of dishes, and your friends are demanding something sweet that will make the night unforgettable. You glance at the pantry, eyes flicking from the jar of vanilla to the box of chocolate chips, and then you remember the Ferrero Rocher you left at the bottom of the freezer—an indulgent, nutty candy that’s practically a dessert in itself. You decide to turn that single, glossy treat into a full-on cake, and the kitchen becomes a laboratory of chocolatey alchemy. The moment you crack the Ferrero, the kitchen fills with a warm, buttery scent that makes your mouth water, and you realize you’re about to create a masterpiece that will outshine any store‑bought dessert.
The first bite is a revelation: a crisp, buttery base that melts in your mouth, followed by a molten hazelnut center that oozes like velvet. The chocolate ice cream layer inside is silky and rich, while the top layer of crushed hazelnuts adds a satisfying crunch that snaps like thin ice. Each bite is a harmony of textures—soft, crunchy, creamy—an orchestra that plays sweet and savory notes in perfect unison. You’ll taste the subtle caramelization of the crust, the deep, bittersweet cocoa, and the faint, nutty aroma that lingers long after the last spoonful.
What sets this version apart is not just the ingredients but the technique. The batter is whisked to a silky smoothness that ensures the crust is tender yet sturdy, while the Ferrero pieces are folded in at the last moment to keep their crunch intact. The ice cream layer is churned to a specific temperature to keep it firm enough for slicing, yet soft enough to release the chocolate flavor with each bite. The final glaze of melted dark chocolate and a dusting of powdered sugar gives the cake an elegant finish that’s almost too pretty to eat. You’ll be amazed at how a simple recipe can transform into a showstopper that looks like a piece of art and tastes like a dream.
I dare you to taste this and not go back for seconds. The combination of buttery crust, chocolatey ice cream, and the iconic Ferrero Rocher crunch will have your guests begging for the recipe. If you’ve ever struggled to make a cake that’s both decadent and structurally sound, you’re not alone—this is the fix you’ve been waiting for. And if you’re worried about the time, trust me: this cake takes less than an hour from start to finish, and the result is worth every minute.
What Makes This Version Stand Out
Flavor: The buttery crust is infused with vanilla and a touch of salt, creating a base that balances the sweetness of the Ferrero Rocher and the chocolate ice cream.
Texture: The combination of a crisp crust, creamy ice cream layer, and crunchy hazelnut topping gives this cake a multi‑dimensional mouthfeel that’s hard to replicate.
Ingredient Quality: Using premium Ferrero Rocher and high‑fat chocolate ice cream elevates the dessert from ordinary to extraordinary.
Simplicity: The recipe requires only a handful of pantry staples and a few specialty items, making it accessible yet impressive.
Make‑ahead Potential: The cake can be assembled a day ahead, allowing the flavors to meld and the ice cream to firm up for a perfect slice.
Audience Reaction: Guests will be stunned by the visual appeal and delighted by the unexpected layers of flavor, making this a conversation starter at any gathering.
Alright, let’s break down exactly what goes into this masterpiece…
Inside the Ingredient List
The Flavor Base
All-purpose flour is the backbone of the crust, providing structure and a subtle neutrality that lets the chocolate shine. The flour’s protein content ensures a tender crumb, while the fine texture prevents any gritty feel in the finished cake. If you skip the flour, the crust will be flimsy and won’t hold the ice cream layer. For a gluten-free version, you could substitute a 1:1 blend of rice flour and tapioca starch, but be prepared for a slightly denser crumb.
Sugar is the sweetener that balances the bitterness of cocoa and the richness of butter. It caramelizes slightly during baking, adding depth to the crust’s flavor profile. Removing sugar will leave the cake under‑sweet and more like a savory biscuit, which might not pair well with the chocolate ice cream.
Unsalted butter brings richness and a silky mouthfeel to the crust. It also contributes to the golden brown color of the baked shell. If you use salted butter, you’ll need to reduce the added salt by half to avoid an overly salty cake. Butter also melts into the flour, creating tiny pockets that expand during baking for a light, airy texture.
Vanilla extract is the subtle fragrance that lifts the entire flavor profile. It’s a classic ingredient that enhances chocolate’s depth. A poor quality vanilla can leave a chemical taste; use a pure vanilla bean paste or a high‑quality extract for the best results.
Baking powder is the leavening agent that gives the crust a slight lift and prevents it from becoming too dense. A pinch of baking soda can be added for an extra rise, but be careful not to over‑bake, or the crust will become tough.
The Texture Crew
Salt is essential for flavor balance, cutting through the sweetness and highlighting the chocolate notes. A half teaspoon is enough to bring out the richness without overpowering the dessert. If you’re on a low‑sodium diet, you can reduce it to a quarter teaspoon, but the taste will be noticeably flatter.
Heavy cream adds body and a luscious, silky texture to the ice cream layer. It also helps the chocolate melt evenly, creating a smooth, glossy finish. If you can’t find heavy cream, you can use a mixture of whole milk and a tablespoon of butter to mimic the fat content.
Whole milk is the liquid base that keeps the batter moist and prevents it from drying out during baking. It also provides a subtle dairy flavor that complements the chocolate. Skipping milk will result in a dry, crumbly crust that doesn’t hold the ice cream layer well.
Ferrero Rocher chocolates are the star of this cake. Their crisp wafer, hazelnut filling, and chocolate coating create a multi‑layered experience in every bite. Chopping them finely allows them to distribute evenly throughout the cake, while larger pieces add surprise crunch. If you can’t find Ferrero Rocher, you can use any premium chocolate‑walnut confection, but the flavor profile will shift slightly.
Chocolate ice cream is the core of the dessert, providing a creamy, rich center that contrasts with the crunchy crust. It also keeps the cake cool and helps it set properly. If you’re making the cake ahead of time, churn the ice cream at a slightly lower temperature to keep it firm enough for slicing.
The Unexpected Star
Cocoa powder gives the cake its deep, bittersweet chocolate flavor. It also adds a subtle bitterness that balances the sweetness of the Ferrero Rocher and sugar. If you use melted dark chocolate instead, the flavor will be richer but the texture will change; the crust will be slightly denser.
Melted dark chocolate is used for a glossy glaze that coats the top of the cake, sealing in moisture and giving a glossy finish. It also adds a layer of chocolate intensity that’s almost like a second ice cream flavor. If you prefer a lighter glaze, you can reduce the amount by half and mix in a little butter for shine.
Hazelnut spread adds a creamy, nutty undertone that enhances the hazelnut flavor of the Ferrero Rocher. It also creates a subtle, buttery texture that blends well with the ice cream. If you’re allergic to hazelnuts, you can use almond butter, but the flavor will be noticeably different.
Crushed hazelnuts provide the crunch that contrasts with the creamy ice cream and the buttery crust. They also add a nutty aroma that’s almost intoxicating. If you prefer a smoother texture, you can toast the hazelnuts lightly before crushing to bring out their flavor.
Whipped cream is optional but adds an airy, decadent topping that elevates the dessert to a celebratory level. It also helps balance the richness of the chocolate and butter. If you’re watching calories, you can skip it or use a lighter whipped topping.
The Final Flourish
Powdered sugar is used to dust the finished cake, giving it a sweet finish and a professional look. It also adds a delicate sweetness that doesn’t overpower the chocolate. If you’re low on sugar, a light dusting of cocoa powder can replace the powdered sugar for a bittersweet finish.
Everything's prepped? Good. Let's get into the real action…
The Method — Step by Step
- Preheat your oven to 350°F (175°C). Grease a 9‑inch springform pan with butter or non‑stick spray, then dust it lightly with flour to prevent sticking. Line the bottom with parchment paper for an extra layer of protection. This step ensures your crust comes out perfectly golden and easy to remove. Once preheated, set the oven timer to 15 minutes to keep track.
- In a large mixing bowl, combine the flour, sugar, baking powder, and salt. Use a whisk to distribute the dry ingredients evenly, preventing lumps. This dry mix is the foundation of your buttery crust, giving it structure and flavor. Keep the bowl aside while you prepare the wet ingredients.
- In a separate bowl, cream the softened butter until light and fluffy using an electric mixer on medium speed. Gradually add the vanilla extract, mixing until fully incorporated. The butter must be at room temperature to achieve the right texture; if it’s too cold, the crust will be crumbly. The mixture should be airy and pale, indicating proper creaminess.
- Pour the dry ingredients into the creamed butter in three batches, folding gently with a spatula after each addition. This slow incorporation keeps the batter aerated, preventing a dense crust. Once the batter is smooth, fold in the chopped Ferrero Rocher, ensuring even distribution. The chocolate pieces will add a delightful crunch to each bite.
- Press the batter into the prepared pan, creating an even layer about 1.5 inches thick. Use a spatula to smooth the surface, ensuring the crust will bake evenly. Place the pan in the preheated oven and bake for 15 minutes, or until the edges begin to pull away from the pan. The center should still be slightly soft, as it will set further during chilling.
- Let the crust cool completely in the pan on a wire rack. While it cools, prepare the ice cream layer: combine the heavy cream, whole milk, cocoa powder, and a pinch of salt in a saucepan, heating gently until the cocoa dissolves. This mixture should not boil; a gentle simmer is enough to blend the flavors.
- Stir in the chocolate ice cream and hazelnut spread until the mixture is smooth and homogeneous. Pour this silky layer over the cooled crust, spreading evenly with a spatula. The ice cream must be slightly softened to flow without cracking the crust. Chill the cake in the freezer for at least 4 hours, or overnight, until the ice cream layer is firm.
- Once firm, remove the cake from the freezer and let it sit at room temperature for 10 minutes to soften slightly for slicing. While it rests, melt the dark chocolate in a double boiler or microwave, stirring until glossy. Brush the melted chocolate over the top of the cake, creating a glossy finish that seals in moisture.
- Dust the finished cake with powdered sugar and top with crushed hazelnuts for an extra crunch. Slice with a warm knife for clean cuts. Serve immediately, or store in the freezer for up to 3 days, wrapping tightly to prevent freezer burn. Enjoy the layers of flavor and texture that make this dessert unforgettable.
That's it — you did it. But hold on, I've got a few more tricks that'll take this to another level…
Insider Tricks for Flawless Results
The Temperature Rule Nobody Follows
The key to a perfect crust is baking at a moderate temperature and not rushing the cooling process. If you bake too hot, the crust will brown too quickly, losing moisture and becoming tough. Keep the oven at 350°F and let the crust set slowly, then cool it completely before adding the ice cream layer. This ensures a crisp, yet tender base that holds the dessert together.
Why Your Nose Knows Best
Before you bake, give the batter a sniff. A sweet, buttery aroma is a sign that the butter and sugar are well combined. If the mixture smells off or overly sweet, adjust the sugar or add a pinch of salt to balance the flavors. Your nose is a reliable guide to flavor balance, so trust it.
The 5-Minute Rest That Changes Everything
After removing the crust from the oven, let it rest for 5 minutes before pressing it into the pan. This brief pause allows the steam to escape, preventing a soggy bottom. During this time, you can also chill the batter in the fridge for a few minutes, which helps the butter firm up and keeps the crust from spreading.
The Secret to a Glorious Glaze
To achieve a glossy, even chocolate glaze, temper the melted chocolate by adding a small amount of butter and stirring until smooth. Tempered chocolate sets with a shiny finish and resists cracking. If you’re in a hurry, simply brush the glaze immediately after melting; the chocolate will set quickly once it contacts the cold cake.
The Quick Chill Trick
If you’re short on time, you can place the assembled cake in the freezer for 30 minutes, then transfer it to a cooler with ice packs for an extra 15 minutes. This rapid chilling method locks in the flavors and prevents the ice cream from melting. It’s perfect for last‑minute dessert prep.
Creative Twists and Variations
This recipe is a playground. Here are some of my favorite ways to switch things up:
Nutty Espresso Swirl
Add a teaspoon of instant espresso powder to the ice cream layer and swirl in a drizzle of espresso syrup. The coffee undertone pairs beautifully with the chocolate and hazelnuts, creating a sophisticated flavor profile that adults love.
Citrus Zest Crunch
Incorporate the zest of one orange into the batter and sprinkle candied orange peel on top. The citrus brightness cuts through the richness and adds a delightful pop of flavor that feels fresh and bright.
Almond Joy Variation
Swap the Ferrero Rocher for toasted almond pieces and use coconut milk in the ice cream layer. The result is a tropical, nutty dessert that’s reminiscent of the classic candy bar.
Chocolate Ganache Finish
Replace the melted dark chocolate glaze with a silky chocolate ganache made from heavy cream and semi‑dark chocolate. The ganache adds a velvety texture and a deeper chocolate flavor that elevates the cake.
Berry Burst Variation
Fold fresh berries into the ice cream layer and top the finished cake with a raspberry coulis. The berries provide a juicy contrast to the creamy, chocolatey base, making this dessert feel lighter and more vibrant.
Storing and Bringing It Back to Life
Fridge Storage
If you need to store the cake for a few hours, keep it in the refrigerator wrapped tightly in plastic wrap. The cold will firm the ice cream slightly, but it will remain slice‑ready. Avoid leaving it in the fridge for more than 24 hours, as the crust may soften.
Freezer Friendly
For longer storage, wrap the cake in parchment paper, then in foil, and place it in an airtight container. It will keep well for up to 3 weeks. When you’re ready to serve, allow it to thaw in the refrigerator for 2–3 hours before slicing.
Best Reheating Method
To revive a frozen slice, place it on a microwave‑safe plate and heat on low for 20–30 seconds, or until just warmed. Alternatively, let the slice sit at room temperature for 10 minutes for a more even temperature. A tiny splash of water before reheating helps the glaze re‑soften and stay silky.