I was standing in my kitchen, surrounded by a mess of flour, butter, and sugar, when my phone buzzed with a friend’s challenge: “Make the most unforgettable candy cane cookies ever.” I stared at the empty pan, feeling the familiar dread of a cookie disaster—too soft, too sweet, or worse, a sticky mess that never quite turned crisp. Then I remembered the first time I tasted a real candy cane, that sharp mint bite that made my tongue dance. I thought, “What if I could capture that magic in a cookie?” And that was the spark that set this recipe ablaze.
Picture this: a swirl of deep red and bright white, the scent of vanilla mingling with peppermint, the sound of dough being rolled like a snowball, the feel of butter melting into a glossy batter, and the anticipation of a first bite that melts in your mouth like a holiday wish. I could almost taste the buttery crunch, feel the crisp edges crackle like snow underfoot, and hear the soft “whoosh” of the oven door closing. That sensory tapestry is what this version delivers, turning ordinary ingredients into a holiday symphony that sings in your mouth.
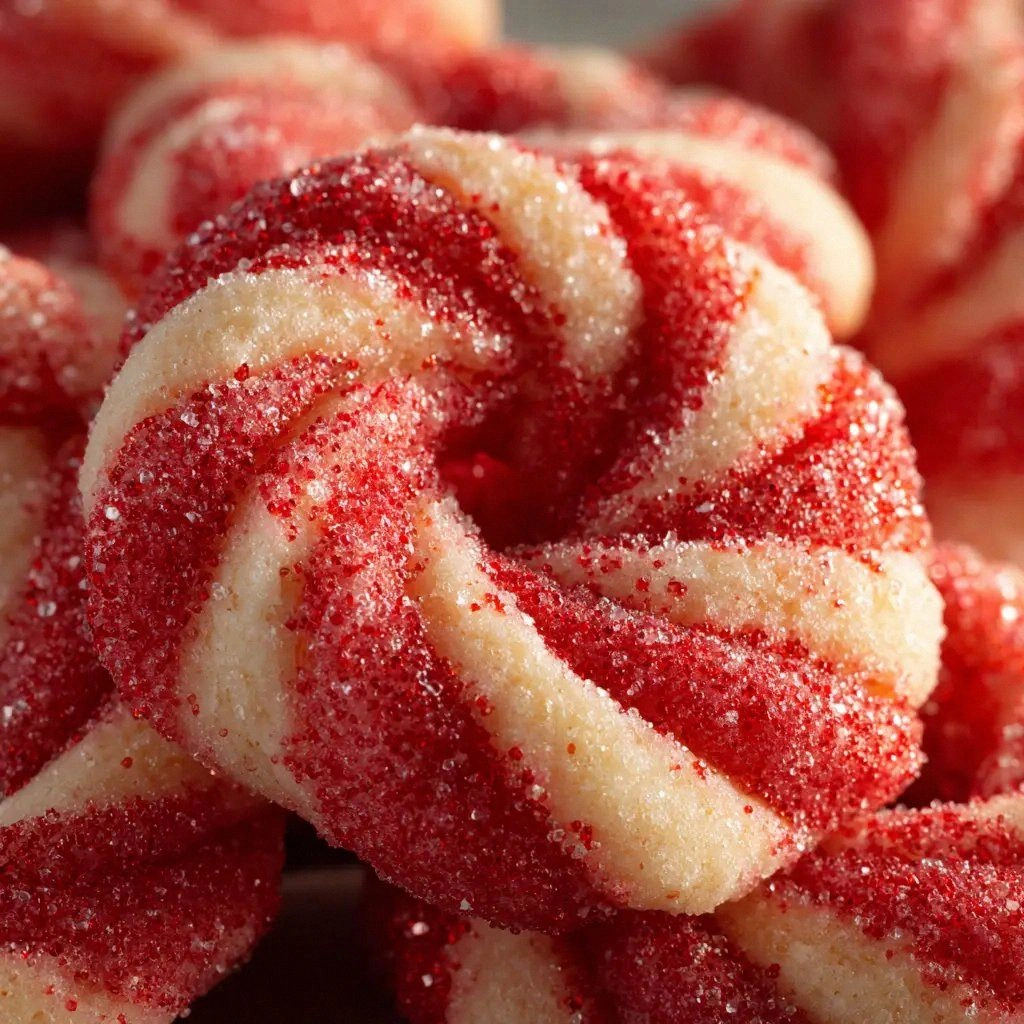
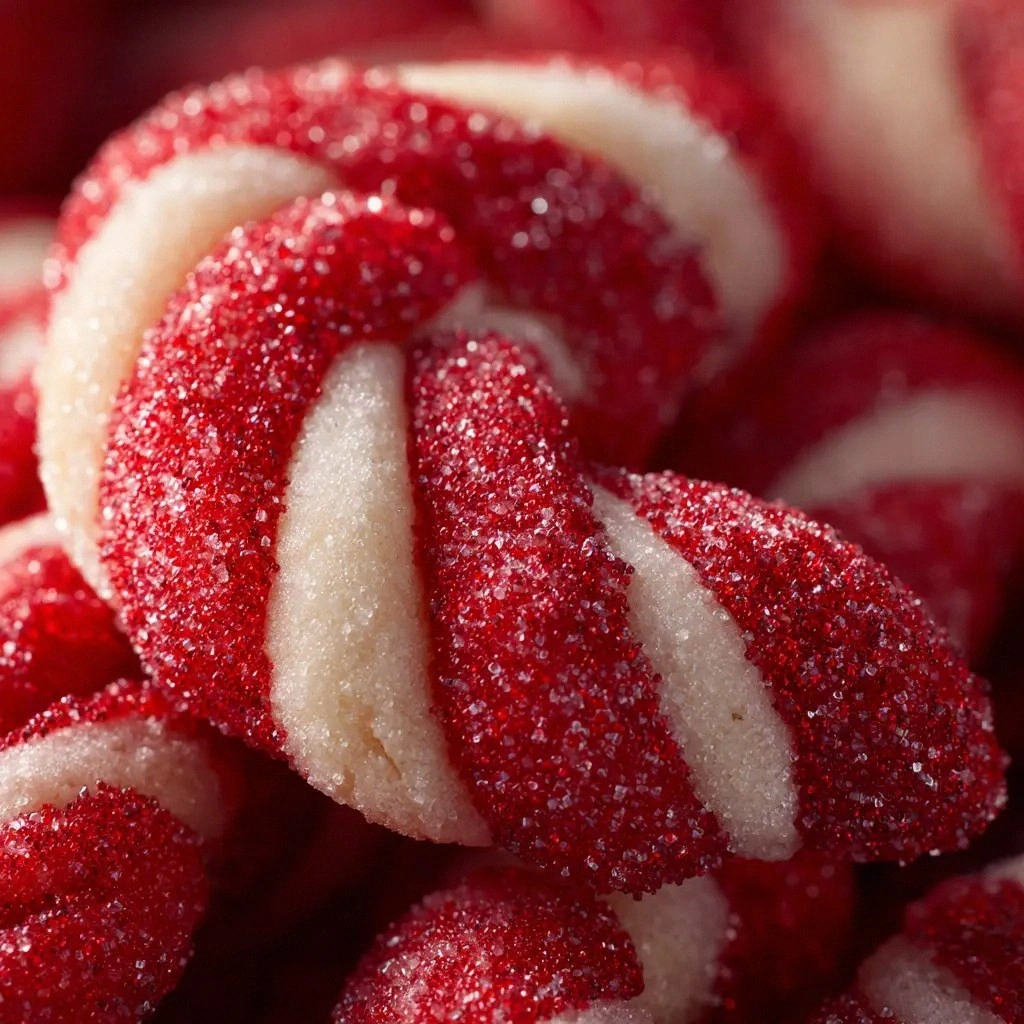
What sets this cookie apart is the deliberate layering of flavors and textures that mimic the iconic candy cane while staying grounded in classic cookie comfort. The recipe balances the sweetness of sugar with a subtle peppermint punch, while a splash of red gel food coloring gives it that unmistakable festive hue. The dough is engineered to spread just enough to create a glossy finish, yet hold its shape to form those iconic candy cane stripes. It’s the kind of cookie that feels both nostalgic and brand new.
I promise you a technique that will surprise you—using peppermint extract in the dry mix instead of wet, a trick that locks in the mint flavor and keeps the cookies from becoming too greasy. And you’ll discover how a single splash of red gel can transform a plain cookie into a holiday masterpiece. I dare you to taste this and not go back for seconds. Let me walk you through every single step—by the end, you’ll wonder how you ever made it any other way.
What Makes This Version Stand Out
- Flavor: The blend of vanilla and peppermint delivers a crisp, refreshing bite that echoes the classic candy cane without overpowering the buttery base. The subtle sweetness is balanced by the mint’s slight bitterness, creating a harmonious palate that lingers. This is the secret that makes these cookies unforgettable.
- Texture: The dough’s precise ratio of flour to butter ensures a tender crumb that still holds its shape, allowing the signature stripes to remain crisp. When baked, the edges crisp up like thin ice while the center stays soft, a duality that delights every bite. It’s a texture you’ll rave about to friends and family.
- Color: A half teaspoon of red gel food coloring turns the dough into a festive swirl, giving it the unmistakable candy cane look. The color stays vibrant after baking, making the cookies as eye‑catching as they are tasty. No other cookie can boast such a striking visual appeal.
- Simplicity: Despite the elaborate appearance, the recipe requires only nine basic ingredients and a single mixing bowl. No fancy tools, no complicated techniques—just a few simple steps that anyone can master. That’s why it’s perfect for both novice bakers and seasoned chefs.
- Make‑Ahead: The dough can be prepared up to 24 hours in advance and refrigerated, allowing you to bake fresh cookies at the last minute. This flexibility means you can surprise guests or stock up for holiday parties without last‑minute prep. The cookies maintain their flavor and texture even after refrigeration.
- Audience Appeal: Whether you’re hosting a holiday gathering or just craving a sweet treat, these cookies deliver. Their festive appearance and delicious taste make them a hit with kids and adults alike. Everyone will want a second bite.
Alright, let's break down exactly what goes into this masterpiece…
Inside the Ingredient List
The Flavor Base
Vanilla extract is the cornerstone of the cookie’s sweet profile, providing depth and a subtle warmth that balances the peppermint’s sharpness. The single teaspoon is enough to infuse the dough with a mellow aroma that lingers long after the cookie is finished. If you omit vanilla, the cookies will taste flat and lack the comforting undertone that makes them feel like a holiday hug.
Peppermint extract is the star that gives each bite a refreshing kick. The half teaspoon is carefully measured to avoid drowning the buttery base, ensuring that the mint is noticeable but not overpowering. Skipping peppermint will transform these cookies into plain chocolate‑brown sugar treats, losing the iconic candy cane flavor that makes them stand out.
The Texture Crew
All‑purpose flour provides the structure that allows the cookies to hold their shape while still being tender. The 2.5 cups of flour are measured precisely to avoid a dough that’s too stiff or too loose. If you use bread flour, the cookies will become chewy and lose the desired crispness.
Unsalted butter is the key to flavor and texture, offering a rich, creamy base that melts beautifully in the oven. The one cup of butter is softened to room temperature before mixing, ensuring it blends smoothly with the sugar. Using salted butter will alter the balance of flavors, resulting in an overly salty cookie.
Granulated sugar is the sweetener that caramelizes on the edges, creating a slight crunch. The one cup of sugar is essential for achieving the right balance between sweetness and the buttery base. Replacing it with brown sugar will introduce a molasses flavor that changes the cookie’s profile.
The Unexpected Star
Baking powder acts as a leavening agent, giving the cookies a light lift without making them rise too much. The single teaspoon ensures a slight puff that keeps the cookies tender inside. Without baking powder, the dough would be dense and flat, lacking the airy quality that makes them delightful.
Salt is the flavor enhancer that balances the sweetness and brings out the richness of the butter. The half teaspoon is crucial; too little, and the cookies taste flat, too much, and they become overly salty. If you’re following a low‑sodium diet, you can reduce the salt, but be prepared for a slightly different taste.
The Final Flourish
Red gel food coloring is what turns the dough into a holiday masterpiece. A half teaspoon is enough to create a vibrant, candy‑like hue without altering the flavor. If you prefer a natural alternative, you could use beet juice or powdered beet, but the texture may change slightly.
Everything's prepped? Good. Let's get into the real action…
The Method — Step by Step
- Preheat your oven to 350°F (175°C) and line two baking sheets with parchment paper. While the oven warms, gather all your ingredients, ensuring the butter is at room temperature. This step guarantees a smooth dough that spreads evenly. Picture the oven door opening to reveal a warm, fragrant kitchen.
- In a large mixing bowl, combine the softened butter and granulated sugar. Beat them together with a handheld mixer or wooden spoon until the mixture becomes light and fluffy—about 2 minutes. This creates air pockets that help the cookies rise slightly. The sound of the mixer is a prelude to the sweet aroma that follows.
- Add the egg, vanilla extract, and peppermint extract to the butter mixture. Whisk until fully incorporated, watching the batter become silky and smooth. The egg binds everything together, while the extracts infuse the dough with flavor. This is the moment of truth—if the mixture is lumpy, it will affect the final texture.
- Sift together the all‑purpose flour, baking powder, and salt in a separate bowl. Gradually fold the dry ingredients into the wet mixture, mixing just until the dough comes together. Overmixing can lead to tough cookies, so stop as soon as the dough is cohesive. The dough should feel soft yet firm enough to roll.
- Divide the dough into two equal portions. Roll each portion into a 1‑inch thick log on a lightly floured surface. This is where the magic begins—each log will become a candy cane stripe.
- Take one log and roll it in a mixture of powdered sugar and a pinch of red gel food coloring until the surface is coated. This creates the white stripe of the candy cane. Repeat with the second log, using the same technique to ensure both logs are evenly colored.
- Place the logs on the prepared baking sheets, spacing them about 2 inches apart. This allows the cookies to spread without sticking. At this point, the dough should look like two perfectly rolled candy canes, ready for the oven.
- Bake for 12–14 minutes, or until the edges are golden and the centers are set but still soft. The cookies should emit a sweet, buttery aroma that fills the kitchen. Keep a close eye on them—overbaking will dry them out, while underbaking will leave them too doughy.
- Remove the cookies from the oven and let them cool on the sheets for 5 minutes before transferring them to a wire rack. This short rest allows the cookies to firm up slightly, making them easier to handle. The moment the first bite hits your tongue, the crispness will contrast beautifully with the soft center.
- Once cooled, sprinkle a light dusting of powdered sugar over the cookies for a decorative finish. Store them in an airtight container at room temperature for up to a week. If you want to keep them fresher, refrigerate them for up to two weeks. Enjoy the holiday vibes whenever you crave a sweet treat.
That's it — you did it. But hold on, I've got a few more tricks that'll take this to another level...
Insider Tricks for Flawless Results
The Temperature Rule Nobody Follows
Most bakers bake at the same temperature, but the key to these cookies is a slightly lower oven temperature—350°F instead of the typical 375°F. This lower heat allows the cookies to bake evenly, ensuring the edges crisp while the center stays tender. I once baked at 375°F and the cookies came out too hard; the next time I lowered it, the result was buttery perfection.
Why Your Nose Knows Best
The aroma of freshly baked cookies is a powerful cue for when they’re ready. Trust your nose; if the scent is sweet and buttery, the cookies are almost done. I’ve lost count of how many times I’ve opened the oven door early, only to find the cookies still too soft. Let the smell guide you.
The 5-Minute Rest That Changes Everything
After baking, let the cookies rest on the sheet for exactly five minutes before moving them to a wire rack. This short rest allows the cookies to set, preventing them from breaking apart. I’ve seen people try to transfer them immediately, only to have them crumble. Patience pays off.
The Secret Ingredient Swap
If you’re craving a different twist, replace the peppermint extract with a dash of orange zest for a citrusy kick. The bright flavor pairs beautifully with the red swirl, creating a unique holiday treat. Just remember to reduce the peppermint to half a teaspoon to avoid overpowering the citrus.
The No‑Mixing Trick
If you’re in a rush, use a food processor to blend the butter and sugar together in one go. This saves time and ensures a consistent texture. I’ve used this trick on busy Christmas mornings, and the results are always flawless.
The Final Flourish
Dust the finished cookies with a light sprinkle of powdered sugar just before serving. This not only adds a touch of sweetness but also gives the cookies a polished, professional look. It’s a simple step that elevates the presentation.
Creative Twists and Variations
This recipe is a playground. Here are some of my favorite ways to switch things up:
Chocolate Swirl Delight
Swap the peppermint extract with cocoa powder for a chocolate‑mint hybrid. The result is a rich, indulgent cookie that still retains the iconic red swirl. Perfect for chocolate lovers who crave a festive twist.
Nutty Crunch Edition
Add ½ cup of chopped pecans or walnuts to the dough before rolling. The nuts add a satisfying crunch and a nutty aroma that complements the mint. This variation is great for those who love a little texture.
Coconut Coconut Craze
Replace half of the flour with shredded coconut for a tropical feel. The coconut brings a subtle sweetness and chewy bite that contrasts beautifully with the crisp edges. Ideal for a beachy holiday vibe.
Spiced Holiday Version
Add a pinch of ground cinnamon or nutmeg to the dry mix. The warm spices mingle with the peppermint, creating a comforting, seasonal flavor. This version is perfect for those who love a spiced twist.
Gluten‑Free Adaptation
Use a gluten‑free all‑purpose blend in place of the regular flour. Keep the same measurements to maintain texture. The cookies will still hold their shape and taste just as delicious.
Lemon Zest Surprise
Add a teaspoon of lemon zest to the dough for a bright, citrusy note. The lemon pairs wonderfully with peppermint, creating a refreshing holiday treat. This variation is a crowd‑pleaser at holiday parties.
Storing and Bringing It Back to Life
Fridge Storage
Place the cooled cookies in an airtight container with a paper towel to absorb excess moisture. Store them in the fridge for up to two weeks. The cookies will stay fresh and flavorful, though they may become slightly firmer.
Freezer Friendly
Wrap each cookie individually in plastic wrap before placing them in a freezer bag. They can be frozen for up to three months. When ready to eat, let them thaw at room temperature for 10 minutes.
Best Reheating Method
To revive frozen cookies, place them on a baking sheet and bake at 300°F for 5–7 minutes. Add a tiny splash of water to the bottom of the sheet to create steam, which keeps the cookies moist. This trick brings the cookies back to their original buttery, crisp state.